
Take your cloning to the next level! In this tutorial, we’ll demonstrate some advanced cloning techniques, such as how to vary the hardness, rotation and opacity settings of the Clone Brush when cloning a complex pattern or texture, adjusting the clone source area to avoid obvious repetition, and how to use the SmartClone tool introduced in PaintShop Pro 2020.
Thanks for watching! We hope you found this tutorial helpful and we would love to hear your feedback in the Comments section at the bottom of the page. You will find a written version of this tutorial below, and a printable PDF copy to download on the Download Resources tab above.
Download your FREE 30-day trial and make every shot your best shot with PaintShop Pro 2023, your all-in-one photo editing and design software.
Download these free resources:
Written tutorial (PDF, 506 KB)
PaintShop Pro resources
Keyboard shortcuts (PDF, 173 KB)
PaintShop Pro User Guide (PDF, 25.4 MB)
What’s New in PaintShop Pro
Cloning and Blending
Featured products
 PaintShop Pro 2023 Ultimate
 AI HDR Studio 3.0
 PaintShop Pro 2023
 Vision FX
Advanced Cloning Techniques in PaintShop Pro
In this tutorial, we’ll demonstrate how to vary the hardness, rotation and opacity settings when cloning a pattern or texture and how to use the SmartClone tool introduced in PaintShop Pro 2020. If you are not familiar with the cloning tools, watch our tutorial on Using the Clone Brush first.
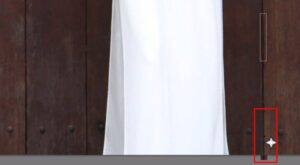
To begin, open up PaintShop Pro with the image you want to work with in the Edit workspace. In this example we are using an image of a woman in front of a wooden wall, and we want to remove the gray objects on either side of the woman and the colored patches on the wall using cloning tools.
Cloning a Wood Texture
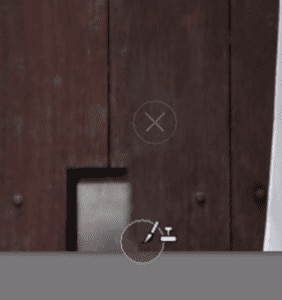
In this example we will begin with the grey objects along the bottom of the wall. We want to cover them up by cloning the texture of the wooden wall over top.
- Zoom in on the objects you want to remove or area you wish to cover up.
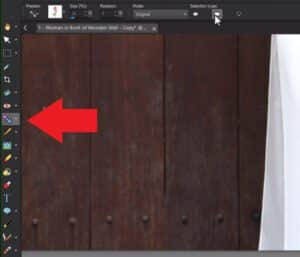
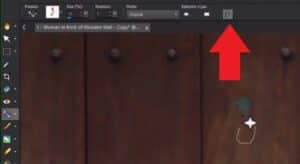
- Select the Clone Brush tool from the Tools toolbar on the left.

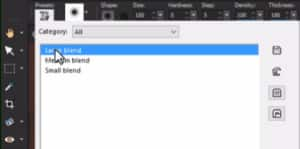
In the Tool Options toolbar at the top, you can adjust various settings such as brush shape, size, hardness, opacity and rotation. You can also select a preset to work with.
- Click on the Presets option and choose Large Blend to start with.
- To select a clone source area, right-click on the section you want to clone from.
- Then click once or drag your mouse to clone over top of the object you want to remove/cover up (target area).
NOTE: keep in mind that if you make a mistake while dragging you may have to press Undo many times to correct it, whereas using single clicks makes it easier to undo and correct.
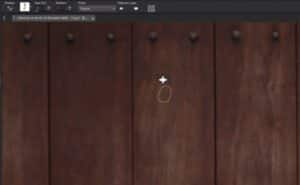
If using the sample image, don’t worry if you cover up the cracks of the wood, because we’re going to fix this later. Repeat this process with both objects, again selecting a clone source that closely matches the wood area.
NOTE: Sometimes the area right beside your clone target area is not always a suitable clone source. If this is the case, look to other parts of the image to find a matching clone source.
- If you find that an obvious cloning pattern is developing (which looks unrealistic), keep changing the clone source as you go. This will help you avoid the repetition effect.
- You can also adjust the brush Hardness setting to produce a softer fading edge that allows you to blend the textures together and avoid creating an obvious pattern.
- Repeat this process to clone the button embellishments, adjusting the brush size as needed.
- You can reduce the Opacity setting of your brush to create a lighter tone to match the area you are cloning onto.

Cloning a Repeating Pattern
After we have finished cloning all the buttons, we need to clone these cracks between the wooden panels. For this we’ll use the SmartClone tool, although you could also use the Clone Brush tool.
- Click on the SmartClone tool from the toolbar on the left and choose the Rectangle selection type.
- Click and drag to create a rectangular selection over one of the cracks between the wood panels.
- When you let go of the mouse, you’ll see it creates a stamp of the selection you’ve just made.
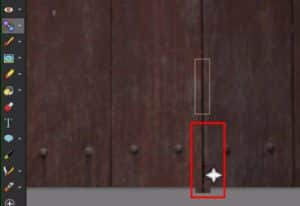
- Line this up with the crack and click to clone in the missing sections of the crack.
- The SmartClone technology will automatically blend the selected image against the background where it’s been stamped.
Cloning an Area
Now we will tackle the green and blue patches on the wall that you want to cover up. Either the Clone Brush or the SmartClone tool can be used – in this example we are demonstrating the SmartClone tool.
- Choose Freehand as the Selection type.
- Draw a small selection around an area of wood that you want to use as your clone source, then click on top of the blue patch and with just a few clicks, the patch is gone.
- Repeat this process with the green patch on the other side.
Now if we compare both images you can see how removing the unwanted objects from the original photo really makes our subject pop in the edited photo and gives us a cleaner overall background and photograph!


Download your FREE 30-day trial and make every shot your best shot with PaintShop Pro 2023, your all-in-one photo editing and design software.

Reader Interactions