
Start your FREE 15-day trial and embark on a design journey with powerful tools for vector illustration, layout, photo editing, typography, and collaboration.
What’s New in CorelDRAW Graphics Suite
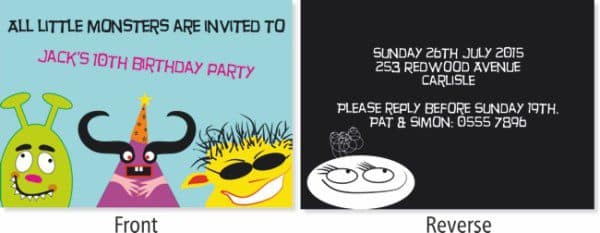
In this tutorial we are going to have fun creating our own party invitation card. We’ll be adding text and creating colorful vector objects. You will learn how to:
- Create a colorful background
- Make basic shapes and create simple figures
- Add text to your card
Step 1 – Create a new document
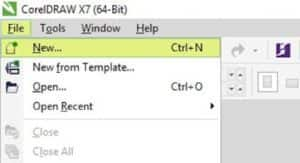
Start by opening a new document. Go to: File > then click on New… (or use the keyboard shortcut CTRL+N).
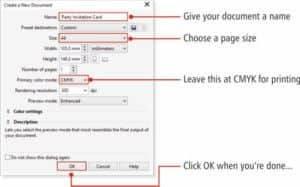
In the Create a New Document window, make the following changes:
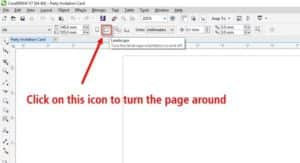
Now click on the Landscape icon to turn your page sideways.
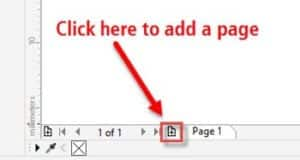
Our card will have two sides so we need to create a second page. In the bottom left-hand corner of the window, click on the small ‘+’ icon to create a second page.
Now we have our two blank pages it’s time to start adding some text and graphics!
Step 2 – Creating a colored background
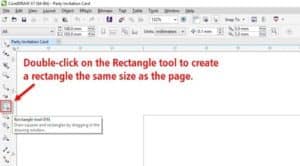
To create a colored background for our card, just double-click on the Rectangle tool in the Toolbox on the left-side of the screen.
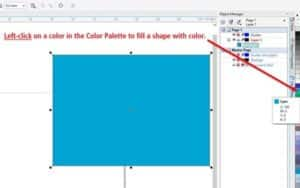
When we create a shape, we can fill the shape with color by left-clicking on a color in the Color palette.
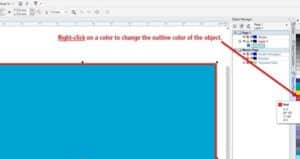
To change the outline color of a shape, right-click on a color in the Color palette instead.
This ‘no-color’ swatch at the top of the Color palette lets you remove the color from an object’s fill or outline.
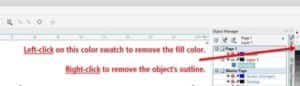
Now left-click on a color to fill the rectangle with blue and right-click on the no-color swatch to remove the outline.
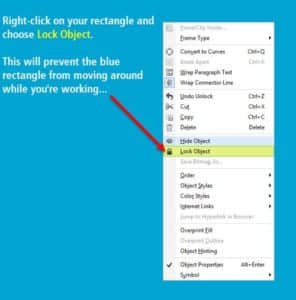
To stop our background from moving around while we’re creating our other objects, right-click on it and choose Lock Object from the context menu.
Step 3 – Creating basic shapes in CorelDRAW
If you take another look at the monsters at the start of this tutorial, you’ll notice that some are made of simple shapes that we can draw by using various tools from our Toolbox. And others were created by drawing ‘freehand’ in CorelDRAW. We’ll now take a look at how this works.
The Green Monster

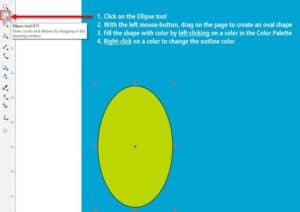
Click on the Ellipse tool (F7) in the Toolbox and drag on the page to create an oval shape.
Change the color of the oval by left-clicking on a color in the Color palette.
Change the outline color by right-clicking on a color.
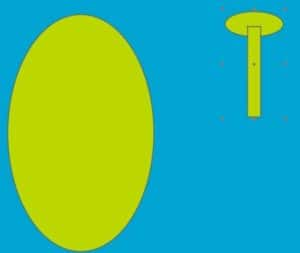
Creating the ears:
Draw another oval with the Ellipse tool and using the Rectangle tool, draw a long, thin rectangle over the top. Color these the same as the larger oval shape. You should then have something like this:
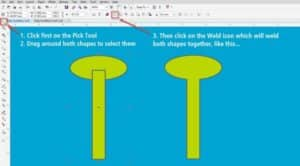
With the Pick tool at the top of the Toolbox, drag around the two new shapes and click on the Weld icon to weld these both together.
Move the ear over to the large oval then click once more on it. The square, resizing handles will change to rotation handles. Drag on a corner handle to rotate the shape.

To create the second ear, hit the ‘+’ key on your keyboard to create a copy.
Drag the copy into place and use the Mirror horizontally icon in the Property bar to flip the object over. Move the second ear into the correct position.
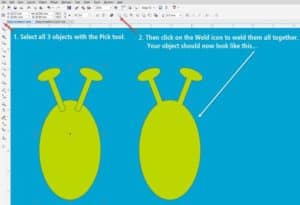
Now select all 3 green objects with the Pick tool and weld them together (If you can’t drag around objects to select them, hold down the SHIFT -key instead and click on each object. This lets also you select multiple objects).
Most of the face can now be created using the Ellipse tool (F7). Just dragging this tool on the page will give you an oval shape. To draw a perfect circle, just hold down the CTRL key while you are dragging. All of the following shapes (eyes, nose, cheeks), were created just using the Ellipse tool.

Using the Artistic Media tool:
The Artistic Media tool lets you draw vector shapes that look almost as if they were painted with a brush and there are many artistic media to choose from! We are now going to use the Artistic Media tool to create the Green Monster’s eyebrows.
Click on the Artistic Media tool (I), in the Toolbox.
On the Property bar, select the Preset icon.
Choose a brush from the drop-down list.
Drag the brush on the page to create the eyebrows.

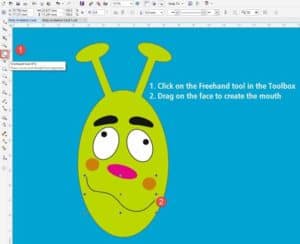
We are now going to use the Freehand tool (F5), in the Toolbox to sketch in the mouth. After we have added the teeth we will finish off the mouth by drawing over the top with an Artistic Media brush.
Now for the teeth!
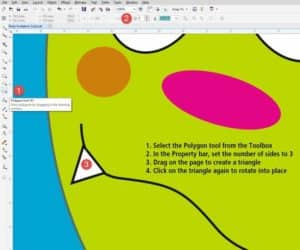
The quickest way to create the teeth is by using the Polygon tool (Y).
Select the Polygon tool from the Toolbox.
In the Property bar, set the number of sides to 3.
Draw the first triangle, fill with white color and make the outline color black.
With the tooth still selected, press the ‘+’ key on your keyboard to create a copy.
Move this along the mouth line and rotate if needed. You should be left with something like this:

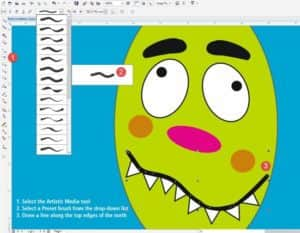
To finish off the mouth, select the Artistic Media (I), tool again from the Toolbox, choose a brush from the list of Presets in the Property bar and draw a line along the top edges of the teeth.
The mouth should now look like this and our Green Monster is now finished!
The Yellow Monster

The yellow monster uses mainly the Artistic Media and the Freehand drawing tools.
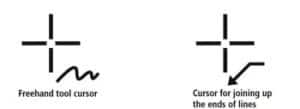
Select the Freehand tool (F5), from the toolbox and draw the shape of the monster’s head.
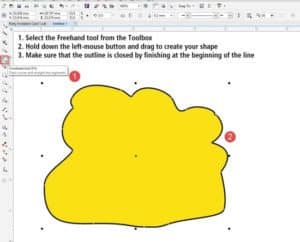
To close the shape (so that you can fill it with color), when you arrive back to the start of the line, watch until the cursor shape changes to a cross with an arrow and click on the end of the line.
Now left-click on the shape and fill with color.
Create the sunglasses by creating two ellipses and filling them with black.
Then use the Artistic Media tool again to create the hair.

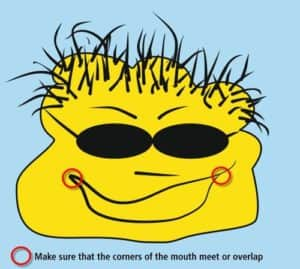
Continue using the Artistic Media tool and various Preset brushes to add the eyebrows, nose, and sides of the sunglasses. Draw two lines to create the mouth.
Make sure that the corners of the mouth are touching or overlapping.
Now select the Smart Fill tool from the Toolbox.
On the Property bar, set the Fill Color to ‘Specify’ and choose the color white.
Set the Outline options to ‘No outline’.
Click inside the mouth area to fill with white.
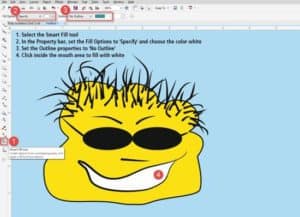
The Yellow Monster is now finished!
Now take the Pick tool again and drag around the yellow monster. Press CTRL+G to group all the objects. Move the monster to where you want to have him.
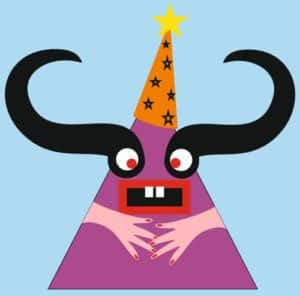
The Purple Monster
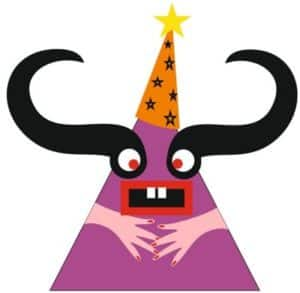
Our third monster uses all the tools we have used up until now: The Freehand tool, Polygon tool, Artistic Media tool and the Smart Fill tool.
Use the Polygon tool from the toolbox and in the Property bar set the number of sides to 3.
Draw a triangle and fill with a purple color.
Create the mouth and teeth by drawing rectangles with the Rectangle tool (the mouth has a black fill and a red outline).
In the Property bar, increase the outline width of the mouth.
The teeth are white with no outline.
You should now have something like this:

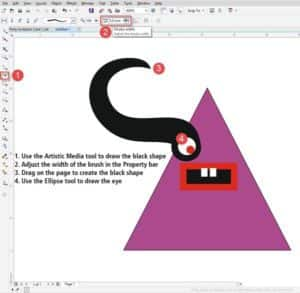
Use the Artistic Media tool to draw the black shape.
Adjust the width of the brush in the Property bar.
Drag on the page to create the black shape.
Use the Ellipse tool to draw the eye.
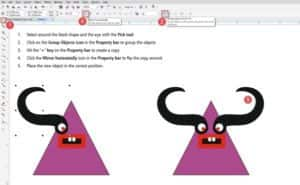
Select around the black shape and the eye with the Pick tool.
Click on the Group Objects icon (CTRL+G), in the Property bar to group the objects.
Hit the ‘+’ key on the Property bar to create a copy.
Click the Mirror horizontally icon in the Property bar to flip the object around.
Place the new object in the correct position.
We are now going to create a party hat for our monster.

Use the Polygon tool with the number of sides set to 3 to create an orange triangle.
In the Toolbox, click on the small black triangle next to the Polygon tool to open the flyout menu.
Now select the Star tool. (You can change the number of points for the Star in the Property bar).
Now draw a large star for the top of the party hat. Add a yellow fill and remove the outline by right-clicking on the ‘No color‘ swatch in the Color palette.
The smaller stars on the hat have their fills removed by left-clicking on the ‘No color‘ swatch.
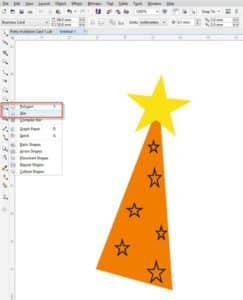
Select all the hat objects with the Pick tool and click on the Group Objects icon (CTRL+G), on the Property bar.
Move the hat over the purple monster’s head and click once more on the hat to get the rotation handles. Rotate the hat slightly. This is what our monster should now look like:

To draw the hands, grab the Freehand tool and draw some hands on the monster, but make sure the lines ‘hang over’ the edge of the body, like this:
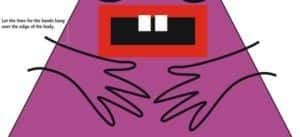
Now select the Smart Fill tool from the toolbox and in the property bar, set the Fill options to a pink color. Set the Outline options to No Outline.
Click within the hands to create new, pink hand shapes.
With the Pick tool, select and delete the black hand outlines by pressing the Delete key.
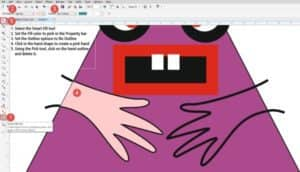
You can now finish off the purple monster by using the Ellipse tool for example, to create finger nails.
The purple monster is now done!
Step 4 – Adding text to our card
All that is left to do is to add text to the front of our card.
Select the Text tool (F8), from the toolbox.
Click on the page and type in your invitation message.
Switch back to the Pick tool, select the text and choose a font that suits your design by selecting one from the drop-down list in the property bar.
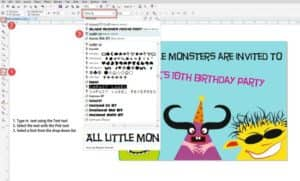
The purple text here was first selected with the Pick tool, then rotated.
Step 5 – Creating the reverse side of our card

Click on the Page 2 tab at the bottom of the window.
Double-click on the Rectangle tool to create a rectangle the size of the page. Fill with black.
Use the Text tool to create the text, then with the Pick tool, left-click on white in the Color palette to change the text color to white.
The face at the bottom was created using the Ellipse and Artistic Media tools.

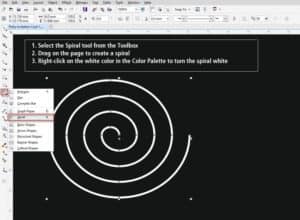
To create the wiry hair, select the Spiral tool from the toolbox.
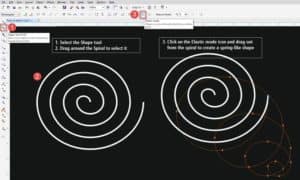
Select the Shape tool (F10), from the toolbox and use this to select around the spiral.
In the property bar, click on the Elastic mode icon.
Drag out from the middle of the spiral to create a spring-like shape
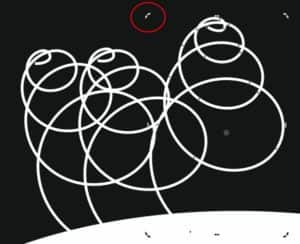
Place the spring over the face and use the ‘+’ key on the keyboard to create copies.
Click each spring again to get the rotation handles and adjust the individual springs.
Step 6 – Saving your card
Once your design is finished you need to save it.
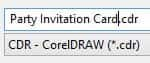
Go to File > Save… and in the Save window, save your file as a .CDR file if you want to edit it again in the future.
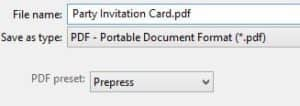
If you are sending your file to a print shop to have it printed out, you might want to save the file as a PDF file too. Go to File > Publish to PDF and in the PDF export window, choose Prepress from the PDF preset drop-down list. Click on Save.
 CorelDRAW Graphics Suite
 Ultimate Vector Bundle Vol. 1
 CorelDRAW Standard 2021
 Ultimate Vector Bundle Vol. 2
 Corel Vector
Start your FREE 15-day trial and embark on a design journey with powerful tools for vector illustration, layout, photo editing, typography, and collaboration.

Comments (2)
Reader Interactions
Comments
Nice info
The content is great 👌