
In this tutorial, CorelDRAW Master Stefan Lindblad shows you how to design a business card in CorelDRAW. You will learn how to properly set up your document and how to add text, a logo and a QR code.
Thanks for watching! We hope you found this tutorial helpful and we would love to hear your feedback in the Comments section at the bottom of the page. You will find a written version of this tutorial below, and a printable PDF copy to download on the Download Resources tab above.
Start your FREE 15-day trial and embark on a design journey with powerful tools for vector illustration, layout, photo editing, typography, and collaboration.
Download these free resources:
Written Tutorial (PDF, 607 KB)
CorelDRAW Graphics Suite Resources
Quick Start Guide (PDF, 2 MB)
Keyboard Shortcuts (PDF, 3.5 MB)
CorelDRAW and Corel PHOTO-PAINT user guides
For CorelDRAW Graphics Suite subscription and perpetual licenses (2018 to 2024), languages include English, Português do brasil, 简体中文, 繁體中文, Čeština, Deutsch, Español, Français, Italiano, 日本語, Polski, Русский
What’s New in CorelDRAW Graphics Suite
 CorelDRAW Graphics Suite
 Ultimate Vector Bundle Vol. 1
 CorelDRAW Standard 2021
 Ultimate Vector Bundle Vol. 2
 Corel Vector
How to Design a Business Card in CorelDRAW
With social media networks more frequently being used in business, there’s been a noticeable decline in printed business cards in some countries; adding a QR code might just be the right function to save your audience time in this digital world. In today’s business climate, being prepared with networking possibilities, using digital business cards and social media linking, is vital.
At the core, a business card is all about networking and inviting someone to contact you, or for you to contact them. Historically the business card is an invitation card, and in 17th century Europe, it was used to announce the arrival of prominent people. Few things are so quick as handing over a card.
When designing a business card, you have the power to decide the hierarchy of its contents. That said, you should bear in mind other cultures’ priorities. Some cultures may prioritize the business title of the cardholder whereas other cultures are shying away from title usage.
Before you start, decide what information you would like to have on your business card. To follow along with this tutorial you will need a logo, first name and last name of the card owner, a (company) postal address, phone number, e-mail, a website link, and for this particular tutorial, a QR Code.
Click on any of the images below to view full-size.
Step 1: Document Setup
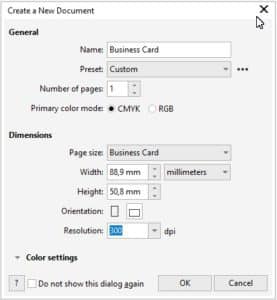
Start by creating a new document in CorelDRAW by going to File > New or Ctrl + N. In the New Document window:
- Name your document and choose CMYK or RGB color mode.
- If you intend to print on the back of the card, change the Number of pages to 2.
- In the Page Size dropdown list, choose Business Card – unless you have custom requirements for a different size or format.
- Select your orientation and keep the resolution at 300 dpi.
TIP: Ask your printer if they prefer any specific color profile and color mode. You can specify these in the Color Settings section.
In your new document, the Property Bar will display the basic document information. Here you can set a new page size, change the orientation, or change the units of measure if you wish.

Step 2: Adding Guidelines
Guidelines help you set up your design, and help you work professionally with the layout.
- Go to Layout > Document Options.
- Click on Guidelines and then the Presets
- Select Page borders and other options if needed.
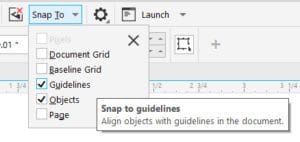
- On the property bar, enable Guidelines in the Snap To dropdown list.
NOTE: in previous versions of CorelDRAW you can set guidelines by going to Tools > Options, then selecting the Document > Guidelines > Presets
Click on the intersecting point in the top left corner where the rulers meet and drag to the top left corner of your business card document. This will reset the 0:0 coordinates to the top left corner and is helpful if you want to add additional guidelines in the Guidelines docker.
You can also add additional guidelines by using the Pick tool to drag them out from the rulers along the top and left side of the interface.
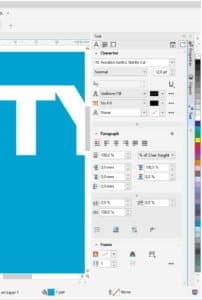
Step 3: Adding Text
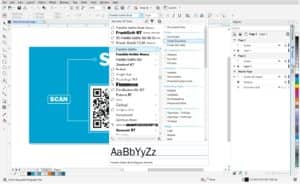
With your business card workspace ready in CorelDRAW, start by adding the company and contact information. Select the font you plan to use. If you’re creating a business card for a client, ask if they have a corporate font they use. Whichever font you use, CorelDRAW has some useful tools that can help you find and manage fonts:
- The Font List, which allows you to group fonts by family or show recently used fonts and filter fonts based on font technology, weight, width, supported scripts, style, character range and more.
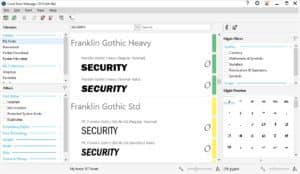
- The Font Manager, a standalone font management application where you can find and preview local fonts, install and uninstall fonts, and delete fonts that you no longer need.
Activate the Text docker (Window > Dockers > Text) to access all the text editing tools. In the Character section at the top, you can adjust the Kerning to increase or decrease the space between individual characters. In the Paragraph section below, you can use the Spacing features to properly make your text more readable.
Step 4: Adding a Background Color
If you would like to have a background color for your business card, activate the Rectangle tool and create a rectangle roughly the size of the card. Then you can adjust the height and width values in the property bar, and center it by pressing “P” on your keyboard.
TIP: you can also create a rectangle that is exactly the size of your card by double-clicking on the Rectangle tool.
To remove the black outline, right-click on the No Color swatch at the top of the Color palette.
Click on a color swatch in the Color palette to fill the rectangle or use the Eyedropper to sample color from an object.
Step 5: Adding a Logo
Import and place the logo, only using print-ready image files. You can use CDR file format images, tiff and in some circumstances PNG 24-bit format, resolution 300 dpi.
TIP: You can use a lower resolution, like 150 or 200 dpi, but I recommend using high-resolution images like 300 dpi to be on the safe side. Just remember to use original images created to 300 from the beginning, and not resampled images. (Which, most of the time, are not good enough for print).
Step 6: Adding a QR code
When all the text information and logotype is set up in your layout, consider adding a QR code to your business card. A QR code contains information that can be read by smartphones and other mobile devices. This information could be your contact information, or a URL to quickly and easily access a company website or a social media profile such as LinkedIn.
To add a QR code, go to Object > Insert > QR Code. Use the Pick tool to resize and position the QR code on your business card.
To edit the QR code information, open the Properties docker (Window > Dockers > Properties). You can set the QR code type to a URL, contact info or even a calendar event. Once you have entered the information, click on the Validate button to validate the QR code.
When all this is set up and you’re finished with your design, it´s time to create a print-ready PDF document and send to your printer company. Now you are ready to start networking!
Start your FREE 15-day trial and embark on a design journey with powerful tools for vector illustration, layout, photo editing, typography, and collaboration.

Comments (1)
Reader Interactions
Comments
Good one, I learned a lot