
Creating a DVD menu for your video productions allows your viewers to decide which parts to view, and in what order. In this tutorial we will explore the interface and tools on Pinnacle Studio’s Author tab and the disc authoring process of designing and creating the DVD menu structure. You will learn how to set up menus and sub-menus, how to add text and images to your menus, how to create and edit chapters, and finally, how to preview your DVD and export it to disc.
Thanks for watching! We hope you found this tutorial helpful and we would love to hear your feedback in the Comments section at the bottom of the page. You will find a written version of this tutorial below, and a printable PDF copy to download on the Download Resources tab above.
Download these free resources:
Written tutorial (PDF, 1.08 MB)
Download a FREE 15-day trial and discover all the essential and advanced video editing features that Pinnacle Studio delivers to make your videos look their best.
What’s New in Pinnacle Studio 25
Capture, Import and Export
Featured products
 Pinnacle Studio 26 Ultimate
 Studio Backlot Membership
 Pinnacle Studio 26
 Vision FX
DVD Menu & Disc Authoring
In this tutorial we will review the DVD menu and disc authoring process using the legacy Author tab. If you are new to Pinnacle Studio or creating DVD menus, it is recommended that you export your disc projects to MyDVD (included in Pinnacle Studio 18 and higher).
Click on any of the images below to view full-size.
Enabling the Author Tab
Although Pinnacle Studio includes the MyDVD program to export your disc projects to MyDVD, you can also use the legacy Author tab, which is what we will focus on in this tutorial. If you don’t have the Author tab available to you at the top, you’ll need to enable it:
- Go to Setup at the top, then click on Control Panel.
- Under Legacy Options, click Enable beside Legacy Authoring Mode.
- Then click Apply and OK.
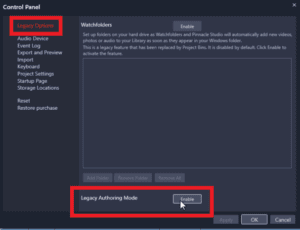
Now you’ll see that the Author tab is available at the top.

Click on the Author Tab. Pinnacle may ask if you want to convert your movie project to a disc project from the video you have open. Click Yes.
Setting Up a Main Menu and Submenus
Under the Author tab, you can scroll down and see a library of themed pre-set menu designs you can choose for your DVD.
If these menus don’t automatically pop up when you open the Author tab, select the Disc Menu icon on the left.
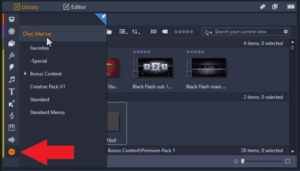
For most of these pre-set designs, there is a main menu and a matching submenu which we’ll use for creating our chapters.
For this tutorial, I want to show you how to create a custom menu with your own image and font type.
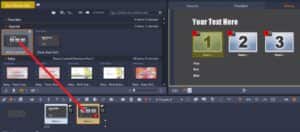
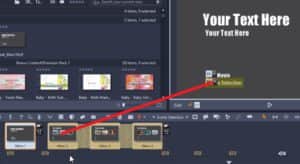
- Select the Blank Main menu template which you can find under the Special
- Left-click and drag the template from the library onto the menu list above your timeline.
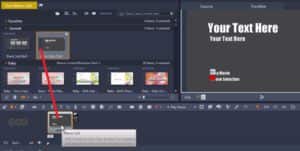
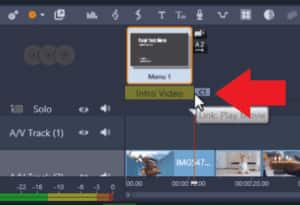
You’ll see a C1 icon underneath the menu you’ve just added which means Chapter 1. Drag this icon to the right to determine where your video will begin. If you drag the C1 icon to the right, you’ll see “Intro Video” and anything you have before the C1 icon will show as an intro video before your main menu.
To create chapters, select the matching Blank submenu and drag it down to the menu list.
Click on the Chapter Wizard icon beside the submenu.

- Select how often you want to place Chapters.
- Under Linking, make sure Link chapters to menu is selected.
- Then click OK.

The Chapter Wizard will automatically add your chapters. To make adjustments, you can manually drag the chapter icon to where you want to place each one. The thumbnails on the preview pane align with where you have your chapters set up on the timeline.
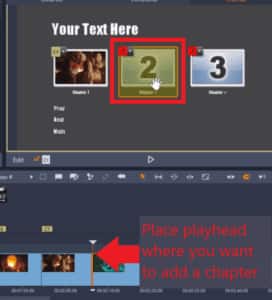
To manually add another chapter, drag your playhead to where you want to add the next chapter.
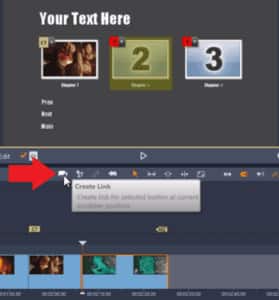
Then click on the thumbnail on the submenu where you’ll be linking to the chapter. Select the Create link button. This will add an extra chapter to your timeline.
Note: If you see a blank thumbnail in the preview pane after setting up your chapters, don’t worry about it. When you click on the Play button which works as a DVD player simulator, you’ll see that the blank icon won’t be visible on your DVD menu.
Go back to the timeline and notice the little red buttons that say, “This menu is not reachable because there are no links to this menu”.
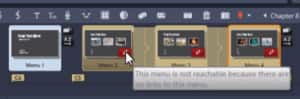
- To fix that, click on the main menu, and go to the Screen Selection button on the preview pane which also has a red button saying it isn’t linked yet.
- Left-click on Scene Selection and drag it down on top of the first submenu.
- Now, all the red notifications are gone for each submenu and the menus have been properly linked.
Customizing Your DVD Menu
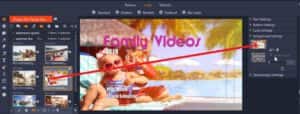
Click on the main menu once again, then click on the Edit button under the preview pane.
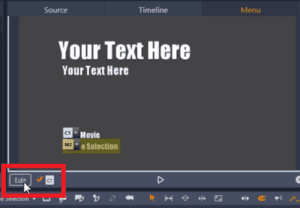
- Click on the text to edit it.
- Change the font and font size under Text Settings.
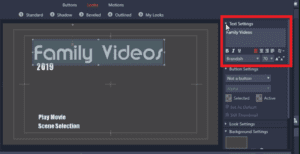
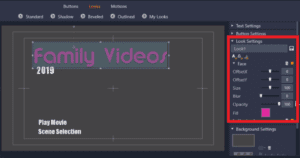
- And under Look Settings we can change the color of the font, add an outline, drop shadow, and make other customizations.
- To change your menu background color, scroll down to Background settings and choose a color and then select Apply.
- To add a picture background instead, access your project bin on the left.
- Select the image of your choice, then drag it into the colored box under background settings. Then click OK.
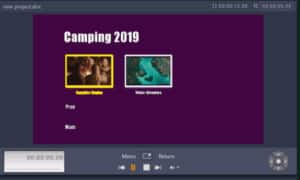
You can edit the submenu just as you did with the main menu by clicking on the submenu icon, then click Edit.
- Here, you can rename the chapters so instead of Chapter 1, Chapter 2, you can name them “Water Park Trip” or “Katie’s Birthday”.
- After making all customizations click OK once again.
Burning to Disc and Previewing DVD Menu
Click on the Burn Disc icon under the preview pane.

Now you can preview your DVD in the DVD simulator. If you click on Scene Selection, you’ll see all your chapters have been labelled and linked to correctly.
Adjust your export settings to match your Video specifications.
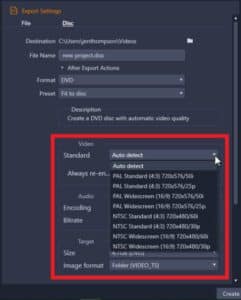
Click to either Burn to Disc so you can burn your DVD right away or Create Image to burn your DVD later on.

Now you’re ready to start making beautiful custom DVD menus to preserve all your family memories!
Download a FREE 15-day trial and discover all the essential and advanced video editing features that Pinnacle Studio delivers to make your videos look their best.

Reader Interactions