
If you want to add a professional quality to your video projects, use Audio Ducking to easily balance multiple audio tracks, like voiceover and background music. In this tutorial we’ll show you how to use the Audio Ducking feature to automatically lower the volume of your music track during periods when you have narration. You will also learn how to make manual adjustments to keyframes to fine-tune the Audio Ducking settings to get precisely the results you want.
Thanks for watching! We hope you found this tutorial helpful and we would love to hear your feedback in the Comments section at the bottom of the page. You will find a written version of this tutorial below, and a printable PDF copy to download on the Download Resources tab above.
Download these free resources:
Written Tutorial (PDF, 281 KB)
Download a FREE 15-day trial and discover all the essential and advanced video editing features that Pinnacle Studio delivers to make your videos look their best.
What’s New in Pinnacle Studio
Audio and Music
Featured products
 Pinnacle Studio 26 Ultimate
 Studio Backlot Membership
 Pinnacle Studio 26
 Vision FX
How to Use Audio Ducking to Balance Music and Voiceover
In Pinnacle Studio, you can use Audio Ducking to balance or blend multiple audio clips, such as a voiceover or narration track, with a background music track. When you use audio ducking, the volume of the music will lower or “duck” so that you can clearly hear the voiceover. In this tutorial we will demonstrate using an advertisement video that has both background music and a voiceover.
Step 1: Add your media
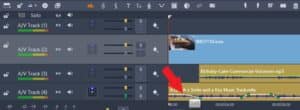
- Drag the videos or images you are working with onto A/V Track 2 from the Project Bin.
- If your audio is separate from the video, drag your voiceover or narration from the Project Bin onto A/V Track 3.
- Add the background music you want to use onto A/V Track 4.
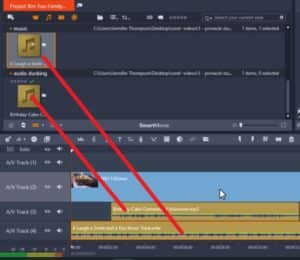
If we press Play to preview the video, you’ll hear that the background music has the same volume level as the voiceover and overpowers it. We want the background music to be a higher level when there is no voiceover, and to “duck” or lower when the voiceover is present.
To do this, we need to use audio ducking.
Step 2: Using the Audio Ducking tool
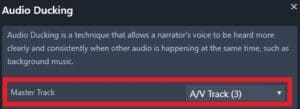
To begin using this feature, click on the Audio Ducking icon on the toolbar. A dialogue box will pop up explaining more about audio ducking.

Select your Master Track: the Master Track is the track that contains the voiceover or the person speaking.
Adjust the Ducking Level: the Ducking Level is the percentage that your music volume will decrease.
- If you want to completely fade out the music every time a person is speaking, adjust the Ducking Level to 100.
- To still hear the music faintly in the background, try adjusting the Ducking Level to 70 or 80.
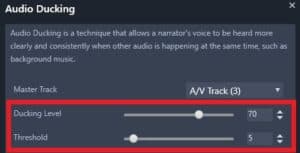
Adjust the Threshold: the Threshold determines the Master Track volume level that will trigger the volume decrease for the other tracks.
- Start with a Threshold setting of 5
- You can play around with this until you’re happy with the results.
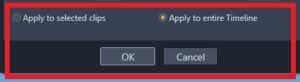
If you want to apply ducking to all non-Master audio tracks, enable the Apply to entire Timeline option.
To apply ducking to the selected track only, enable Apply to selected clips.
Once you are satisfied with the settings, click OK. Now look at the sound waves on A/V Track 4. You can see that keyframes have been added that duck down when the voiceover is speaking and come back up when the speaker has finished.

Step 3: Making Manual Adjustments
To manually adjust how the sound fades in and out, you can adjust the green squares to change the position of the keyframes. To do this, click on the Audio Mixer icon.

Left-click on the keyframe you want to adjust and drag it left or right to create longer or shorter fade-ins or fade-outs.
Press Play to preview. As you can hear, the music fades nice and slowly before the voiceover and the music doesn’t distract from the speaker. Now that you are familiar with how to use audio ducking, you can enhance your video projects with professional-quality audio.
Download a FREE 15-day trial and discover all the essential and advanced video editing features that Pinnacle Studio delivers to make your videos look their best.

Comments (2)
Reader Interactions
Comments
se è possibile i commenti del video tradotti in Italiano , non tutti conosciamo l inglese grazie
Ciao Fernando
Per vedere i sottotitoli nella tua lingua:
– Fai clic sull’icona “Settings” nell’angolo in basso a destra del video player
– Fai clic su “Subtitles” e seleziona la tua lingua
– Se la tua lingua non è elencata, fai clic su “English (auto-generated)”, quindi fai clic su “Auto-translate” e seleziona la lingua.
Distinti saluti
The Discovery Center team