
An S-curve, like the one formed by this photo, creates a sense of motion, depth, and perspective in your photos. Lines are key compositional elements in photography. This tutorial will show you how to use lines most effectively in your photos.
You will learn how to:
- Keep horizons level.
- Use repetition to convey symmetry and contrast.
- Use diagonal lines to draw the eye, and convey motion. Remember, contrasting diagonals have a chaotic effect.
- Use converging lines by placing the convergent point at one of the target spots for the rule of thirds, and the eye is powerfully drawn to this location.
- Effectively use curved lines. For example, S-curves give a great feel of depth, motion, and detail.
There are examples of all of these principles being used below.
Thanks for watching! We hope you found this tutorial helpful and we would love to hear your feedback in the Comments section below. And don’t forget to visit our social media pages and show us what you’ve learned by sharing your photos, videos and creative projects with us.
Download your FREE 30-day trial and make every shot your best shot with PaintShop Pro 2023, your all-in-one photo editing and design software.
Photography Composition Tutorials
 PaintShop Pro 2023 Ultimate
 Vision FX
 PaintShop Pro 2023
 AfterShot Pro 3
Lines in photography are an immensely powerful element. Proper arrangement of lines, guides the eye around the image, often placing emphasis on the subject matter or conveying a sense of movement.
Improper arrangement can draw the eye out of the photo or take away from the strength of the subject matter. With a really strong balance of compositional elements, lines can themselves become the subject matter. Many claim that certain types of lines convey calm or chaos or other emotional states, while this is somewhat subjective and dependent on each particular photo, strong use of lines can dramatically increase the emotional impact of a photo.
When looking for lines, consider that a line isn’t necessarily a literal line like a railroad track or road markings. A line can be the division between light and dark or between different colors or the edge of a wall and the space next to it. In reality there are far more implied lines like this, than there are actual lines.
Vertical Lines
Decide whether to orient your camera vertically or horizontally. A vertical framing can convey strength and size. Skyscrapers and pillars for example will usually have an appearance of immense strength and scale if shot vertically (especially from a low angle). Vertical lines in a horizontal image can strongly divide the photo. If composed properly this can be very powerful.
It is very important to apply the rule of thirds when dealing with strong lines. Dividing a photo in half with a vertical line can be visually unsettling unless for a specific reason.
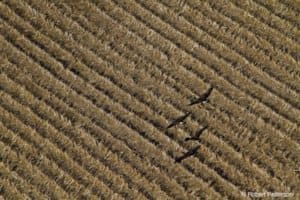
Look for repetition of lines like fence slats or telephone poles. Contrasting strong straight lines with curvy more organic elements is also pleasing to the eye.
Very tall vertical lines will start to converge (think looking up at a tall building), if this is not the desired effect, a tilt shift lens can correct this or photo editing software can fix the problem.

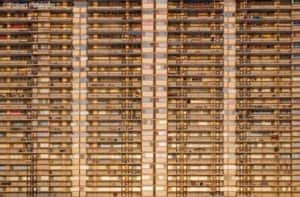
Repetition is a key element to look for when photographing lines.

When shooting tall buildings, vertical lines become converging lines.

The convergence was corrected in photo editing software here for a more symmetrical look.
Horizontal Lines
The same vertical line rules apply to horizontal lines. Look for repetition, follow the rule of thirds and decide which way you will orient your camera (vertically or horizontally) to best achieve your vision.
The most common horizontal line is the horizon line. It is very important that the horizon in a photo be perfectly level. The slightest angle is glaringly obvious and very unsettling. This is particularly true for the horizon in a shot of an ocean or lake.
It is strangely easy to make this mistake but there are a few tools you can use to ensure straight horizon lines.
If your camera overlays the rule of thirds graph simply align it with one of the horizontal lines.
Most SLR cameras have focus points marked inside the viewfinder these can be used as guides to align your horizon with. Some tripods have spirit levels built in and small attachable ones are also available at most camera shops. Some cameras have a digital level built in that is viewable on the LCD screen. If all else fails the problem can be fixed in photo editing software.

Crooked Horizon line
Repetition is a great element to look for when photographing lines. Here the balconies repeat throughout the photo

The lines of the railings repeat in both the foreground and background.

Diagonal Lines
Diagonal lines are great for conveying movement in a photo and work very well at drawing the eye to the subject matter. Numerous conflicting diagonal lines imply chaos or action but be careful to ensure the effect is desirable and not just confusing.
Try to avoid diagonal lines going directly to the corners of the frame as this draws the eye out of the photo.


Converging Lines
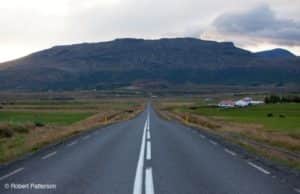
Lines that converge in a photo give an excellent sense of depth and perspective. A common example would be a shot of railroad tracks. Be deliberate in deciding where you place the point of convergence. Again apply the rule of thirds and place that point at the intersection point that best achieves what you are trying to achieve with your photo. Again, try to avoid letting the diverging ends of these lines go directly to the corners.
Symmetry with converging lines.
The convergence point in this shot takes the eye to roughly the top right third of the photo.

Curved Lines
Curved lines can imply movement, depth and playfulness but are sometimes fairly difficult to compose. Rainbows can be tricky, often leading directly to a corner in your photo but with a little attention the correct composition can be found.
One fantastic common use of curves is known as Hogarths Line or the S-Curve of Beauty. Starting on the lower part of the frame and winding its path through the photo, an S-Curve gives a great sense of depth, motion and perspective, while keeping the viewers eye in the frame. This doesn’t have to literally be an S-shape, but generally refers to any curving line winding its way through a photo. As with other lines, try to avoid it entering or exiting the frame directly at the corners. This is a much harder element to capture than one might think. It is often easier to achieve from slightly higher angles.


Download your FREE 30-day trial and make every shot your best shot with PaintShop Pro 2023, your all-in-one photo editing and design software.

Reader Interactions