
Learn about the Font Manager, a standalone application that is included in CorelDRAW Graphics Suite. Get a tour of the application interface and see how you can use libraries and collections to easily manage your font library and keep your fonts organized.
Thanks for watching! We hope you found this tutorial helpful and we would love to hear your feedback in the Comments section at the bottom of the page. You will find a written version of this tutorial below, and a printable PDF copy to download on the Download Resources tab above.
Start your FREE 15-day trial and embark on a design journey with powerful tools for vector illustration, layout, photo editing, typography, and collaboration.
Download these free resources:
Written tutorial (PDF, 576 KB)
CorelDRAW Graphics Suite Resources
Quick Start Guide (PDF, 2 MB)
Keyboard Shortcuts (PDF, 3.5 MB)
CorelDRAW and Corel PHOTO-PAINT user guides
For CorelDRAW Graphics Suite subscription and perpetual licenses (2018 to 2024), languages include English, Português do brasil, 简体中文, 繁體中文, Čeština, Deutsch, Español, Français, Italiano, 日本語, Polski, Русский
What’s New in CorelDRAW Graphics Suite
Working with Text
 CorelDRAW Graphics Suite
 Ultimate Vector Bundle Vol. 1
 CorelDRAW Standard 2021
 Ultimate Vector Bundle Vol. 2
 Corel Vector
How to Use the Font Manager
The Corel Font Manager is a standalone application included in CorelDRAW Graphics Suite (Windows and Mac). It works with CorelDRAW and Corel PHOTO-PAINT to search, filter, organize and manage fonts. In this tutorial we will be using the Windows version, however the application works the same way on both platforms.
Click on any of the images below to view full-size.
The Font Manager Interface
The Font Manager can be launched from its own icon, or for Windows users, directly from within CorelDRAW or PHOTO-PAINT via the Application Launcher. The interface has a toolbar and 3 main sections: the Libraries pane, the Preview pane, and the Properties pane.
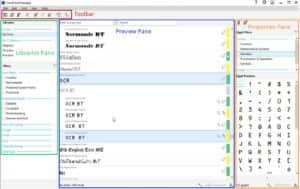
The Preview Pane
In the Preview pane, fonts are organized in font families and have a color bar to indicate font status:
- Green – font or font family that is installed
- Green with lock icon – protected system font or font family
- Yellow – font or font family not installed, available in CorelDRAW and Corel PHOTO-PAINT only
- Grey – font family containing both installed and not installed fonts
Each font also has a font technology symbol:
- O for OpenType fonts
- T for TrueType fonts
- A for Type 1 fonts
By default, each font is displayed in its font name. At the top of the Preview pane you can enter sample text in the Preview Font window to see how each font looks with specific characters. The font names reappear when you clear the Preview Font window.

There is also a Search window at the top of the Preview pane that you can use to search for a specific font.
The number of fonts on your system is displayed in the bottom left corner of the Preview pane, and in the bottom right corner you can use the Resize slider to change the display size.

Installing, Uninstalling and Deleting Fonts
The Font Manager lets you install and uninstall single or multiple fonts as well as entire font families. You can delete fonts that you no longer need to prevent clutter.
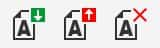
Select a font in the Preview pane and then use the toolbar icons to install, uninstall or delete the font. You can also access these commands by right-clicking on the font or under the Font menu.
NOTE: Fonts that are used by the operating system are protected and can’t be uninstalled or deleted.
Managing Duplicate Fonts
Your folders or collections may contain duplicates of the same font. This is indicated by a badge in the upper right corner beside the font technology symbol.

You can show all duplicate fonts and then delete the ones you don’t need.
- Use the Duplicate Fonts button on the top toolbar to toggle between showing and hiding duplicate fonts in the Preview
- You can also access the Show/Hide Duplicate Fonts command by right-clicking on any font in the Preview pane, or under the Font
- Use the Duplicates filter in the Font Status filter category in the Library pane to display only duplicate fonts in the Preview
The Properties Pane
When you select a font in the Preview pane, its glyphs (numbers, symbols and special characters) appear to the right in the Properties pane.
NOTE: if the Properties pane is not visible, click on the Show font properties button in the top toolbar.

At the top of the Properties pane you click on the icons to view either:
- Glyph set, to preview and filter available glyphs for the selected font; or
- Details to see detailed font information such as version, technology, code page, designer, etc.
In the Glyph Filters area, you can use the checkboxes to filter the Glyph Preview list to show only numbers, currency or symbols, etc. OpenType fonts will also have specific OpenType features, such as different stylistic sets, available as filtering options.
Under the Glyph Preview list, click on the small arrow to expand the Glyph Details section, which includes information such as name, glyph ID, keystroke, etc.
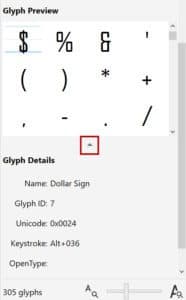
The number of glyphs for the selected font is displayed in the bottom left corner of the Properties pane, and beside it there is a Resize slider to adjust the glyph display size.
The Libraries Pane
The Libraries pane has 3 sections: Folders, Collections and Filters.
Folders
Folders let you easily access and monitor fonts that reside in the same folder. The default folder in the Font Manager is called My fonts. It includes all installed Windows fonts and all fonts in your added folders.
To add a folder:
- File > Add Folder; or
- Click the Add folder icon on the toolbar.
- Browse to the folder that has the fonts and click Select Folder.
- Now that folder appears in the Font Manager.
To remove a folder, select the folder in the Libraries pane and then:
- Go to File > Remove Folder or Collection; or
- Click the Remove icon on the toolbar; or
- Right-click on the folder and select Remove Folder or Collection.
Collections
Collections are ideal for easy access to fonts that reside in different folders. For example, you can create a collection that includes all the fonts used in a project, or a collection of a certain style of fonts such as scripts.
To create a collection:
- Go to File > Add Collection or click the Add collection icon on the toolbar.
- Enter a name for the collection.
- Click a folder or another collection to display a list of fonts and select the font you want to add.
- To add the font to the collection:
- Drag it from the Preview pane to the collection; or
- Right-click on the font in the Preview pane and select Add to collection; or
- Go to Font >Add to collection.
To remove a font from a collection, right-click on the font in the Preview pane and select Remove from [collection name]. You can also go to Font > Remove from [collection name].
NOTE: removing a font from a collection does not delete or uninstall the font.
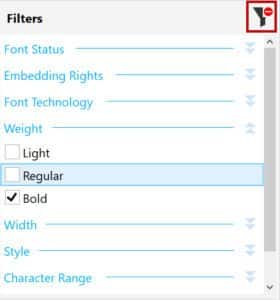
Filters
In the Filters section you can select certain options to filter what is displayed in the Preview pane, such as Font Status, Style, OpenType features and more.
Click on the arrows beside a filter category to open it, then select the filters you want to use. You can use multiple filters at the same time.
To remove individual filters simply uncheck them. To remove all filters, click the Remove font filters button in the top right corner of the Filters section.
Acquiring More Fonts
You can download additional fonts from within the Font Manager using the Get More icon on the toolbar. In the Get More window you can find many new font packs, some for free and some for purchase. The downloaded packs will appear under My Collections.

Start your FREE 15-day trial and embark on a design journey with powerful tools for vector illustration, layout, photo editing, typography, and collaboration.

Reader Interactions