
In this tutorial, you’ll learn how to blend photos together using PaintShop Pro. Photo blending allows you to combine the best parts of multiple shots taken in the same location into one photo. You can also blend photos to remove certain elements of a photograph, such as people or vehicles, to get a perfect shot of a scenic view or landscape.
Thanks for watching! You will find a written version of this tutorial below, and a printable PDF copy to download on the Download resources tab above.
Download your FREE 30-day trial and make every shot your best shot with PaintShop Pro 2023, your all-in-one photo editing and design software.
Download these free resources:
Written Tutorial and Sample Images (Zip, 8 MB)
PaintShop Pro resources
Keyboard shortcuts (PDF, 173 KB)
PaintShop Pro User Guide (PDF, 25.4 MB)
What’s new in PaintShop Pro
Cloning and blending
Artistic tools and projects
Featured products
 PaintShop Pro 2023 Ultimate
 AI HDR Studio 3.0
 PaintShop Pro 2023
 Vision FX
How to blend photos in PaintShop Pro
In this tutorial, you’ll learn how to blend photos together using PaintShop Pro. Photo blending allows you to combine the best parts of multiple shots taken in the same location into one photo.
You can also blend photos to remove certain elements of a photograph, such as people or vehicles, to get a perfect shot of a scenic view or landscape.
You will learn how to:
- Import multiple photos into the Photo Blend Wizard.
- Use the Photo Blend basic tools: Brush In, Brush Out and Eraser.
- Process so that the images merge into one.
Click on any of the images below to view full-size.
When using the Photo Blend tool, it is important that the images you will be blending were shot either using a tripod or in quick succession, so that the backgrounds behind your subjects are consistent.
How to blend photos to create a composite image
- Open PaintShop Pro, click on the File menu and choose Photo Blend.
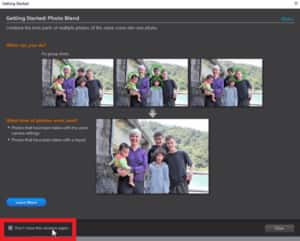
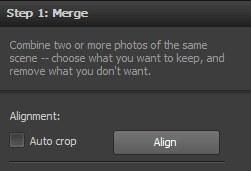
If this is the first time you have opened the Photo Blend wizard, the Learning Center window will pop up to provide some information on this feature and how it works.
To prevent this window from popping up again in future, just check the box beside Don’t show this window again on the bottom left of the dialogue box. Then click Close.
When the Photo Blend window opens, click on the Minus icon to remove the default standard image.
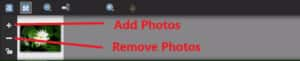
Click the Plus icon to add your own images that you want to blend together:
- Browse to where you have your photos located on your computer.
- Select the images you want to work with and press Open.
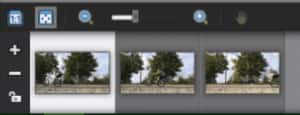
These photos will then be loaded into the tray at the bottom of the screen.
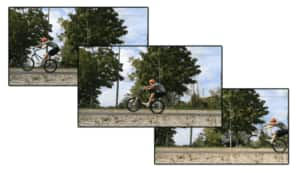
In this example, I have three different shots of a boy riding his bicycle. And I want to make a cool composite image where you can see the progression of him biking from right to left.
These photos were taken with a tripod so they are all aligned quite well, but if you took your photos with a handheld camera you can click on the Align icon to help align the images perfectly.
Now we are ready to brush in our subjects. Click on the first photo in the tray and then select Brush In.

Brush over the subject you wish to keep in the shot.

The brushing in doesn’t have to be perfect since the background is the same in each photo, so it won’t matter if you brush in parts of the sky or tree as well. Repeat this process with the next two photos.
TIP: You can increase the brush size to cover a larger area or reduce it to make detailed adjustments.

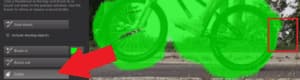
You will notice that any areas you have brushed in have automatically been brushed out of the other photos. In cases where the subjects of one shot overlap another, like in this example here with the bicycle wheel, you will need to reduce the brush size to be more precise.
You can also use the Eraser tool to clean up around the edge of the brushed-in area so it doesn’t include any excess background around the wheel.
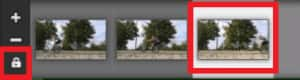
Click on Brush Out to mark areas you want to remove from the final image, such as the car in Image 3.

If you prefer to use one image as the background image, click on the Lock icon in the tray and this will lock it in so that this image is used as the background to include all the blended components from the other images.
When you have completed the three images, click the Process button and the photos will be blended.

Click Save and Close to save the blended photo on your computer or click Edit to open it in PaintShop Pro for further editing.

How to blend photos to remove objects and people from landscape shots
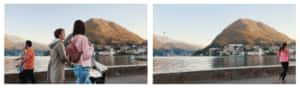
I’d like to also show you another great use for this tool. I’ve got two photos taken of this scenic view but there are people blocking the view from different sides in each shot taken.
I want to combine these photos together to get rid of all the people blocking the view.
- Click on the thumbnail in the tray and use the Brush Out tool to erase the subjects you want to remove from the shot as we did previously.
- Repeat this process for the second photo in the tray.
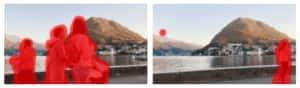
- Click on Process to blend the photos together. And now you can see that the scenic view is complete without anyone blocking it!

These are just a couple ways you can blend photos to create unique images or perfect your photographs.
Download your FREE 30-day trial and make every shot your best shot with PaintShop Pro 2023, your all-in-one photo editing and design software.
