
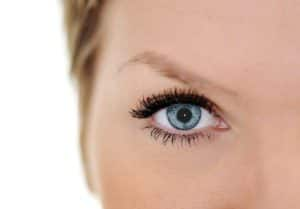
The red-eye effect is a common problem in photos. It is caused by the light of a camera’s flash reflecting off the retina of the person (or pet) and can ruin an otherwise great photo. PaintShop Pro has tools that can help you fix this, and this tutorial will show you how. The Red Eye tool instantly replaces the red color in the subject’s pupil with a dark grey color, for a more natural look. But if you want more fine tuning, the advanced Red Eye Removal allows you to make multiple adjustments hue color, iris size, glint and more.
Thanks for watching! We hope you found this tutorial helpful and we would love to hear your feedback in the Comments section at the bottom of the page. You will find a written version of this tutorial below, and a printable PDF copy to download on the Download Resources tab above.
Download your FREE 30-day trial and make every shot your best shot with PaintShop Pro 2023, your all-in-one photo editing and design software.
Download these free resources:
Written Tutorial (PDF, 654 KB)
PaintShop Pro resources
Keyboard shortcuts (PDF, 173 KB)
PaintShop Pro User Guide (PDF, 25.4 MB)
What’s New in PaintShop Pro
PaintShop Pro Tools
Corrections and Enhancements
Featured products
 PaintShop Pro 2023 Ultimate
 AI HDR Studio 3.0
 PaintShop Pro 2023
 Vision FX
How to Use the Red Eye Tool
Red-eye effect in photos can sometimes be an issue, in particular with older photos. When light from the camera’s flash reflects off the retina of a photo subject, a red-eye effect is captured in the photo.
In this tutorial, you’ll learn several ways to remove the red-eye effect from photos.
Red Eye Removal – Basic Method:
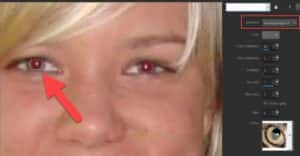
Click on the Red Eye tool on the Tools toolbar.
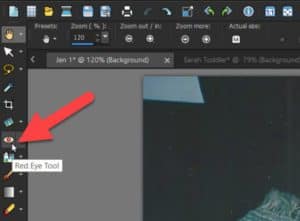
On the Tool Options palette, adjust the Size of Red-Eye control, so that the pointer is about twice the size of the red area needing correction.
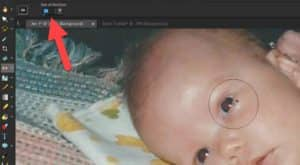
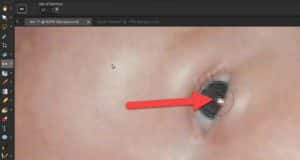
Position the pointer directly over the eye and click.
You can also size the pointer interactively by holding down Alt while dragging the Red Eye tool up or down. Then simply position the pointer directly over the eye and click.
NOTE: You may need to click over the eye area twice to completely remove all the red.
Red Eye Removal – Advanced Methods:
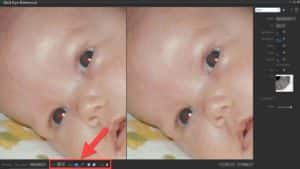
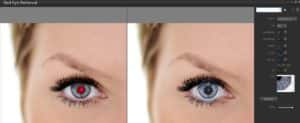
Go to Adjust > Red Eye Removal. This will open the Red Eye Removal window.
The before and after panes let you compare as you remove the red eye. At the bottom of the window, you can change the view to Single, Dual Vertical, or keep it as Dual Horizontal.
Also at the bottom of the window, you can adjust the zoom level to zoom up on the eye, and use the Pan tool to position your viewpoint.
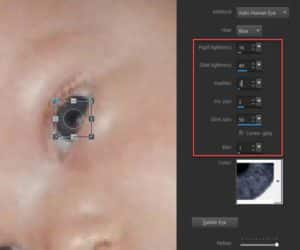
Along the right side of the window are various settings.
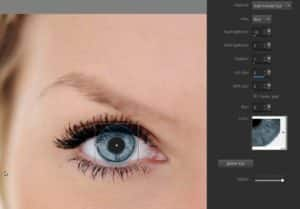
- Method: choose Auto Human Eye, or choose Auto Animal Eye if you’re removing red eye from an animal or pet photo.
- Hue: choose an iris color from the drop-down list.
- Color: select the color variation.
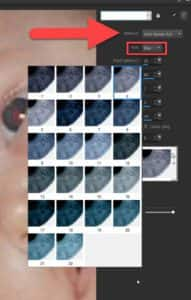
NOTE: the Hue drop-down list is only available for the Auto Human Eye method.
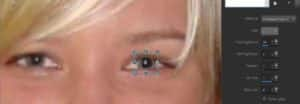
Click inside the red area of the eye to select the eye automatically, or drag from the center of the eye to the outside edge of the red area.
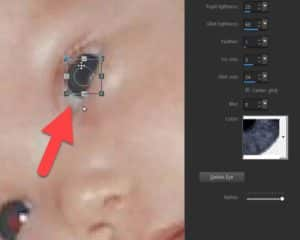
If you accidentally create multiple eyes or want to start over, simply select the eye you want to delete and click the Delete Eye button.
- Make adjustments to the Pupil lightness, Iris size, Glint lightness, and Glint size until the red eye is removed.
- Adjust the Feather level so the edges of the corrected eye blends more naturally or adjust the Blur levels.
Increase these settings gradually, until the eye blends naturally with the rest of the image.
- Click on the second eye you wish to fix, and the same settings will be applied. You can click and drag on the eye to reposition it or drag on the handles to resize it.
- Click OK to finish.
How to Use the Freehand and Point-to-Point Pupil Outline Methods:
If you have a lower quality photo or a photograph where the eyes are irregular in shape or partially obscured, it is best to use the Freehand Pupil Outline method or the Point-to-Point Pupil Outline method. This would also be the best method to use if you can’t find the exact color match in the Color setting with the Auto Human Eye method.
- Choose the Freehand Pupil Outline method and click and drag to draw a selection around the red eye area.
NOTE: if you choose the Freehand Pupil Outline method or the Point-to-Point Pupil Outline method, you must confine the selection area to the pupil of the eye. These methods are designed to correct the pupil area, where red-eye occurs, without changing the surrounding iris. So you won’t be able to adjust the Hue or the Iris size.
Once you have drawn your selection, adjust the Pupil lightness, Glint lightness, Feather, Glint size, and/or Blur settings if necessary. And then repeat the process with the second eye.
Once you are happy with the results, click OK.
The Point-to-Point Pupil Outline method is very similar, with the only difference being how you create the selection around the pupil. Instead of drawing in one continuous freehand stroke, you create the selection by clicking several times to create a series of connected lines around the pupil, double-clicking on the last point to complete the selection.
Alternative Method for Partially Obscured Pupils:
This method is similar to the previous example, but with an extra step at the beginning and end. As with the Freehand and Point-to-Point Outline methods, it is used when more careful correction is needed for partially obscured pupils. And if you are more comfortable with the Eraser tool rather than drawing freehand, you will find this method easier.
First, we need to make a duplicate of the image. The red eye removal will be done on this duplicate layer, not on the original photo.
- Open the Layers palette by going to Palettes > Layers.
- Right-click on the image in the Layers palette and choose Duplicate.
- Then go to Adjust > Red Eye Removal.
- Click on Auto Human Eye and click the center of the pupil and drag out your eye. Don’t worry if this overlaps the eyelids or skin, because we’ll be erasing the excess later on.
Make adjustments as we did before to the Pupil lightness, Iris size, Glint size and so on until these look natural.
- Press OK to exit the Red Eye Removal window.
Now we are going to take care of any parts of the new iris that overlaps the eyelids and lashes.
- With the duplicate layer still selected in the Layers palette, activate the Eraser tool on the toolbar.
- To adjust the size of the Eraser, hold down the Alt key while dragging up and down.
- Carefully brush over any overlapping parts of the iris that you want to remove, and the original photo on the layer below will show through.
TIP: when the Eraser tool is activated, the Tool Options palette provides other settings that you can experiment with to get more natural results, such as reducing the Hardness (to soften the edge of the Eraser) and Opacity (for a smoother color blend).
PaintShop Pro makes it easy to correct red eye in even the most difficult of photos with the red eye tool! So you can have fun experimenting with and restoring all your photographs.
Download your FREE 30-day trial and make every shot your best shot with PaintShop Pro 2023, your all-in-one photo editing and design software.

Reader Interactions