
Here are 6 simple ways to fix summer photos and make them look more professional. It’s easy to get snap-happy with all the great photo opportunities during summer vacations and adventures but you don’t always have time to set up each shot perfectly or wait for ideal lighting conditions. In this tutorial we’ll show you some quick and easy ways to fix common issues with summer photos, like straightening and cropping, removing blemishes or unwanted objects, adjusting light and color and adding some effects as a finishing touch.
Thanks for watching! We hope you found this tutorial helpful and we would love to hear your feedback in the Comments section at the bottom of the page. You will find a written version of this tutorial below, and a printable PDF copy to download on the Download Resources tab above.
Download your FREE 30-day trial and make every shot your best shot with PaintShop Pro 2023, your all-in-one photo editing and design software.
Download these free resources:
Written tutorial (PDF, 2 MB)
Sample images (Zip file, 7 MB)
PaintShop Pro resources
Keyboard shortcuts (PDF, 173 KB)
PaintShop Pro User Guide (PDF, 25.4 MB)
What’s New in PaintShop Pro
Holiday Projects
Artistic Tools and Projects
Featured products
 PaintShop Pro 2023 Ultimate
 AI HDR Studio 3.0
 PaintShop Pro 2023
 Vision FX
How to Fix Summer Photos with PaintShop Pro
In this tutorial, you’ll learn 6 tips to fix some common issues with summer photos and make them look more professional.
Click on any of the images below to view full-size.
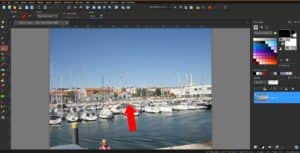
Tip #1: Straighten your Photo
Before you start adjusting or adding effects, it’s important to have a good base photo. Even if your photo is just slightly crooked, it is very noticeable and detracts from the overall image quality. Straightening a photo in PaintShop Pro is simple so there is no excuse for having crooked photos!
- Select the Straighten tool from the Tools toolbar on the left.
- A straightening bar with end handles will pop up on the image.
- Drag each handle of the straightening bar to align it with the part of the image that you want to straighten, in this case the boardwalk is a good reference to use.
- Click the Apply icon (check mark) to apply the changes.
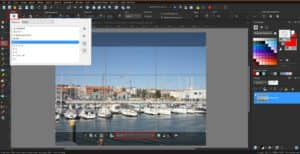
Tip #2: Crop your Photo
Another important step to get a good base photo is cropping. You can crop out any unwanted objects or people at the edges of your photo, but you can also use cropping to improve the overall image composition.
- Select the Crop tool from the Tools toolbar on the left and the crop rectangle will appear on the image.
- If you want a standard photo size, select from the Presets dropdown list on the Tool Options palette or on the floating toolbar at the bottom of the crop rectangle.
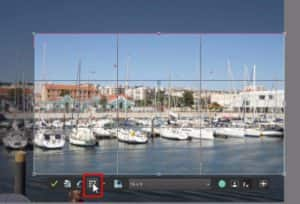
- Drag one of the corner boxes to resize or use the handle in the center to reposition the crop rectangle. If you have selected one of the presets, the aspect ratio will be automatically maintained.
- You can also select Free Form and enter your own custom width and height dimensions on the Tool Options palette. If you want to maintain aspect ratio, you will need to check this option on the Tool Options palette.
- Click the green check mark to apply the crop to the current image or select Crop as New Image to preserve your original image.
To learn more about cropping, watch our full tutorial How to Crop Photos.
You can also use a composition guide such as the Rule of Thirds grid to improve the image composition. You can turn the composition guide on or off using the button on the floating toolbar at the bottom of the crop rectangle.
As a general rule of composition, horizons should align with a horizontal grid line and important objects or subjects at one of the horizontal or vertical intersections.
To learn more about composition, watch our Photography Composition tutorial series.
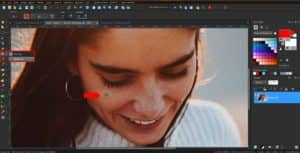
Tip #3: Remove Imperfections and Unwanted Objects
With PaintShop Pro it’s easy to make touch ups to your photos, whether it’s removing a small blemish from a portrait or an unwanted object that you weren’t able to crop out. The Blemish Fixer is a great tool for small touch ups.
- Click the drop-down arrow next to the Red Eye icon and select Makeover.
- Select the Blemish Fixer in the Tool Options palette.
- Adjust the brush size so that the blemish fits just inside the inner circle. You can adjust the brush size in the Size box on the Tool Options palette, or by holding down the Alt key as you drag your mouse up or down.
- Hover over the blemish, click, and you’ll see how the blemish has been covered.
To learn more about the Blemish Remover and other makeover tools, watch our full tutorial Using the Makeover Tools.
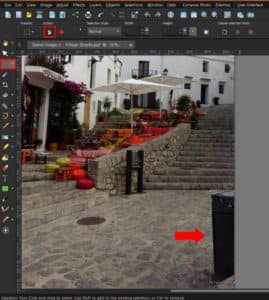
For larger objects, use the Magic Fill tool. In this example we want to remove the trash bin from the bottom right corner of the photo.
- Click the Selection tool on the left toolbar, then click and drag to create a selection marquee around the object you want to remove.
- Then click on the Magic Fill icon on the Tool Options palette and you’ll see the object has now been removed.

To learn more about using the selection tools, watch the full tutorial Introduction to Selection Tools.
Tip #4 Adjust the Lighting
A common issue with summer photos is the lighting. Glare from the harsh summer sun can make your photos look washed out. Or if it’s a gloomy day or you’re taking photos in the shade or evening your photos can end up too dark. There are several ways to adjust the lighting in PaintShop Pro.
- Under the Adjust menu, use One Step Photo Fix or Smart Photo Fix to automatically adjust the brightness and saturation.
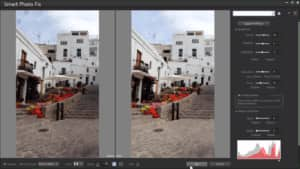
NOTE: Smart Photo Fix will by default apply the same automatic adjustments as One Step Photo Fix, but you can use the sliders to make manual adjustments as well.
For photos that are too dark:
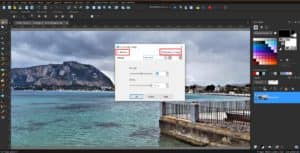
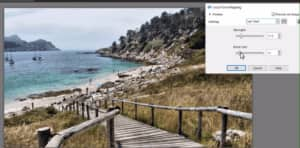
- Click on Adjust > Fill Flash and adjust the settings to your liking.
- Or try Adjust > Brightness and Contrast > Fill Light and Clarity and make adjustments to make your photo brighter and crisper.
BONUS TIP: Make sure Preview on Image is checked to see what the adjustment will look like before applying. For a more detailed view, click on Preview in the top left to open a Before/After window, which you can maximize.
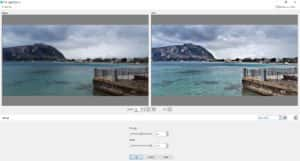
For photos that are too light or washed out:
- Click on Adjust > Backlighting and play around with these settings until you’re happy with the result.
Tip #5 Adjust the Color
There are also lots of ways to adjust color in PaintShop Pro, here are the two most common and easy methods.
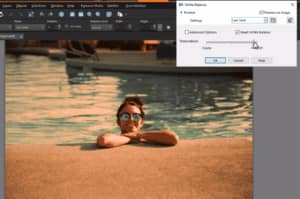
1. Click on Adjust > White Balance and adjust the temperature slider to your liking. In addition to fixing color issues, the white balance setting can be used to alter the mood of an image by making it warmer or cooler.
2. Click on Adjust > Hue and Saturation > Hue/Saturation/Lightness. Adjust the Saturation slider to make your photos more vibrant and colorful – just don’t go too far!
Tip #6 Adding Effects
PaintShop Pro has a wide variety of effects to enhance or even completely transform your images. Here are just a few of our favorites that we hope will inspire you to try out some other effects as well.
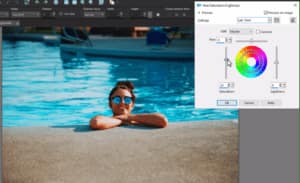
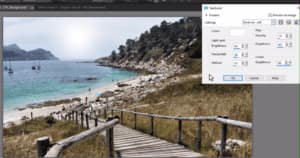
1. Local Tone Mapping:
Go to Adjust > Brightness and Contrast > Local Tone Mapping to create an effect similar to HDR.
2. Effects
Under the Effects menu, you will find several different categories of filters and artistic effects. Try out a few to find your favorites and you can even use multiple effects on one image. All these effects have options and settings that you can manually adjust to your liking.
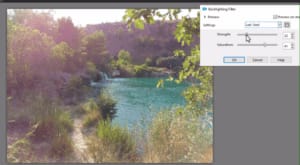
Go to Effects > Illumination Effects > Sunburst to add a lens flare and sunbeams or sunspots which is perfect for summer photos!
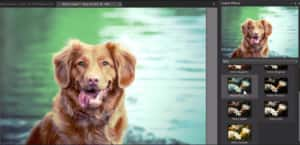
3. Instant Effects
Instant Effects are quick filters that you can apply with just one click. First, go to View > Palettes and ensure Instant Effects is checked. Once the Instant Effects palette is open in the interface, you can select a category and an effect. Click once on the effect to see the results in the Preview window; double-click on the effect to apply it to your photo. Use Undo (or Ctrl + Z) if you aren’t happy with the results.
As with Effects, you can apply more than one Instant Effect to a photo.
In this example, we used Retro Process 1 from the Retro category to give the image a soft green look to it.
These are just a few of the many ways you can fix summer photos before sharing them with your friends and family!
Download your FREE 30-day trial and make every shot your best shot with PaintShop Pro 2023, your all-in-one photo editing and design software.

Reader Interactions