
With PaintShopPro’s Selection tools you can isolate and edit a specific object or area in your photos while leaving the rest of the image unchanged. Once you have mastered the technique of creating a selection, there are many creative uses such as removing backgrounds or objects, creating composite images, adding special effects and more. In this tutorial we’ll cover the basics of creating a few simple selections: rectangular, preset shapes and irregular shapes. You will also learn how to add selections to new images to make composites.
Thanks for watching! We hope you found this tutorial helpful and we would love to hear your feedback in the Comments section at the bottom of the page. You will find a written version of this tutorial below, and a printable PDF copy to download on the Download Resources tab above.
Download your FREE 30-day trial and make every shot your best shot with PaintShop Pro 2023, your all-in-one photo editing and design software.
Download these free resources:
Written tutorial and Sample Images (ZIP, 6.72 MB)
PaintShop Pro resources
Keyboard shortcuts (PDF, 173 KB)
PaintShop Pro User Guide (PDF, 25.4 MB)
What’s New in PaintShop Pro
PaintShop Pro Tools
Working with Selections
Featured products
 PaintShop Pro 2023 Ultimate
 AI HDR Studio 3.0
 PaintShop Pro 2023
 Vision FX
Introduction to PaintShop Pro’s Selection Tools
In this introductory tutorial you’ll learn the basics of using PaintShop Pro’s Selection tools to create regular and irregular shaped selections.
Click on any of the images below to view full-size.
Setting up your Workspace
- Open PaintShop Pro in the Edit workspace.
- If the Layers palette is not already open, go to View > Palettes and click on Layers. You can also open the Layers palette by pressing F8 on your keyboard.
- Click on the Window menu and ensure Tabbed Documents has a checkmark beside it.
- Open the 3 sample images provided: Sunset, Calm Lake and Salt Flats.
Now let’s get our images ready. We are going to demonstrate using the Selection tools to combine different backgrounds and foregrounds of these 3 images, so we need to have them all in one layered image file.
Starting with the Sunset image, activate the Pan tool (hand icon). Right-click on the sunset image and select Copy. Now move to the Calm Lake image, right-click on it and select Paste > Paste as New Layer.
NOTE: to copy and paste, you can use Edit > Copy and Edit > Paste as New Layer with any tool activated, or you can use keyboard commands Ctrl + C to copy and Ctrl + V to paste.
Since the sunset image is much smaller than the lake image, activate the Pick tool (arrow icon) and drag out one of the corner handles to increase the size of the sunset image so it is as large as the lake image.

Repeat these steps to copy and paste the Salt Flats image as a new layer on the lake image.
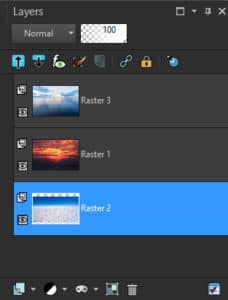
In the Layers palette, right-click on the Background layer (lake image) and select Promote Background Layer. You will see that the layer name is now Raster 3. Click on Raster 1 layer (sunset image) and drag it below Raster 3 layer. Do the same with Raster 2 layer (salt flats image). Now the lake image is visible on top. This is what your Layers palette should look like.
We are going to use these 3 photos to demonstrate how you can use the Selection tool to select part of one image and delete it to reveal part of the image below. Using this technique will allow you to create a composite image using the sky of one photo and the bottom of another photo.
Making a Rectangular Selection
The Selection tools group is the 3rd icon on the left-hand Tools toolbar. Click on the dropdown arrow and you will see there are 5 selection tools that you can choose from. We will start with the main Selection tool, which is represented by the dotted line rectangle. You can also activate this tool by pressing S on your keyboard.

Once you activate the tool, you will see the Property bar along the top, which has options for Selection type, Mode, Feather, etc. In the Property bar, use the following settings:
- Selection type: Rectangle
- Mode: Replace
- Feather: 0
- Anti-alias: checked
- Selection style: Normal
- Width: 1
- Height: 1
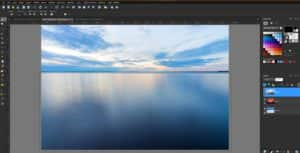
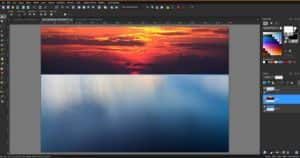
Click on the lake image in the Layers palette to make it the active layer. Activate the Selection tool and drag a marquee (dotted line, also referred to as “marching ants”) to encompass the entire lower water area, but just slightly shorter than the horizon. It can be difficult with some photos to get your selection area to line up exactly with an element such as a horizon, so in the next step we’ll show you how to get it perfect.
TIP: You can drag the selection marquee beyond the side and bottom outer edges of your image and the marquee will automatically shrink to fit the edge of the photo.
Modifying a Selection
To match up our top selection line exactly with the horizon, go to Selections > Modify > Expand.
TIP: for ease of viewing, you can make the Expand Selection window larger by grabbing any corner and dragging it out.
Because our lake image is quite large, we will need to adjust the Zoom to 50 to zoom out. Now drag the image in the Before or After window down until you can see the top of your selection.
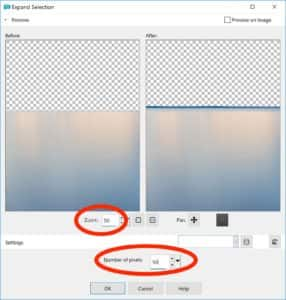
In the Number of pixels field, use the arrows or type in a number to expand your selection area until it matches exactly with the horizon line, then click OK.
NOTE: You may notice that the right, bottom and left selection edges have also expanded slight beyond the image. That’s ok. Since there’s nothing there to “select”, it won’t affect anything going forward.
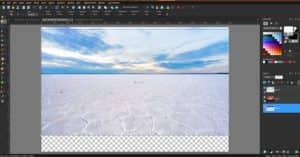
Press the Delete key on your keyboard. The lake portion of the image will disappear, and you will see the sunset image now. In the Layers palette, click on the Eye icon beside the sunset image layer to hide it. Now the salt flats image will be visible.
At this point, if you want to create a composite using the bottom of the salt flats image and the sky of the lake image, press Ctrl + D to remove the selection marquee (you can also do this by going to Selections > Select None).
Click on the salt flats layer in the Layers palette to make it the active layer. Activate the Pick tool and use it to reposition the salt flats image to line up with the horizon. Now you can crop and resize your composite image to your liking.
But let’s say you want to make a different composite using the bottom of the lake image and the sky from the sunset image.
Click the Undo icon (or Ctrl + Z) a few times to return to the point where your selection marque appears on the lake image, and the bottom portion of the lake has not been deleted.
Click the Eye icon beside the sunset image layer in the Layers palette to show the sunset image.
Click on the lake image layer in the Layers palette to make this the active layer.
Your selection marquee should still be visible; click on Selections > Invert. Now the selection marquee is around the sky of the lake image. Press Delete to remove it.
Press Ctrl + D to get rid of the selection marquee. Activate the sunset layer and then activate the Pick tool. As before, you can now reposition the sunset image so that the horizon is lined up with the lake image.
The lighting difference is rather harsh between the two images, but you get the idea. You can use this process to combine different parts of multiple images to create some really unique composites!
Making a Shape Selection
Let’s return to the original lake image. You can do this by using Undo (Ctrl + Z) or simply by closing the lake image without saving and reopening it.
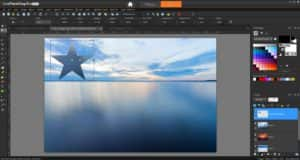
Activate the Selection tool. In the Property bar, you will see that the Selection type is set to Rectangular, as we used in the previous section. Click on the dropdown arrow and select a shape, such as Star 1.
Click and drag the selection marquee to create the star shape wherever you want on the image.
- If you want to cut out the selection from your image, press the Delete key.
- If you want to move the selection to a different area on your image, activate the Pick tool and use it to drag the selection to where you want it.
- If you want to use the selection on a different image, go to Edit > Copy. Open the new image and go to Edit > Paste as New Layer to paste the selection.
Making Irregular Selections
Close the 3 sample images we have been working with and open the Blocks sample image.
Here we have a shape that’s not rectangular, nor does it fall into any of the shapes in the drop-down list we just used. There are two ways we can tackle this. The first is using the Point-to-Point selection option in the Freehand Selection tool.
- From the Selection tools group, activate the Freehand Selection tool, represented by a lasso icon. It’s located directly under the Rectangular Selection tool.
- In the Property bar set the Selection type to Point to point.

Start at the corner of any of the blocks. Click once to start the selection, move your cursor to the next corner and click again. This creates the first line of your selection area. Continue to move the cursor to each corner and click, creating a series of straight lines around the blocks. As you are creating the last line that will join up with the starting point, double-click and this will create the selection area.

NOTE: If you make a mistake part way through, just press the Esc key. If you have already completed your selection, press Ctrl + D to remove the selection marquee and start over.
Once your selection is complete:
- If you want to cut out the selection from your image, press the Delete key.
- If you want to move the selection to a different area on your image, activate the Pick tool and use it to drag the selection to where you want it.
- If you want to use the selection on a different image, copy and paste it as a new layer.
- If you want to remove the background but keep the object or area you selected, go to Selections > Invert and then press the Delete key.
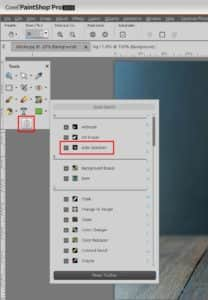
Using the Auto Selection Tool
The Auto Selection tool can be a quicker alterative to using the Point to Point method. It will create a rectangular selection area that automatically snaps to the edges it detects.
- Press Ctrl + D to remove the point to point selection you just made.
- Select the Auto Selection tool, represented by the dotted line rectangle with an arrow inside it.
NOTE: if you are working in the Essentials workspace in PaintShop Pro, your Tools toolbar may not include the Auto Selection tool. To fix this, click on the plus sign at the bottom, choose the Auto Selection tool from the list, and it will be added to the toolbar.
Drag the selection marquee to make a tight selection around the stack of blocks. You will see that the marquee snaps into place to automatically create the selection.

You can now use this as with the other types of selections we covered: delete it, move it, copy and paste to a new image, or invert the selection to delete the background.
When working with selected objects or areas that closely match the background, you may find some extra bits added to your auto selection area. Once you have moved or copied and pasted your selection, you can use the Eraser tool or one of the Selection tools to get rid of any unwanted areas.

Download your FREE 30-day trial and make every shot your best shot with PaintShop Pro 2023, your all-in-one photo editing and design software.

Reader Interactions