
You’ve probably heard the term depth of field before, but depending on how familiar you are with photography you may not know exactly what it means. So what is depth of field? The quick definition is that depth of field determines how much of the field of view is in focus. This is helpful for ensuring that your subject is properly focused while blurring the background. A short depth of field places emphasis on an object by blurring the background and foreground, great for portraits and artistic shots. A long depth of field brings the foreground and background into focus; great for landscapes with multiple focuses. Watch along with photographer Robert Patterson and try out what you learn with your own camera!
Thanks for watching! We hope you found this tutorial helpful and we would love to hear your feedback in the Comments section at the bottom of the page. You will find a written version of this tutorial below, and a printable PDF copy to download on the Download Resources tab above.
Written Tutorial (PDF, 327 KB)
Download your FREE 30-day trial and make every shot your best shot with PaintShop Pro 2023, your all-in-one photo editing and design software.
Photography Composition Tutorials
 PaintShop Pro 2023 Ultimate
 Vision FX
 PaintShop Pro 2023
 AfterShot Pro 3
While arguably not necessarily an element of composition, Depth of Field has such a great effect on every other compositional element that it should be well understood. Depth of Field is the range of optical focus in a photo. By using certain controls it is possible to have just about everything in your image, foreground and background, in focus or conversely to have only a small region in focus.
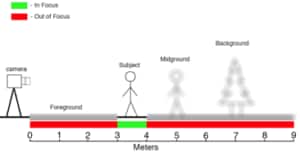
The diagrams below explain Depth of Field. In the first, a large depth of field is used. In this situation everything is in focus from 1 meter to 8 meters. In the second only everything between 3 and 4 meters is in focus.
Large Depth of Field

Shallow Depth of Field
The visual impact of this is quite striking, it makes the difference between a plain old picture of someone and a beautiful portrait shot. It’s also very useful if you don’t have an interesting or pretty background to place your subject in front of. By creating a very soft (out of focus) background, an otherwise ugly collection of lines or shapes can become a soft abstract image that puts emphasis on the sharply focused subject.
This also helps to create depth between subject and background. A good example of this can be seen on National or International Newscasts. When a reporter does a stand-up or a sign off you will often see them talking to the camera with a beautiful out of focus street behind them with street and traffic lights becoming an almost abstract image.
Controlling Depth of Field
Initially this can be tricky but with practice it becomes second nature. The control of Depth of Field relies on using a combination of aperture, focal length, focus and the distance between the camera and the subject and the subject to the background.
If you’re not familiar with the basic components and operation of an SLR camera now would be a good time to check out the Camera and Lenses sections of the Equipment Module.
The Rules:
– The wider the lens the larger the depth of field (more in focus)
– The longer the lens the more shallow the Depth of Field (less in focus)
– The smaller the aperture (larger f-stop number), the larger the depth of field (more in focus
– The larger the aperture (smaller f-stop number), the more shallow the depth of field (less in focus)
The Steps
Shallow Depth of field
- Select a long lens. The longer the better but it will depend on the shot you’re trying to take as well as how much space you have.
- Put as much distance as you can between the camera and the subject. This will depend on the framing you wish to use and any obstacles that may get in your way.
- Put as much distance as possible between the subject and the background.
- Select the widest aperture you can (smallest f-stop number). This will affect your exposure so you will have to adjust your shutter speed accordingly. Remember though that too slow a shutter speed and you risk blur from any movement of the camera and any movement in the image. Generally no less than a 60th of a second but preferably faster, especially with long lenses. A tripod is recommended. On very bright days it may be difficult to get a very wide aperture without overexposing. To overcome this issue use the smallest ISO number you can. If this still isn’t enough a Neutral Density Filter will help reduce the amount of light getting into the lens and thus allow you to open the aperture more.
- Focus on your subject and push the button.
Large Depth of Field
Note: This is not as difficult as a shallow Depth of field. It’s usually what happens by default. Also: use an Aperture Priority setting on your camera to simplify this process.
- Select a normal to wide lens.
- The distance to the subject and subject to background isn’t as critical here but generally the closer everything is to each other the more in focus everything will be.
- Select a smaller aperture and adjust shutter speed accordingly.
- Focus on the subject and press the button.
An Exercise:
(note: A similar exercise can be done with Focal Length)
- Set up a shot on a tripod. With a subject in the foreground and a background with a fair amount of detail in it.
- Set your camera to Aperture Priority. This will allow you to adjust your Aperture without having to compensate exposure with your shutter speed.
- Take a series of the same shot starting at f-22 or the smallest available on your camera. With each shot decrease your f-stop number by one increment. Take as many shots as there are f-stop numbers on your camera.
- Look at your photos and compare each shots depth of field. Use the meta data for each image to get a sense of how f-stop values effect Depth of field.
Try taking a series of shots with a zoom lens. With each shot back away from your subject but zoom in to achieve the same composition. Try to maintain the same exposure if possible.

Four shots from the above mentioned exercise show how depth of field increases as aperture value increases (as the aperture gets smaller).

Here the soft background places emphasis on the subject.

Here the shallow depth of field creates an abstract colorful background.

Depth is created here as the tulips gradually go out of focus with the people in the background.

In this photo with a large depth of field, the background becomes a confusing mess that takes away from the subject.

A shallow depth of field, eliminates this problem by blurring the lines, emphasizing the subject.
Download your FREE 30-day trial and make every shot your best shot with PaintShop Pro 2023, your all-in-one photo editing and design software.

Reader Interactions