
Have you ever been out shooting landscapes and come home to find your photos look like they were taken by a tourist instead of an aspiring Ansel Adams? It’s OK… you’re not alone.
As simple as it seems, capturing a breathtaking landscape through your lens actually involves a lot more than just pointing the camera towards the horizon and clicking the shutter.
Shooting a stunning scene requires three main things—a well thought out plan, careful composition, and skillful post-processing.
AfterShot Pro can help with the post-processing, so you get an amazing landscape photo with a just few clicks. But before we start working on any photos, let’s take a quick look at a few things to consider that can help you get the landscape shots you’re looking for, before you ever click the shutter (or just go ahead and jump down to my workflow tips).
Gear to Consider for Landscapes
I’m a big believer of the saying “It’s the photographer who makes the photo, not their gear,” so I think all you really need to get started with landscape photography is your camera!
That said, if landscapes are your passion (or you think they will be in the near future), there are certain cameras, lenses and gear that will just be inherently better for the job. When you’re ready to take your landscape photos to the next level, here are three things you’ll want to consider keeping in your bag:
- A good solid tripod (this is a must, read on to find out why)
- Super-high megapixel camera (if you want to print your photos)
- Prime lenses (wide angle or telephoto)

A Tripod…
The first thing you need to know is a tripod is not an option.
If you’re serious about shooting landscapes, you’ll need to shoot before sunrise and at sunset, when the light is the most interesting but also when it’s at its lowest intensity.
To capture the right amount of light, you’ll have to rely on long shutter speeds and using a tripod will help you fight off those blurry images. There are three things to ask when buying a tripod:
- Is it affordable?
- Is it sturdy?
- Is it lightweight?
Unfortunately, tripod makers have made it pretty hard to answer yes to all three of these criteria. In almost all cases, a sturdy and lightweight tripod will be expensive. And an affordable, sturdy tripod? You guessed it… heavy.
One tip I can offer is that it’s better to buy one good tripod that will last a long time. All too often, I hear of beginners who’ve bought a cheap tripod only to realize it doesn’t fit their needs, so they upgrade and the old one gets trashed. Take your time, do a bit of research, and find a tripod that’s right for you.
Your Camera…
The second thing to think about is which camera you’ll be taking with you.
If you’re shooting for the web and sharing on social media, or don’t think you’ll be printing your photos at large sizes, then most any digital camera will do.
But if you’re considering for ultra-sharp large prints of your work, you’ll find a lot of landscape photographers prefer to use super-high megapixel cameras like the Nikon D800 or the Canon 5DS.
And Lenses.
The nice thing about shooting landscapes is just about any lens will do the trick.
You can use anything from an ultra-wide angle to a telephoto or even a super telephoto lens and you’ll still get a great landscape shot. The focal length really depends on the shooting situation.
An ideal landscape lens will fall somewhere in the f/8 and f/16 range. This is the range most of your shots will be captured in, ensuring a maximum depth of field. There are some great zoom lenses in the 14-24mm and 70-200mm range that give you great sharp images but, more often than not, prime lenses are where it’s at for landscapes.
It’s a common misconception that all landscape images are, or should be, taken using a very wide-angle lens. The problem with wide-angle is they introduce distortion, which can be distracting and often displeasing in a landscape shot.
Notice some barrel distortion? Don’t worry, AfterShot Pro’s got you covered in post.
Composing Your Shot
More has probably been written about composition than any other area of photography imaginable.
There are endless “rules”… like the rule of thirds, using leading lines, avoiding center composition, and the list goes on and on and on. Some of the rules work some of the time but, most often, I like to treat them as guidelines or advice that might apply in a particular situation.
Truth is, every photographer will produce a different composition of the same scene. Some might work better than others but it’s all subjective anyway. So go ahead—experiment and shoot what you think looks best.
Things to avoid? If you’re shooting with a shallow depth of field, don’t have a large out of focus subject in the foreground. And try to resist the urge to tilt your camera… an off-kilter horizon never looks good.
My Quick Landscape Workflow in AfterShot Pro
After a day of shooting landscapes, the only thing left to do is give your photos a tweak in AfterShot Pro to make them really pop and stand out. There are all kinds of things you can do to adjust and perfect your landscape photos, but today I’m going to go over a few basics that will really help your shots shine.
To start, let’s take a look at a sunset shot I took on the street in Prague. It was one of those moments that combines the beauty of nature and the city.
I wish I could say I’d planned this shot, carefully waiting for sunset while standing in the same location, but—truth be told—I just happened to be in the right place at the right time.

When I look at this photo straight out of the camera, I can see that the buildings need some tweaking. Right now, you can see a little bit of detail but not quite enough.
The buildings should either be pure silhouettes, or they need to have some more detail brought out of the shadows. In this situation I’m going to punch up the detail by bringing up the Fill Light slider, in this case to 1.85.

Next, I want to bring out the colors a bit, so I adjusted the Vibrance slider.
I chose Vibrance instead of Saturation because I think its effects are a little more subtle, making it look more natural. I also adjust the Blacks, Contrast, Exposure, and Temp sliders until I see a result I’m happy with.

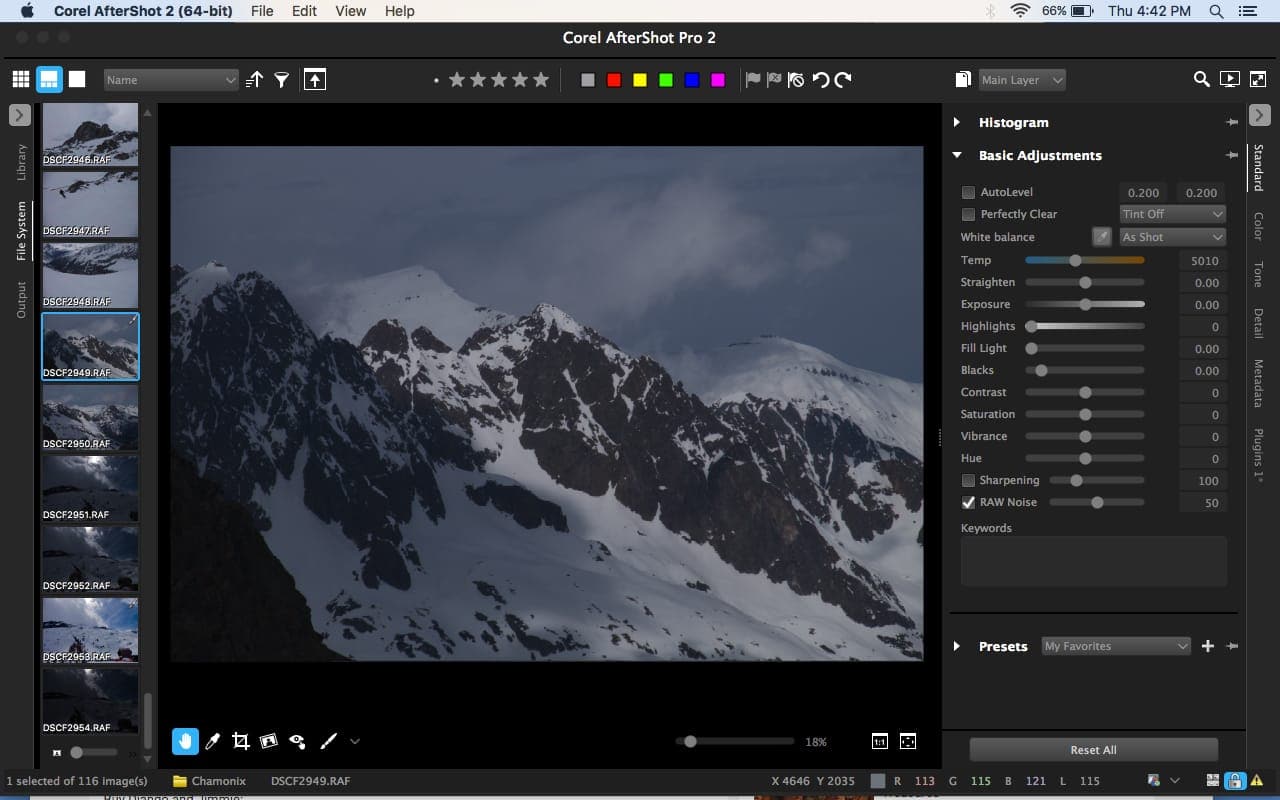
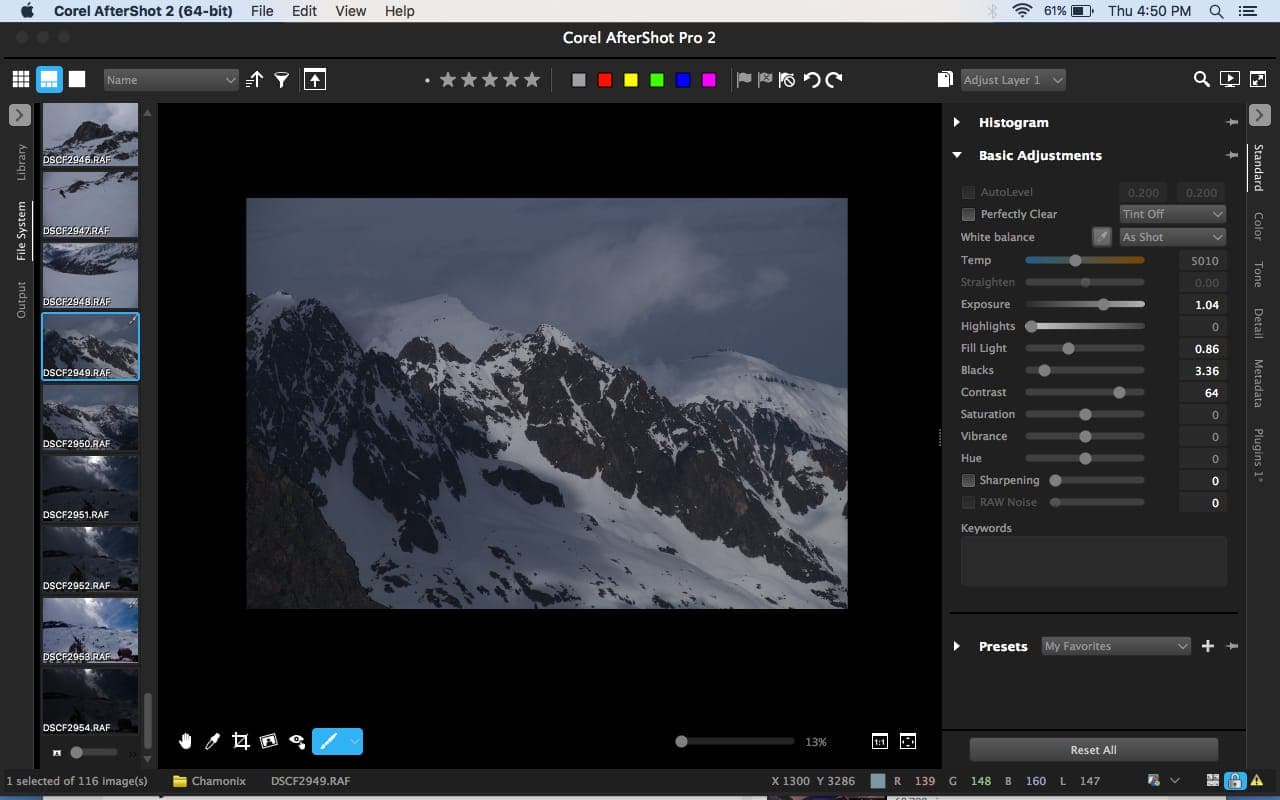
For the next example, I’m going to use an Adjust Layer on this landscape shot I took last week in the French Alps.
The rock in the foreground is way underexposed, so I’m going to use the adjust brush to bring that up a bit.
Next, I go back to the main layer and adjust the Contrast, Exposure, Fill Light, Saturation, and Vibrance until I get an overall image that is pleasing to my eye.
And there you have it! A quick and simple workflow to adjust and perfect your landscape photos in AfterShot Pro! You can take a look at my final post-processed image below.
With these tips, you should now be able to get out there to capture some breathtaking landscape images—so get out there, start shooting and share your favorite landscape images with us in our photo gallery. We can’t wait to see them!
Try AfterShot Pro today! Download the free 30-day trial and discover the faster way of working with your photos.


0 Comments