
In this tutorial, we’ll look at some of the fun effects you can apply to text in CorelDRAW. First we’ll use the tools in the Interactive Effects toolbox such as Contour, Distort and Envelope. Then we’ll take a look at some of the effects you can create with tools in the Shape toolbox.
Thanks for watching! You will find a written version of this tutorial below, and a printable PDF copy to download on the Download resources tab above.
In this tutorial, we’ll look at some of the fun effects you can apply to text in CorelDRAW. First we’ll use the tools in the Interactive Effects toolbox such as Contour, Distort and Envelope. Then we’ll take a look at some of the effects you can create with tools in the Shape toolbox.
Thanks for watching! We hope you found this tutorial helpful and we would love to hear your feedback in the Comments section below. You will find a written version of this tutorial below, and a printable PDF copy to download on the Download Resources tab above.
Start your FREE 15-day trial and embark on a design journey with powerful tools for vector illustration, layout, photo editing, typography, and collaboration.
Download these free resources:
Written tutorial for Windows (PDF, 1.3 MB)
Written tutorial for Mac (PDF, 1.3 MB)
CorelDRAW Graphics Suite Resources
Quick Start Guide (PDF, 2 MB)
Keyboard Shortcuts (PDF, 3.5 MB)
CorelDRAW and Corel PHOTO-PAINT user guides
For CorelDRAW Graphics Suite subscription and perpetual licenses (2018 to 2024), languages include English, Português do brasil, 简体中文, 繁體中文, Čeština, Deutsch, Español, Français, Italiano, 日本語, Polski, Русский
Working with text
What’s new in CorelDRAW Graphics Suite
CorelDRAW tools
 CorelDRAW Graphics Suite
 Ultimate Vector Bundle Vol. 1
 CorelDRAW Standard 2021
 Ultimate Vector Bundle Vol. 2
 Corel Vector
Adding effects to text
In this tutorial, we’ll look at some of the fun effects you can apply to text in CorelDRAW. First, we’ll use the tools in the Interactive Effects toolbox, then we’ll use some of the tools in the Shape toolbox.
Click on any of the images below to view full-size.
2D effects: Contour, Blend, Envelope
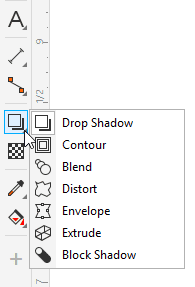
We’ll start with 2D effects that can be found in the Effects flyout on the Toolbox toolbar. With all these tools, I can either start with the object selected, or I can select the object within the tool.
The examples in this tutorial will start with this artistic text selected.

Contour
Choose Contour from the toolbox. All the effects tools have a few presets, as well as options that appear in the Property Bar when the tool is activated.

You can also check the Status Bar to see the Selected Tool information. For example, when the Contour tool is activated, this is what you will see in the Status Bar.

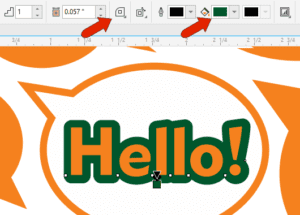
With the Contour tool, you can click and drag inward to offset each character inward or click and drag outward. Dragging the black square increases the offset, and the outlines are trimmed at the overlaps. There are options for rounding corners and setting fill color.
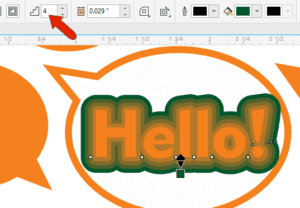
This is what happens when we increase the number of contour steps and reduce the offset.
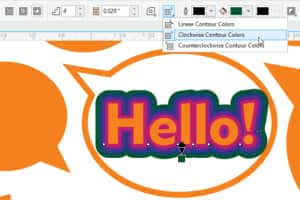
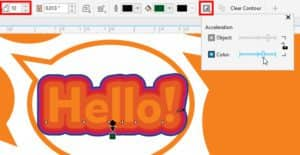
The Contour colors dropdown provides options for how the colors proceed from the object color to the contour fill at the outer edge.
A high number of steps creates a nice gradient effect, and the Object and color acceleration icon allows you to control the level of acceleration from start to finish.
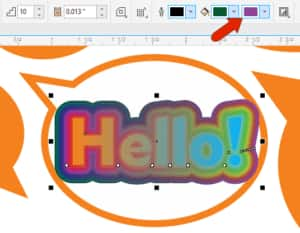
If the text has a non-solid fill, such as a fountain fill, the contour colors can also change within their steps. And you can set a second fill color.
In the Objects docker (Window > Dockers > Objects), note that Contour is an effect applied to the text.

You can use Ctrl + K to break apart the contour, and move the contour group away, preserving the original text.

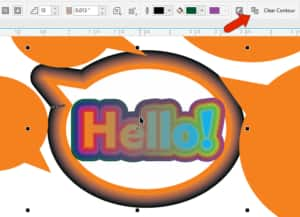
Also note that these effects can be applied to any objects, not just artistic text. For example, you can click and drag the bubble to apply the same contour.
Or with the bubble selected and the Contour tool activated, you can click the Copy contour properties icon and choose the text contour to copy and apply.
This effect cannot be applied to paragraph text, however. For this effect, and the others in this toolbox, you would have to convert paragraph text to artistic.
Blend
Blend creates a progression from one object to another. Copy the text object and change its color.

Activate the Blend tool and drag from one object to the other.

In this example, the blue text is on top, but you can change the order in the Objects docker.
By default, there are 20 steps between the two objects, but you can change this. You can also change progression to the color spectrum and adjust acceleration.

If you move one of the two text objects, the blend adjusts. You can even change the font and size.

This blend can also be broken apart and ungrouped, to allow for additional modifications.
Distort
There are three types of distortion: Push and Pull, Zipper and Twister.
Push and Pull pulls out all the surrounding edges of each object. You can drag the diamond to center the effect or click the Center distortion icon. You can drag the square to change the amplitude.
To remove the effect, click Clear Distortion on the Property Bar.
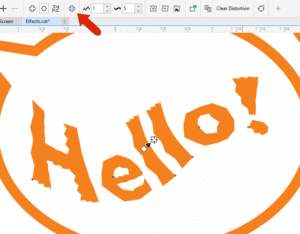
The Zipper distortion adds a saw-tooth effect. You can adjust amplitude or frequency, or randomize, smooth or localize, which reduces the effect the farther you go from the center.

The Twister distortion produces a swirl effect, and you can drag the center point of the swirl or change the rotation.

You can use the Add new distortion icon to add a new distortion. In this example we applied a zipper effect on top of the twisted text.
Envelope
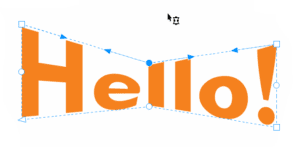
The Envelope tool fits text to the edges of a closed curve. The default mode is Unconstrained, which works like the Shape tool. You can drag nodes to distort the text, double-click to add nodes, make nodes smooth or symmetrical, etc. There are several mapping options which control how the object fits within its envelope, such as original, putty, or vertical, and you can keep straight lines straight.

You can also apply an envelope of straight lines . . .
Or one that has arcs on all sides . . .
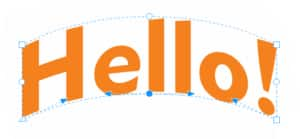
or one that has S-curves.

You can use any curve as an envelope. In this example, an ellipse is used as the envelope. Select the text, then click Create Envelope From.
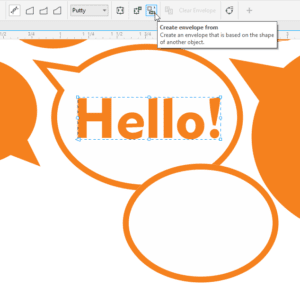
Click the ellipse, and the text adjusts in place to fit.

3D effects: Extrude, Block Shadow and Drop Shadow
The 3D effects in this toolbox are Extrude, Block Shadow and Drop Shadow.
Extrude
Extrude creates the effect of the selected object being pulled up. Click and drag toward the direction of the extrusion and click the color icon. You can use the object color or pick a solid fill or gradient.

You can drag the X to control the direction, and the line to control the length. You can also change the type of extrusion.
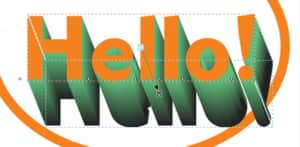
You can also add a bevel or add lighting effects. The vanishing point is locked to the object by default, but you can change this. Add an extrude to another object and copy the extrude properties from the text. You can also copy the text’s vanishing point.

Block Shadow
This tool adds solid shadows to objects. Click the text to select it, then drag to where you want the shadow. As with the other effects, you can drag the arrow to change length and direction. You can also change the shadow color.

Break apart the text and shadow and move the shadow out to see how it looks – it’s one solid curve.

Create a new block shadow and click the Simplify option. Now when you break apart and move the shadow to the side, you can see the difference – the simplified one (green) was trimmed where it met the text characters.

For another shadow example, start with text that has an outline color and thickness. When you add a block shadow, by default it includes the outlines.

But you can disable Generate From Object Outline to keep the outlines out of the shadows.

Drop Shadow
With this tool, you can click and drag to create a shadow from a specific edge – the left edge in this example.

The shadow start point can be along any edge of the text, and you can move this by dragging the white square. The black square sets angle and distance, and the white line controls opacity. The feathering controls the sharpness of the shadow edges, and there are several feathering options.

Shadow color can be set as well, and the long list of merge modes controls how the shadows blend with underlying objects.
As with other effects, you can copy drop shadows.

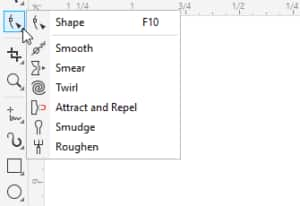
Tools in the Shape toolbox
There are also lots of effects you can apply to text after the text has been converted to curves. In addition to the node editing you can do with the Shape tool, you also have all the other tools in the Shape toolbox, such as Smooth, Smear, Twirl, Attract and Repel, Smudge and Roughen.
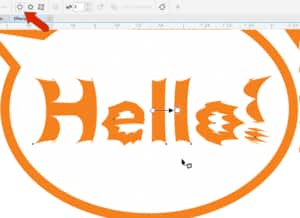
For example, you can Smear text by dragging, and you can press and hold the Shift key to change the nib size.

Twirl is another fun effect, and dragging a tiny distance goes a long way.

Or you can roughen up the edges, then use Smooth to fix them.

These are just some of the ways you can add effects to text. Now that you are familiar with these tools, experiment by adding and combining effects on your text.
Start your FREE 15-day trial and embark on a design journey with powerful tools for vector illustration, layout, photo editing, typography, and collaboration.
