
In this tutorial we’ll look at 2 techniques to colorize black and white photos in PaintShop Pro. Black and white images certainly have their charm. But it’s easy, and rather fun, to breathe new life into these images by adding some color. The first technique uses the Paint Brush tool to paint color over different parts of your photos using a layer blend mode of Color (Legacy), which allows textures and shadows from the original image to show through. The second technique also uses the Paint Brush tool, but in combination with the Freehand Selection tool to fill an area with a solid color, then adjust the layer opacity and Hue/Saturation/Lightness values to get exactly the color you want.
Thanks for watching! We hope you found this tutorial helpful and we would love to hear your feedback in the Comments section at the bottom of the page. You will find a written version of this tutorial below, and a printable PDF copy to download on the Download Resources tab above.
Download your FREE 30-day trial and make every shot your best shot with PaintShop Pro 2023, your all-in-one photo editing and design software.
Download these free resources:
Written Tutorial and Sample Images (Zip, 2 MB)
PaintShop Pro resources
Keyboard shortcuts (PDF, 173 KB)
PaintShop Pro User Guide (PDF, 25.4 MB)
What’s New in PaintShop Pro
Photo Restoration
Corrections and Enhancements
Featured products
 PaintShop Pro 2023 Ultimate
 AI HDR Studio 3.0
 PaintShop Pro 2023
 Vision FX
How to Colorize Black and White Photos with PaintShop Pro
In this tutorial, we’ll look at several tools and techniques you can use in PaintShop Pro to add color to black and white images. We’ll use layers to control the intensity and blend of new colors and explore painting manually as well as painting inside selected areas.
Open PaintShop Pro and open the Edit workspace.

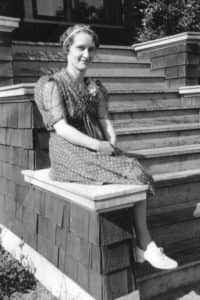
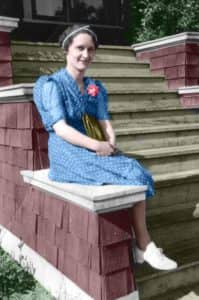
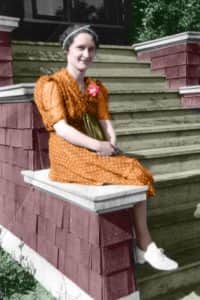
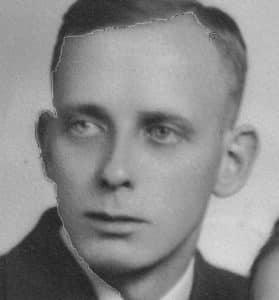
This is the image we’ll use for the first example. Use File > Open to bring this image into the Edit workspace.
The first step with black and white images is to made sure that the color depth is at least RGB 16-bits. This can be done by going to Image > Increase Color Depth > RBG 16-bits/channel. Whereas RGB 8-bit supports 256 colors, 16-bit supports 16.7 million.
This is also why, when scanning black and white images, you should always choose to scan in full color.
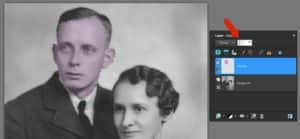
For this tutorial, you’ll need to have both the Layers and Materials palettes displayed. This can be done in the Palettes menu, or by pressing the F6 and F8 keys.
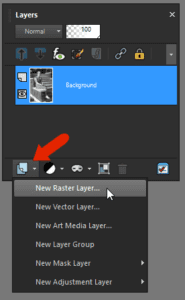
In the Layers palette, click the New Layer icon and create a new raster layer.
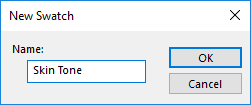
This layer will contain the colorizing effects for face and arms, so name this layer “Skin Tone.” Set its blend mode to Color (Legacy). This means that the textures and shadows from the original image will show through, and the applied color will be partially translucent.
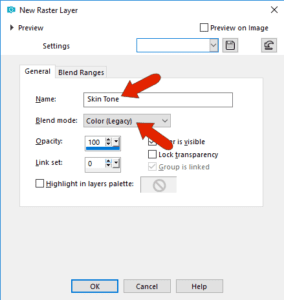
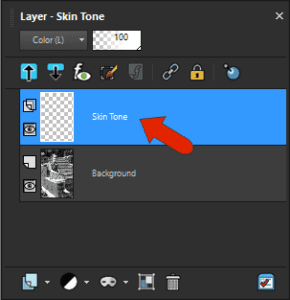
Click OK to create this layer, and the layer should now be active.
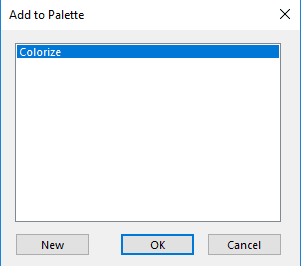
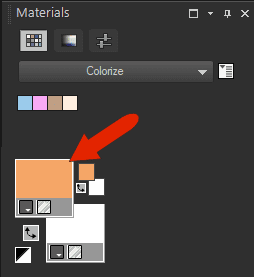
To choose a skin tone color, click the foreground swatch in the Materials palette. Once you have the color you like, click Add to Palette. This is because we’ll need to come back for this color later, when painting over the arms.

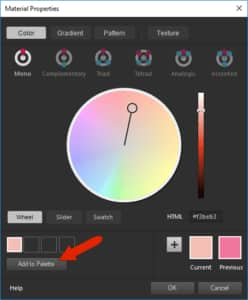
Choose a palette you’ve already created, or create a new palette for this project. Assign the color a name, and click OK.
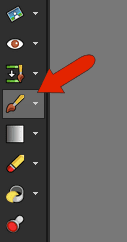
To start applying this color, activate the Paint Brush tool.
Before starting, you can adust the brush size by pressing the Alt key while dragging the mouse, or by entering a number in the Size setting in the property bar. Use a brush hardness of around 50, so that the color will be feathered, or faded, toward the edges of the brush. Zoom in closely, and use a small brush size to paint around the outside of the face, being careful to stay within the edges.
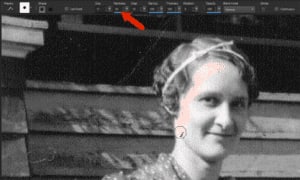
Fill in the rest of the face and neck, reducing the brush size for smaller areas.
For the dress, add a new layer that also uses the Color (Legacy) blend mode. All layers you add for this image should use this blend mode.
Choose your dress color, and while still using Paint Brush, increase the brush hardness a bit. Use a small brush size to trace around the edges. For large areas like this, it’s best to paint using a series of many short strokes, rather than a few long strokes. This is because you’ll probably find yourself needing to undo sometimes. And it’s better to undo a little at a time, than a lot at once.
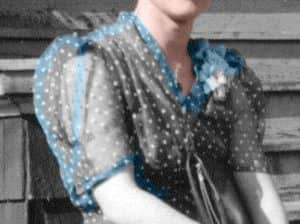
When the border tracing is complete, you can increase the brush size to fill in the rest. You can paint right over the flower and purse.
For the flower, zoom in very closely and choose a pink color. With a very small brush size, paint over the flower.
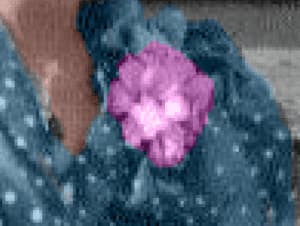
Do the same to paint the purse a brown or gray color.

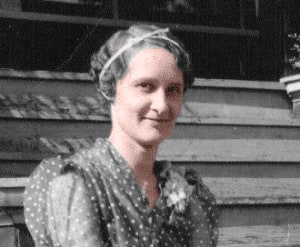
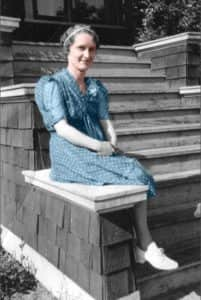
Continue adding layers and paint for the various parts of this image: house walls, steps, greenery, lips, eyes, hair. For the arms, you can make the Skin Tone layer active again, and use the Skin Tone color you added to the palette.
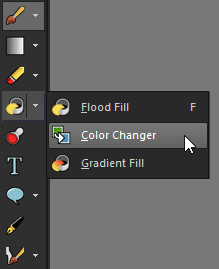
One advantage of keeping colorizing effects in separate layers is that you can go back and adjust one specific part. For example, to change the dress from blue to orange, make the dress layer active and choose the color you want to use. Then activate the Color Changer tool.
Click any part of the blue dress, and all blue changes to orange. The flower and purse remain untouched, since they weren’t blue.
TIP: when saving colorized images, use File > Save As and save in .pspimage format. This will preserve your layers, making it easy to make color adjustments later. Saving in other formats, such as JPG, will merge all layers into a single layer.
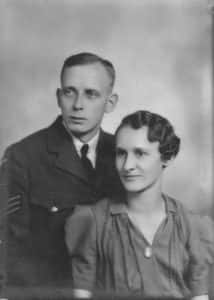
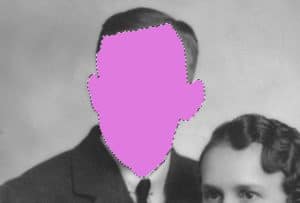
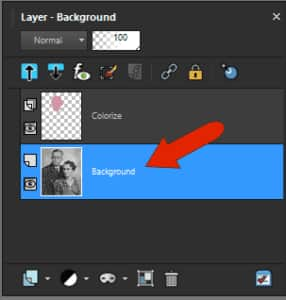
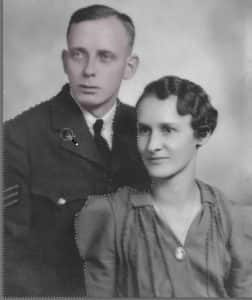
For the second technique, we’ll use this wedding photo.
Be sure to increase color depth, and add a layer for colorizing. The blend mode for this layer can be Normal. (You can colorize each part of the image in its own layer as in the previous example, or just place all colorizing effects on a single layer. )
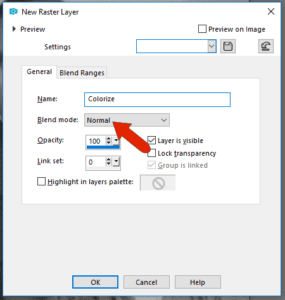
Make sure the new Colorize layer is active.
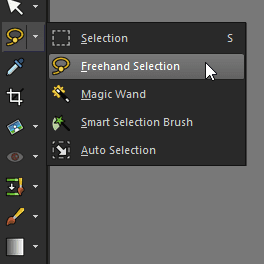
Instead of painting directly onto the canvas, this time we’ll mark off in advance the areas to paint. Activate Freehand Selection from the Selection tools flyout menu.
We’ll start with the groom’s face. Zoom in closely and carefully trace around the area you want to colorize. This is done with one, long dragging operation.
When finished, the area should be surrounded with the moving, “marching ants” border.

Choose any color, and activate the Paint Brush tool. Paint inside the marked area; you can use a large brush since paint will only be applied inside the area that you have marked with the freehand selection tool.
In the Layers palette, reduce the layer opacity so that the groom’s face returns to view.
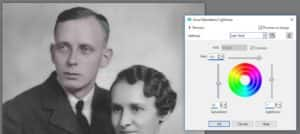
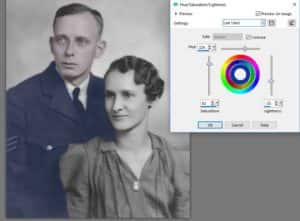
To set the color, go to Adjust > Hue and Saturation > Hue/ Saturation/ Lightness. Check the Colorize box, and adjust all three sliders to get the skin color you want. Click OK.
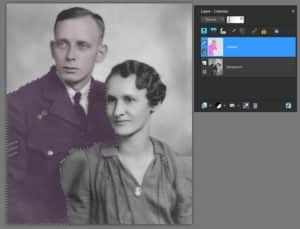
Next we’ll work on the groom’s uniform. This is a large area to trace with Freehand Selection, so we’ll try another tool. First, make the Background layer active again.
Activate the Smart Selection Brush, also found in the Selection tools flyout menu.

In the Property Bar for this tool, set the Mode to Add. This means that anywhere you click, the selected area will be added to what’s already selected. You’ll probably have to adjust the brush size and tolerance values as well, once you start clicking and see what becomes selected.

Click on areas of the dark uniform until the entire jacket is marked off.
Make the new colorizing layer active again, and choose the color you want to apply (again, it can be any color). This time, instead of the Paint Brush, activate the Flood Fill tool.
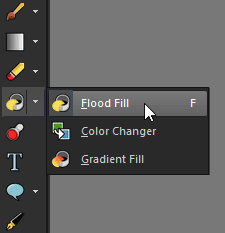
Click anywhere in the uniform, and the entire area is painted.
Again, go to Adjust > Hue and Saturation > Hue/Saturation/ Lightness to adjust the color.
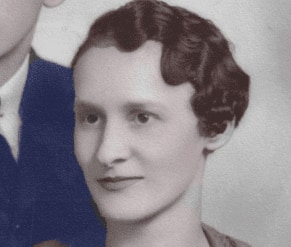
Continue with the same steps for other parts of the image: the bride’s dress and skin, hair and eyes, even the cameo and pocket button. And while adjust the various colors, you can try both with and without Colorize checked. That’s one nice thing about PaintShop Pro: there’s always more than one way to accomplish a task, which is what makes the application so powerful and fun to use.
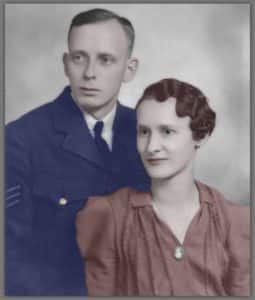
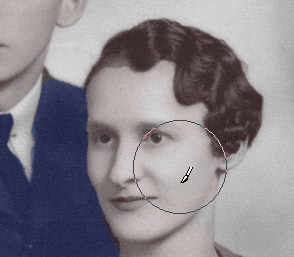
Before saving your new image, add one final touch: a rosy cheek for the new bride. Use the Paint Brush with a low hardness, and a brush size that extends past her cheek. Choose a pink color, and click once to apply the blush.
Download your FREE 30-day trial and make every shot your best shot with PaintShop Pro 2023, your all-in-one photo editing and design software.

Comments (4)
Reader Interactions
Comments
Hi!
Question: I have version Paint Shop Pro 2018 Ultimate, can I colorize b/w photos with this version or must I upgrade???
Pls comment.
BR
Erkki
Hi Erkki,
Yes, you can colorize black and white photos in PaintShop Pro 2018. All of the tools and techniques used in this tutorial are available in PaintShop Pro 2018.
Best regards,
The Discovery Center team
Amazing You still don’t have a “one click option” for coloring BW pictures.
For future updates PLEASE include the ability to perform both Black and White to color and Color to Black and White. That would be a novel thought! One button for each… Heck, in the age of AI this should be a sinch!
I’m sure there are scripts that can perform the following: (Just need to enable all this with the push of a button…) Obviously a Tweak screen should come up as to what tones, what colors, what grades of color, etc. etc. to use because every picture is different…
1) Fix grainy photos
2) Scan for noise and smooth out hairs, cracks, blemishes etc.
3) the usual stuff needed to do this…