
Learn how to create an animated lower third in Pinnacle Studio. In this tutorial you will learn how to create a motion graphic and save it as a project group so you can re-use it again. We’ll also show you how we combine the powers of keyframing, shapes, masks, text, blur effects and more to create this lower third.
Thanks for watching! You will find a written version of this tutorial below, and a printable PDF copy to download on the Download Resources tab above.
Download a FREE 15-day trial and discover all the essential and advanced video editing features that Pinnacle Studio delivers to make your videos look their best.
Download these free resources:
Written tutorial (PDF, 833 KB)
Pinnacle Studio project file (Zip file, 32 KB)
What’s new in Pinnacle Studio 25
Advanced video editing projects
Templates, overlays and graphics
Featured products
 Pinnacle Studio 26 Ultimate
 Studio Backlot Membership
 Pinnacle Studio 26
 Vision FX
Creating an animated lower third
In this tutorial, we’re going to break down exactly how we made this lower third, from start to finish, including keyframing, effects and exporting.

Nearly anything can be animated in Pinnacle Studio, but for this project we used four main elements, or layers.
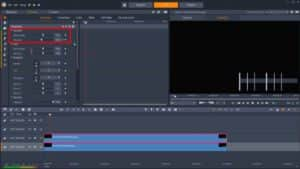
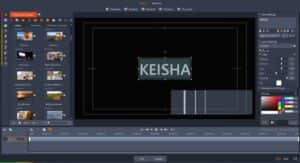
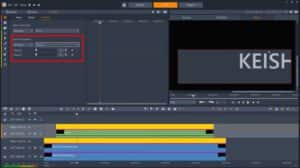
I’ve got two of the layers for this lower third animation on my timeline at the moment – they are both PNGs – the blue box, and these thin lines that will soon become flashes. I made these in Corel PaintShop Pro, and exported them at 1080 by 360 pixels. Now that they’re on my timeline, they’re not quite in the right position, so I’ll change the vertical position of both layers to -31.5. I also want to make sure the layers are as long as I want the total animation to be, so I’ll drag them out to 6 seconds in length.
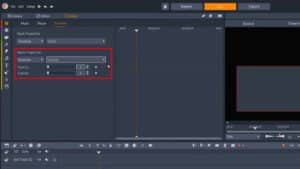
For the start of the animation, I want the box to grow vertically, so I’ll unlink the horizontal and vertical axes, take vertical all the way down to 0, and then set a keyframe. Then I’ll jump ahead twenty frames by pressing Shift + X twice and change vertical back to 100. Now the box grows vertically as I scrub the timeline.
Now I want to animate the movement of these white lines from right to left, as the box behind it is growing. I’ll position the playhead five frames in from the start, select the flashes clip, create a horizontal position keyframe, and push the clip off the right edge of the screen. Jump twenty frames ahead and push the position of the flashes so they are outside the left-hand edge of the blue box, which automatically creates another keyframe.

Then I just have to go back to the start and copy the value for the first keyframe I added, so that the layer starts off screen and doesn’t start moving until 5 frames in.
Now when I scrub the playhead, I’ve got the box growing, and the flashes moving across the box, but I only want the flashes to display when they are inside the box – so I need to make a mask.
Ensure the flashes are selected, and click Mask, and Create Mask – this makes a mask the same length as the clip. I’ll create a Shape mask, and select the Rectangle tool, and draw a rectangle to cover the blue box as perfectly as possible – I can zoom in to make this as accurate as possible. Then go to the mask function, and as I only want the clip to appear on screen when it is inside the mask, I need to put the opacity of the matte – which is everything that is outside the mask – to 0.
Switch to the timeline tab, and as I scrub backwards, the flashes are now contained by the mask, and look like they are just flashing over the surface of the box, but as I go back further, because the box’s vertical size starts to reduce, the flashes extend beyond the boundary of the box. So, I need to create some keyframes on my mask to replicate these parameter changes.
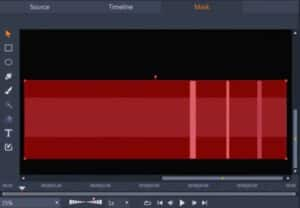
Make sure the mask track is selected and go to Shape. Now I can find the first frame where the box stops growing – which is frame 20 – and I’ll unlink the shape’s size parameters and create a keyframe on the Y axis. Then find the point where the box starts to grow, which is frame 0, and put the shape’s Y axis to 0 as well. Now the mask shape should grow at exactly the same rate as the box below the mask, and the flashes now appear to be constrained by the box below them. There seems to be a bit of a discrepancy here though – as the mask gets smaller, the position doesn’t match the box underneath, so I can just keyframe the vertical height of the shape mask as well – first I’ll keyframe at the end of the box growth, where I have the size keyframe, then go to around frame 5 before the flashes start to enter, and, on the mask tab, move the mask shape so it lines up with the box.
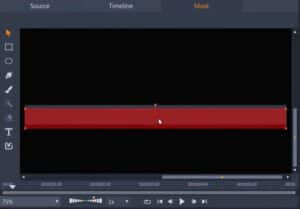
Now when I scrub the playhead the flashes look as if they are completely contained by the box – but they are actually constrained by this mask, which we’ve used to imitate the growth of the box.
Next I want to make these flashes more dynamic, so I’m going to add some blur to them, to simulate motion blur. I just go to Editor > Effects > Camera and select Blur. Because the flashes are moving horizontally, I only want to add horizontal blur – I’ll start it at 10 and drop it down to 0 around frame 20.
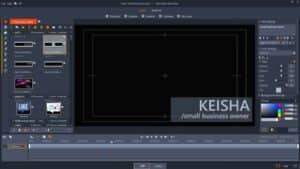
Now I need to add my text layers. I’ll add the first one on the next track up, put in the subject’s name, choose a font, and I’ll make the text the same color as one of the flashes, and then reposition it on top of the text box.
Back on the timeline, I’ll make the text layer end at the same time as my other layers. Then I’ll keyframe the position again, push the layer off the right of the screen, keyframe, and then I’ll jump ahead ten frames, and put horizontal back to 0. Looking good – except I want the text to start to come in a bit sooner, so I’ll just move the whole text layer back 5 frames. Actually, let’s move it back another 5 frames so the text layer starts to enter while the flashes are still on screen.
I need to mask the text, so it doesn’t show outside of the text box, so I’ll create a new mask. And then draw another rectangle. And set the matte opacity to 0 again. Now the text is constrained to the box.
I’ll just add some blur to the text entrance – I’ll keyframe horizontal blur from 20 to 0 during the text movement.
My next layer is to be the subject’s description – and I want this to start 5 frames after the previous text layer, so I’ll select track 1, go to frame 15, and create a new text layer. Input the text, and make it the same font, but slightly smaller and make it the same color. I can then reposition it and make any other adjustments to font size. Then come back to the timeline and make the text layer end at the same point as my other text layer. And I’ll then make the same text entry by keyframing the horizontal position of the text layer.
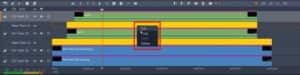
I just need to mask this text layer as well, and as the mask for this is exactly the same as the last mask I created, I can just copy the mask – right-click the mask track on the timeline and Copy, create a new mask track on track 1, and then right-click on the mask track and Paste.
And I’ll add the same blur effect, starting at 20 and going down to 0 after 10 frames.
So now I have the entry for the animation complete – and I just want to reverse the parameters to exit the animation. I’ll start with the text box – it took 20 frames to enter, so I’ll move the playhead to the end of the layers, and Shift + Z twice to jump back 20 frames. Place a vertical size keyframe here, jump back to the end and move vertical size to 0.
Jump back again to 20 frames from the end and select my subtitle layer. The entry for this text layer took 20 frames, so I’ll jump back another 20, and set a horizontal keyframe, then jump forward 20 and slide the text back off screen.
Repeat this for the main text layer but starting another 5 frames earlier to get that staggered effect. And then just repeat the blur for each text layer’s exit.
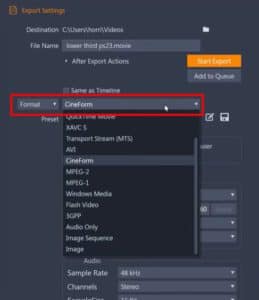
To export this animation with a transparent background to drop into my projects, I just add mark in and out points, then go to Export, and select Cineform MOV – all of the black background will not be exported, just the animation from the layers that I’ve created.
Or if I wanted to have the text updateable, for example I want to use the same animation but replace the name for different subjects in my video, instead of exporting, I could group all of these tracks and save them as a sub-project that I can drag to any timeline in Pinnacle Studio.
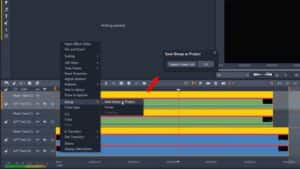
To use, start a new project, drag a clip to the timeline, drag the sub project on top of the clip, and we can then easily change the name to reflect the new subject.
Download a FREE 15-day trial and discover all the essential and advanced video editing features that Pinnacle Studio delivers to make your videos look their best.
