
In this tutorial, you will learn how to create a lower thirds animation that includes a graphic object, text, and motion. You will also learn how to save your own custom motion paths and motion graphics so you can reuse them in future projects. For VideoStudio Ultimate users looking for more advanced options, check out the tutorial on the Boris Title Studio tab to learn how to use the templates and presets included in the Ultimate Effects Collection.
Thanks for watching! You will find a written version of this tutorial below, and a printable PDF copy to download on the Download Resources tab above.
By Vin Morreale
Learn how to create and animate a lower thirds graphic using Boris Title Studio. Start by creating an overlay track to work with and drag the Title Studio effect onto the track. Launch the FX browser to select one of the many presets and templates or create your own. This tutorial will show you how to use the various controls and settings to create spline shapes, position the shapes, change the color, add and adjust text, and finally, add some animation to your lower third graphic.
Download a FREE 30-day trial and turn your best moments and life experiences into unique movies with this easy and fun video editor packed with intuitive tools and creative effects.
Download these free resources:
Written tutorial (PDF, 1 MB)
VideoStudio User Guides and Help files
For VideoStudio X9 to 2023, languages include English, Deutsch, Français, Italiano, Nederlands, 简体中文, 繁體中文, 日本語
What’s new in VideoStudio
Using templates and overlays
Advanced video editing projects
Featured products
 VideoStudio Pro 2023
 Studio Backlot Membership
 VideoStudio Ultimate 2023
 Vision FX
How to create a lower thirds animation
In this tutorial, you’ll learn how to create your own lower third animations for your videos to make your videos more dynamic and engaging!
Click on any of the images below to view full-size.
How to create a basic lower thirds animation
In this first example, we are creating a basic lower thirds animation that consists of a colored background object with a title on top. We’ll start with the background object.
- Start with your video on the Video track on the timeline.
- In the Library panel, click the Media icon and under the Backgrounds category, select Solid Colors.
- Drag your desired color to the Overlay track and adjust the length to the duration you want your lower thirds animation to last for.
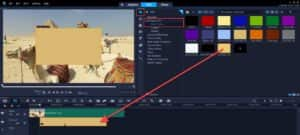
To change the color of the background object:
- Double-click on the object on the timeline to open the Options panel.
- On the Edit tab, click on Color Picker and choose Corel Color Picker.
- In the Color Picker window, you can select the exact color of your choice.
We use the yellow nodes on the preview pane to adjust the size and positioning of the background object, moving it down to the bottom left corner. Now we are ready to add some motion.
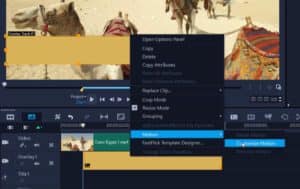
- Right-click on the background object on the timeline and select Motion > Customize Motion.
- This will open the Customize Motion window.
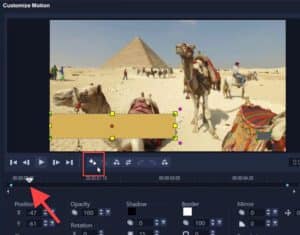
For this lower third animation, we want the animation to fly in from the left and later, to fly out the same way it entered. To do this, we need to add some extra keyframes and create motion paths.
- Drag the playhead about half a second in and click on the Add Keyframe icon. This keyframe represents the point when the object will stop after it has entered from the left.
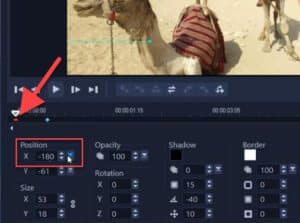
- Now click on the first keyframe and adjust the X Position number until the object disappears off screen.
- Next, drag the playhead to where you want the animation to fly out, about half a second before the final keyframe.
- Click on the Add Keyframe icon.
- Click on the final keyframe and once again, adjust the X Position until the object disappears off screen. With that, we’ve created a motion path for our lower thirds to follow.
How to save a custom path for motion titles
We’re going to save this motion path as a custom path in the media library so we can use it again. As you will see, it is much easier to just apply this path to our text, instead of having to manually set up the same keyframes again.
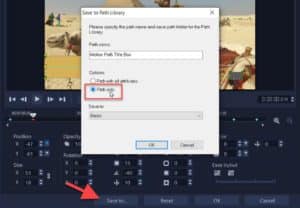
- Click on the Save to button at the bottom of the window.
- Enter a name for the path you created.
- Select the Path only option in this case, since we only want to preserve the motion to apply to the text.
NOTE: If you adjust some of the other settings in the Customize Motion window, such as changing the opacity or adding a border or shadow, use the Path with all attributes option to preserve all these custom settings along with the motion.
- Under Save to, you can choose the Basic or Custom folder then press OK.
- You will get a messaging saying Export successful. Click OK, then OK again to exit the Customize Motion window.
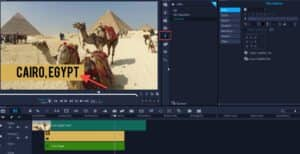
Now we’ll add our title.
- Click on the Title icon on the Library panel and then double-click on the preview pane to type in your text.
- You can use the various settings on the Title Options panel to format your text (font, size, color, etc.)
- On the preview pane, use the yellow nodes to adjust the size and positioning so it fits nicely on top of the background object.
- On the timeline, adjust the length of the title so it matches the length of the background object.
- On the Library panel, click on the Motion Paths icon to see all the paths. The custom path we just created will be available in the Basic or Custom folder, wherever you chose to save it.
- Drag the path down on to the text on the timeline.
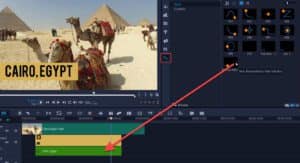
When you press play to preview, your text will follow the same motion path and fly in and out along with your background object.
How to save your custom lower thirds animation
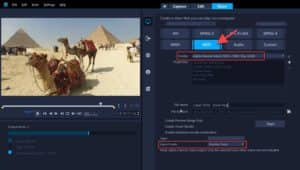
We can save the lower thirds background object to use in future projects by exporting it as a .mov file.
- Click on the Share tab and select MOV.
- On the Profile dropdown list, select the Alpha channel video type that matches the resolution you want to export, such as 1920×1080.
- On the Export track dropdown list, select Overlay Track, since we only want to export the graphic animation and not the background video or title.
- Type in a File name, select a File location and then click Start.
To use it in future projects:
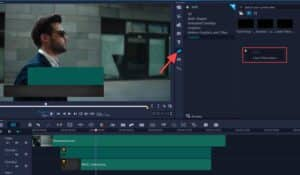
- Click on the Overlays icon on the Library panel.
- Select a category to import your lower thirds animation into. You can use an existing category such as Graphics or click the +Add icon to create a new folder.
- Right-click on a blank area in the media library and select Insert Decoration.
- Locate the .mov file you’ve saved and click Open.
- Now you can drag and drop it onto the Overlay track to use in your new project.

How to create an advanced lower thirds animation
Now that you know the basic steps to create a lower thirds animation you can experiment with more advanced techniques, such as layering multiple shapes on the overlay tracks and creating different motion paths.
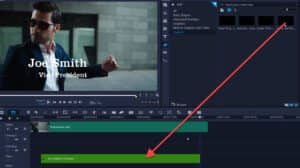
In this example, we have shapes on two overlay tracks: a solid color on Overlay track 1, and a textured background from the media library on Overlay track 2. As in the first example, we’ve resized and repositioned both shapes to the bottom left corner.

We want to create a custom motion path so the green shape flies down from the top, and the textured background flies in from the left.
- Right-click on the rectangle on Overlay track 1 and select Customize Motion.
- Add a keyframe half a second in, then go back to the first keyframe and adjust the Y position until the rectangle disappears off the top of the screen.
- Right-click on the textured background on Overlay track 2 and select Customize Motion.
- Add a keyframe half a second in, then go back to the first keyframe and adjust the X position until the background disappears off the left of the screen.
If you want to have one or both shapes fly off the screen, follow the steps from the first example – set a keyframe where you want the shape to start to fly off, then go to the last keyframe and adjust the X or Y position until the shape disappears off the screen.
How to save as a motion graphic
We are going to save these 2 overlays as a single lower thirds motion graphic that we can use in future projects. To do this, we export this animation as a .mov file following the same steps we took earlier.
To bring the motion graphic .mov file we just saved into a new project:
- Click on the Overlays icon on the Library panel and select a category (or create a new folder).
- Right-click on a blank space in the media library and select Insert Decoration.
- Locate the .mov file you’ve saved and click Open.
Now we are going to add some text to the motion graphic to create a custom motion title.
- Click on the Title icon on the Library panel.
- Double-click on the preview pane and add your title.
- Drag the motion graphic you created onto the Title track on the timeline (not the Overlay track).
A small number 2 will now appear on the Title track, indicating that there are two objects stacked together in this title. You will notice in the preview pane that the motion graphic’s size and position need to be adjusted. To do this, click on the number 2 and select the .mov file.

- Double-click on the motion graphic on the preview pane to open the Options panel.
- On the Edit tab, click on Alignment Options and then select Original Size so the motion graphic restores to the original size.
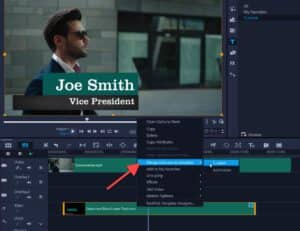
- Click on the number 2 again on the Title track and this time, select the title so you can reposition it in the preview pane to fit nicely on top of the motion graphic.
Now that we’ve created this custom lower thirds motion title, we’re going to save it in case we want to use it in a future project. Right-click on the Title track, select Merge and save as template, and save to the folder of your choice.
You can reuse this lower third animation in future by dragging it from folder it was saved into in the Title library down onto the Title track on the timeline. If you want to change the text, just click on the number 2 on the Title track and select the title, then click on the preview pane to edit and change the text for your new project.
These are just a few ideas to get you started. Get creative and experiment with different shapes, effects and motion paths to create as many lower thirds animations as you want!

Download a FREE 30-day trial and turn your best moments and life experiences into unique movies with this easy and fun video editor packed with intuitive tools and creative effects.
