
In this tutorial, you’ll learn how to combine text and motion graphics to create eye-catching, professional-looking motion titles. We will also show you how you can save these motion titles as templates to use in future projects, and how to customize motion graphics by adding effects and changing the color scheme to perfectly suit your video.
If you are using VideoStudio 2019 or higher, download a FREE motion graphic sample file to try it out yourself.
Thanks for watching! You will find a written version of this tutorial below, and a printable PDF copy to download on the Download resources tab above.
Download a FREE 30-day trial and turn your best moments and life experiences into unique movies with this easy and fun video editor packed with intuitive tools and creative effects.
Download these free resources:
Written tutorial (PDF, 1 MB)
Sample motion graphic (Zip file, 2.1 MB)
VideoStudio User Guides and Help files
For VideoStudio X9 to 2023, languages include English, Deutsch, Français, Italiano, Nederlands, 简体中文, 繁體中文, 日本語
What’s new in VideoStudio
Using templates and overlays
Advanced video editing projects
Featured products
 VideoStudio Pro 2023
 Studio Backlot Membership
 VideoStudio Ultimate 2023
 Vision FX
Creating motion titles in VideoStudio
In this tutorial, you’ll learn how to combine text and motion graphics to create eye-catching, professional-looking motion titles. We will also show you how you can save these motion titles as templates to use in future projects, and how to customize motion graphics by adding effects and changing the color scheme to perfectly suit your video.
How to combine text and motion graphics
In our first example, we’ll create a motion title for a YouTube video travel vlog.
- To add text or a title, click on the Title icon to open the Title library.
- Double-click on the preview pane to add text and type out your title.
On the Title Options tab there are a variety of options to format your text, such as changing the font face, color, size and other formatting options.
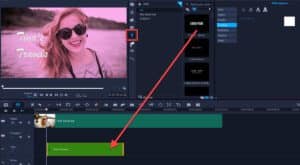
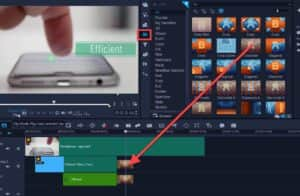
To add a motion graphic, click on the Overlays tab and locate the library folder where you have saved your motion graphics. Drag the motion graphic you want to use onto the Title track.
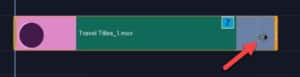
On the timeline, a number will now appear showing that there are two objects stacked together in this title. If you click on the number icon, you will see a list of the objects stacked within the title.
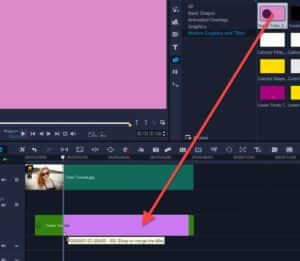
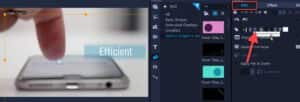
- Click on the object you want to modify. In this case, select the motion graphics object.
- Click and drag the motion graphic on the preview pane to readjust its position.
- Use the orange boxes to adjust the size and the green boxes to adjust the perspective.
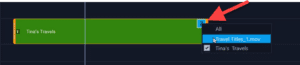
You can also adjust the entry and exit points of both the graphic and the title.
- Make sure you click on the number icon to select the object you want to modify.
- Click and drag on the motion graphic to reposition it within the Title layer so it begins at the same time as the text.
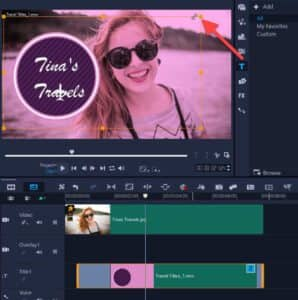
Alternatively, you can hover your mouse over the left or right edge of the overlay and click and drag to adjust its entry and exit point.
Now when you preview the title, you’ll see our motion graphic appears at the same time as our title text.

How to save a custom motion title
You can save your new motion title as a template to use in other video projects.
- Right-click on the Title track and select Merge and Save as Template
- Select the Custom folder or create a new folder if you wish.
When you want to use this motion title in a new video project:
- Open the Titles library and select the Custom folder (or the new folder you created).
- Select the motion title template you created and drag it onto the Title track.
How to customize motion graphics
There are so many ways that you can customize these motion graphics to suit your video project. Maybe you want to add some effects for more creative flair, or change the colors to match your brand colors. Here are a few ideas to get you started.
In this example, we’re creating a promo video for a business. As before, we’ve created a title on the Title track. If you want the motion graphic to pop up before the title does, you must add the motion graphic to the Overlay track on the timeline and add the title to the Title track.
- Drag the motion graphic to the Overlay track above your title (we’re using Callout Titles 1).

- Readjust the size and position of the motion graphic and make any adjustments to the title so it fits with the motion graphic.
Now we’ll make some customizations. First, double-click on the motion graphic on the Overlay track to bring up the Edit tab.
To add transparency: Type a value in the Transparency field or use the slider to adjust the transparency of the motion graphic.
To change the color scheme: Click on the Color tab and then select the Color Wheel option. You can adjust any of the color wheels to completely change the color of the motion graphic to match your brand colors or video color scheme.

To add transitions: Click on the Transitions icon to open the library. Drag any of the transitions onto the Overlay and/or Title track, for example to add a fade or dissolve to the end so they softly disappear.
Now that you have learned how to create titles with motion graphics and some options for customization, you can get started making your own motion titles and enhance your video projects with some eye-catching, professional looking titles.
Download a FREE 30-day trial and turn your best moments and life experiences into unique movies with this easy and fun video editor packed with intuitive tools and creative effects.

Comments (2)
Reader Interactions
Comments
Sres
ya es necesario que los videos también puedan escucharse en español
Saludos
Hola Eddy,
Para ver subtítulos en tu idioma:
– Haga clic en el ícono “Settings” en la esquina inferior derecha del reproductor de video.
– Haz clic en “Subtitles” y selecciona tu idioma.
– Si su idioma no aparece en la lista, haga clic en “English (auto-generated)”, luego haga clic en “Auto-translate” y seleccione su idioma.
Saludos
Discovery Center team