
Turn your ordinary photos into haunting images with these fun and easy Halloween photo effects! In this tutorial, we’ll show you how to use PaintShop Pro’s Retro Lab and Instant Effects, plus a few simple adjustment tools, to create spooky, spine-tingling images. Once you learn how to use these tools and combine different effects, the creepy creative possibilities are endless!
Thanks for watching! You will find a written version of this tutorial below, and a printable PDF copy to download on the Download resources tab above.
Download your FREE 30-day trial and make every shot your best shot with PaintShop Pro 2023, your all-in-one photo editing and design software.
Download these free resources:
Written tutorial (PDF, 1.3 MB)
Stock photos (download from Shutterstock.com)
Jack-o-lantern
Moon
Mansion
Skull
PaintShop Pro resources
Keyboard shortcuts (PDF, 173 KB)
PaintShop Pro User Guide (PDF, 25.4 MB)
What’s new in PaintShop Pro
Holiday projects
Artistic tools and projects
Featured products
 PaintShop Pro 2023 Ultimate
 AI HDR Studio 3.0
 PaintShop Pro 2023
 Vision FX
5 fun and easy Halloween photo effects
In this tutorial, we’ll look at several tools and techniques you can use in PaintShop Pro to turn ordinary photos into spooky and creepy images. We’ll add some Halloween photo effects using tools in the Photo Effects menu and the Instant Effects palette, as well as several tools for adjusting color, saturation, and lightness.
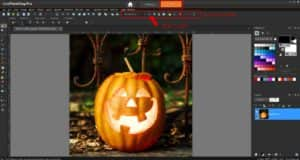
To begin, open PaintShop Pro in the Edit workspace and open the Jack-o-Lantern image.
Halloween photo effect #1: Spooky Forest script
We’ll start with the easiest effect: running a ready-made script. This script is part of our Fall Scripts Collection, which can be purchased from the Store tab of the PaintShop Pro Welcome screen. This collection contains four scripts; the one we’ll use here is called “Spooky Forest.” You can run scripts from the File > Script > Run menu, or you can display the Script toolbar by choosing View > Toolbars > Script. Just look for Spooky Forest in the dropdown menu and click the Run icon.
It takes just a few seconds for the script to run, and here is the creepy result:
But if you’re the DIY type who would rather create your own Halloween photo effects, here are several more eerie examples.
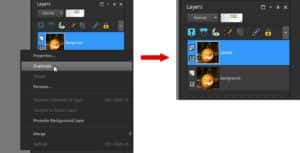
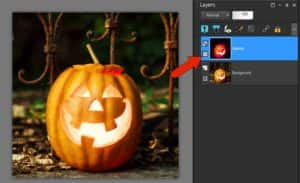
If you ran the script on the jack-o-lantern, either close it without saving or use File > Save As to save it with a new name. Then open a fresh copy of the original, happy pumpkin. So that the original image will be preserved, right-click on the Background layer in the Layers palette and duplicate it. Click the name of the new layer, and replace it with “Spooky.”
Halloween photo effect #2: Photo effects with the Retro Lab
To start spookifying, go to Effects > Photo Effects > Retro Lab. You can also open the Retro Lab from the Learning Center (View > Palettes > Learning Center or press F10). In the Learning Center, click on Effects then select Retro Lab.
What appears is a before-and-after view of the image. If your Area of focus isn’t already a circle, click the Circle selection icon. To place the circle, drag from the center of the pumpkin outward. You can click and drag inside the circle to move it, or drag one of the surrounding square handles to resize the circle.
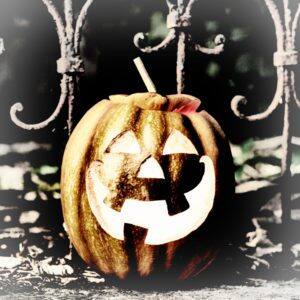
In the After window, you can see a vignette of darkness outside the circle. To get a sense of the various weird effects you can create, click the Randomize Parameters icon a few times.
You can adjust the sliders to create your own unique effect. The top four sliders control the darkness, blur, glow, and feathering; the Color Adjust sliders below control the hue, saturation and color. For this sinister red example, the settings are:
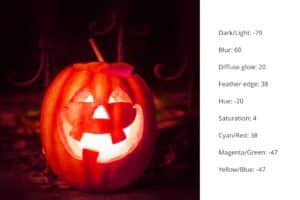
When your pumpkin looks good (or evil), click OK. And because these effects were created on their own layer, you can bring back the original image by clicking the Eye icon to hide the “Spooky” layer.
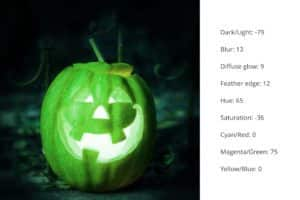
Let’s try one more effect, which you can do on the original image, or you can create a new layer. This time, increase the size of the circle to include more of the background. To bring out a gruesome green glow which seeps into the background, use the following settings:
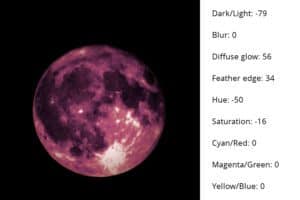
Halloween photo effect #3: Creating a blood moon
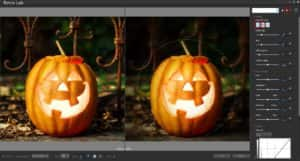
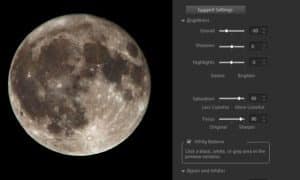
For the next effect, open the Moon image. Before applying effects, let’s increase the contrast between the moon’s surface and shadows. Go to Adjust > Smart Photo Fix, which again brings up a before-and-after view.
The settings shown below bring down the brightness, increase the amount of color, and sharpen the shadows. Click OK once you are happy with the results in the After window.
Then open up the Retro Lab again (Effects > Photo Effects > Retro Lab)
First, adjust the selection circle to fit the moon. Then use the settings shown below to bring out more red, wash out the color a bit, and increase the blur and feathering. Press OK to see the result: a full moon you wouldn’t want to encounter while walking alone down a dark street.
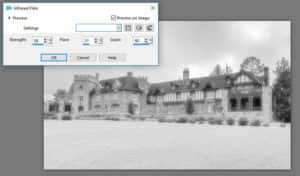
Halloween photo effect #4: Haunted mansion
Next, open the Mansion image, which would look great on a real estate website. But with a few clicks, we can produce a haunted mansion.
First, go to Effects > Photo Effects and select Infrared Film. Keep Preview on image checked, so that you can see adjustments in real time.
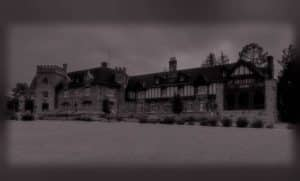
This effect also has a Randomize Parameters icon, which is fun to play with. Or adjust the sliders yourself, to make the house look séance-ready.
In this example, the above image is still a bit too bright. So use Adjust > Hue and Saturation > Hue/Saturation/Lightness and bring down the Lightness slider to around -52.

And for a more historical look, try the Retro Lab again. Use a rectangular selection this time and these suggested settings to wash out the color and give a sepia appearance.
| Dark/Light: -26 | Feather Edge: 55 | Cyan/Red: -9 |
| Blur: 0 | Hue: 20 | Magenta/Green: 6 |
| Diffuse Glow: 61 | Saturation: -79 | Yellow/Blue: -15 |
Halloween photo effect #5: Using Instant Effects
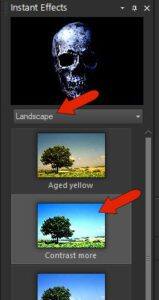
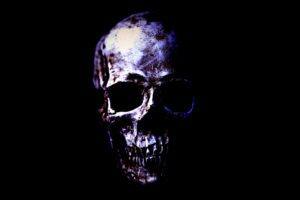
For the final effect, open the image of the skull. It’s already pretty freaky-looking but we can make it even more so by using Instant Effects.
First, access the Instant Effects palette by going to View > Palettes > Instant Effects, or by pressing Shift + F2 on your keyboard. If you have the Learning Center open, you can go to Effects and select Instant Effects to open the palette.
At the top of the palette there is a Preview image, and underneath that is a dropdown menu. Select the Landscape category from the dropdown menu and double-click on the Contrast More effect.
Now the shadows are more pronounced. Now choose the Retro category from the dropdown list and double-click on the Retro Dark effect. The difference is subtle, but the overall effect is darker and more purple, with stronger glowing areas.
To switch to a glowing yellow effect, go to Adjust > Hue and Saturation > Colorize, and try these settings:

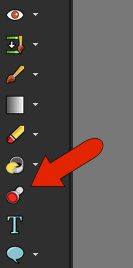
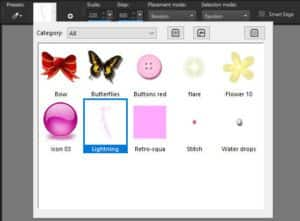
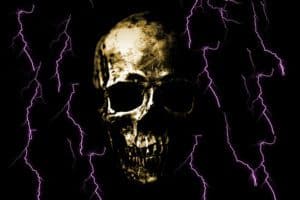
To add a lightning after-effect, activate the Picture Tube tool. In the Property bar, click the graphic to open the menu of available images. Choose Lightning.
Set the Scale to 220, the Step to 500, Placement and Selection mode as Random. Then just click in various spots on the image, to add random lightning bolts.
Now that you are familiar with the Retro Lab and Instant Effects, you can experiment with different settings to add Halloween photo effects to any image.
Download your FREE 30-day trial and make every shot your best shot with PaintShop Pro 2023, your all-in-one photo editing and design software.

Comments (2)
Reader Interactions
Comments
Haunted Mansion and
Using Instant Effects
those two are very well described for creating the Halloween effect.
Creating a Blood Moon is seems simple but difference and created effect is really Bold. Appreciation for effort.