
You don’t need to go out in a snowstorm to capture a snowy winter scene! Learn how to add snow to a photo instead. In this tutorial we will demonstrate two methods to create a snow effect. The first method uses a pattern fill, and the second uses a noise effect. You’ll also learn how to save the snow effect as an overlay that can be used on other photos.
Want to add a snow effect with just one click? Check out our Falling Snow Script and Winter Chill Script that will automatically create the effect for you.
Thanks for watching! We hope you found this tutorial helpful and we would love to hear your feedback in the Comments section at the bottom of the page. You will find a written version of this tutorial below, and a printable PDF copy to download on the Download Resources tab above.
Download your FREE 30-day trial and make every shot your best shot with PaintShop Pro 2023, your all-in-one photo editing and design software.
Download these free resources:
Written tutorial (PDF, 1.02 MB)
PaintShop Pro resources
Keyboard shortcuts (PDF, 173 KB)
PaintShop Pro User Guide (PDF, 25.4 MB)
What’s New in PaintShop Pro
Artistic Tools and Projects
Adding Effects
Featured products
 PaintShop Pro 2023 Ultimate
 AI HDR Studio 3.0
 PaintShop Pro 2023
 Vision FX
How to Add Snow to a Photo
Here are two methods that you can use to add snow to a photo. It’s important to note that for both methods, the size of your photo plays a large role in how the snow effects will appear. You’ll probably have to adjust settings and scales to get the effect you want.
Click on any of the images below to view full-size.
Method 1: Using a Pattern to Add Snow to a Photo
Open your photo in PaintShop Pro’s Edit tab. For this tutorial, we will be using this image of some children with hockey gear.

Step 1: Create a new image
Go to File > New and in the New Document window set the Image Dimensions to a square size that is smaller than your photo, in this case 400×400 pixels. Make sure Transparent is checked and click OK.

Step 2: Add a raster layer
Make sure your Layers palette is visible (press F8 or go to View > Palettes and select Layers).
Add a raster layer by selecting New Raster Layer from the Layers menu, or by clicking on the New Layer icon at the bottom of the Layers palette and selecting New Raster Layer.
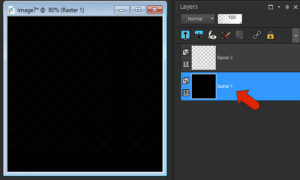
Click on the bottom layer in the Layers palette to make it the active layer, then activate the Flood Fill tool.
In the Materials palette, set the Foreground (top) swatch to black then click on the image to fill the layer with black. This will make it easier to see the snow pattern that will be added on the layer above.
Step 3: Use the Paint Brush to add snow
In the Layers palette, click on the top layer to make it active and then activate the Paint Brush tool.
In the Materials palette, set the Foreground (top) swatch to white.
In the Tool Options toolbar select the Default brush the brush library window. Reduce the Hardness setting to around 30.
Click on the image to place random white paint spots. Using different sizes will produce a more realistic effect. You can change the brush size by dragging while holding down the Alt key, or by adjusting the Size setting on the Tool Options toolbar.
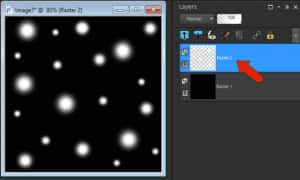
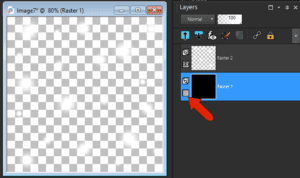
In the Layers palette, click on the Visibility (eye) icon beside the black layer to turn it off, leaving only the white dots showing.
Note the title of your image – in this example the title is Image 7.
Step 4: Add a snow pattern to your photo
Returning to your photo, add a new raster layer above the background, which will contain the snow effect.
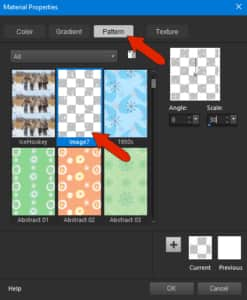
Activate the Flood Fill tool and click on the Foreground (top) swatch in the Materials palette. This will open the Material Properties window.
Click on the Pattern tab at the top and select your snow image (in this case Image 7).
For now, leave the Scale value as is, since it’s hard to know how the pattern will be sized relative to the photo itself.
Make sure the new raster layer is the active layer. With the Flood Fill tool active, click on your photo to fill the layer with the snow pattern.
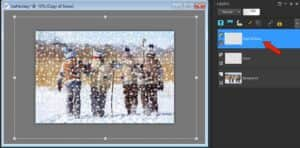
In this example, the snow is rather dense, and the pattern repeat is easy to see, because the original photo is much larger than the pattern image.

But we can adjust the pattern settings to achieve a more realistic effect.
Click Undo to remove the flood fill then click the Foreground swatch again to open the Material Properties window.
On the Pattern tab, adjust the Scale setting – for our photo the original Scale setting was around 30 and we increased it to 80.
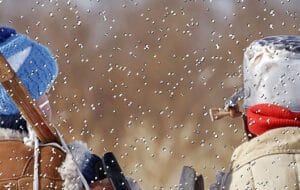
Click on your photo with the Flood Fill tool to add the adjusted snow pattern. You may have to repeat these steps a few times until you’re happy with the results.

The snow already looks a little blurry because we used a low Hardness setting for the Paint Brush tool, but you can blur a bit more by going to Adjust > Blur and selecting Gaussian Blur. In the Gaussian Blur window, make sure Preview on image is checked and then adjust the Radius setting to your liking.
BONUS TIP:
If you want more dense and random-looking snow:
- Right-click on the snow layer in the Layers palette and select Duplicate.
- Zoom out so that you have extra space around your photo on the image canvas.
- Activate the Pick tool and make sure the Mode is set to Scale in the Tool Options toolbar. Then drag outwards to increase the size of the duplicate layer.
Now we’ve got ourselves a blizzard!
Method 2: Using Noise to Add Snow to a Photo
The second snow effect method will have a slightly more natural appearance. Starting with the original photo, add a new raster layer for noise.

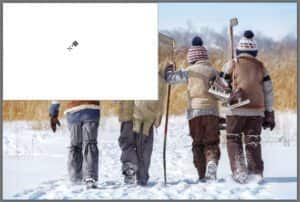
Step 1: Create a selection area
The noise effect is rather dense, so we are going to add it to about a quarter of the original image size, and then scale it up later.
Activate the Selection tool and drag on your photo to create a selection area about a quarter of the photo.
In the Materials palette, set the Foreground swatch to white.
Activate the Flood Fill tool then click on the selection area to fill it with white.
Press Ctrl + D to deselect and remove the selection marquis.
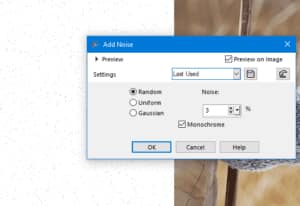
Step 2: Add noise
Zoom in closely on the white area so you’ll be able to see the noise that will be added. Go to Adjust > Add/Remove Noise and select Add Noise.
In the Add Noise window:
- Make sure Preview on Image is checked so you can see how the effect changes as you adjust the following settings.
- Select a Noise Type. Any will work; in this example we used Random.
- Make sure Monochrome is checked so the noise will be shades of gray.
- Adjust the Noise Amount percentage until you are happy with the look.
- Click OK.
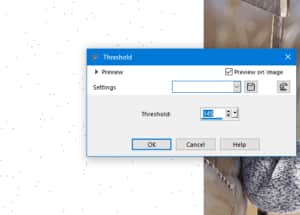
TIP: If you want to greatly reduce the noise density, go to Adjust > Brightness and Contrast and select Threshold. Then adjust the Threshold slider to find a value at which most of the dots disappear.
Step 3: Resize the noise effect
With the noise layer still active, activate the Pick tool and make sure the mode is set to Scale. Drag outward with the Pick tool to expand the noise area to cover the photo.
Step 4: Remove the noise background
The next step is to remove the white background of the noise layer, so that only the small greyscale dots are left.
Activate the Magic Wand selection tool, and in the Tool Options palette set the Match Mode to RGB Value. Set the Tolerance to 0 so that only white will be selected.
With the Magic Wand, click on any white area of the noise layer to select all the white, then press Delete to remove it.
Step 5: Transform the noise to snow!
Press Ctrl + D to deselect the noise dots, and what remains on this layer is the noise in shades of gray. To change the dots to all white, go to Adjust > Brightness and Contrast and select Brightness/Contrast. Move the Brightness slider all the way to the right to the maximum value (255).
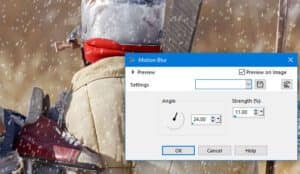
To give the snow a more realistic appearance we will add a blur effect. Go to Adjust > Blur and select Motion Blur.
In the Motion Blur window, you can adjust the Strength percentage to your liking. You can also adjust the Angle setting if you want the appearance of blowing snow.
BONUS TIPS:
1. If you find that your snowflakes are too small:
- Make sure the noise layer is the active layer and select the Pick tool, set to Scale mode.
- Zoom out so you have extra canvas space around your photo.
- Drag outward with the Pick tool to increase the size of the noise layer, which results in larger snowflakes.
2. As with method 1, you can duplicate the noise layer for a denser effect, and/or resize the duplicate layer to have snowflakes in different sizes.
How to Add Snow to Other Photos
Once you are happy with the look of your snow effect, you may want to use it on other photos.
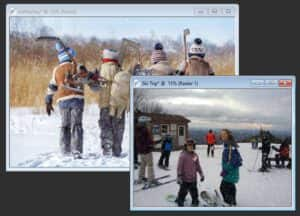
If you have another photo open in PaintShop Pro, you can simply copy (Ctrl + C or Edit > Copy) the noise layer from the original photo, switch to the new photo and paste it in (Ctrl + V or Edit > Paste as New Layer).
Another way to bring the snow effect into a new photo is to drag the noise layer from the Layers palette on the original photo into the new image.
Use the Pick tool to resize if needed.
Or, if you don’t have another photo ready for snow yet, you can save the snow effect as a separate image. You can do this with either type of snow effect we created in this tutorial, and there are two ways to do this:
1. In the Layers palette, click on the Visibility (eye) icon beside the photo layer to turn off the photo so it is not visible. Then go to File > Save As, enter a file name and save it in PNG format.
OR
2. Drag the noise layer from the Layers palette into a blank space on your canvas and this will create a new image. Then use File > Save As to save it in PNG format.
NOTE: It is important to use PNG format when saving your snow effect overlay, since this format will preserve the background transparency.
Once your snow effect overlay is saved, you can now use it to add snow to other photos at any time.
Download your FREE 30-day trial and make every shot your best shot with PaintShop Pro 2023, your all-in-one photo editing and design software.

Comments (1)
Reader Interactions
Comments
Bellissimo effetto, esistono tutoria in italiano per Paint Shoppro 2023 Ultimate? Uscirà la versione 2024? Grazie. Ciao mauro.