
Learn how to edit and adjust the pre-installed masks that are included with PaintShop Pro, to create some fun, interesting or amusing photo effects. In this tutorial, you’ll see how to use a mask to create a photo frame and border effect, and how to combine two separate photos with a pair of masks. Expand your creativity possibilities by downloading free content, including masks, from the Welcome tab inside PaintShop Pro.
Thanks for watching! We hope you found this tutorial helpful and we would love to hear your feedback in the Comments section at the bottom of the page. You will find a written version of this tutorial below, and a printable PDF copy to download on the Download resources tab above.
Download your FREE 30-day trial and make every shot your best shot with PaintShop Pro 2023, your all-in-one photo editing and design software.
Download these free resources:
Written tutorial (PDF, 1.4 MB)
Sample images (Zip file, 4.1 MB)
PaintShop Pro resources
Keyboard shortcuts (PDF, 173 KB)
PaintShop Pro User Guide (PDF, 25.4 MB)
What’s new in PaintShop Pro
Working with masks
PaintShop Pro tools
Featured products
 PaintShop Pro 2023 Ultimate
 AI HDR Studio 3.0
 PaintShop Pro 2023
 Vision FX
How to edit and adjust masks
PaintShop Pro comes with a few pre-installed masks, and you can download more from the Welcome tab inside PaintShop Pro. On the Welcome tab, click Get More in the left menu and select the Creative Content category along the top. Scroll down to find the free Creative Content Pack, which includes line styles, picture tubes, preset shapes, and of course – masks!
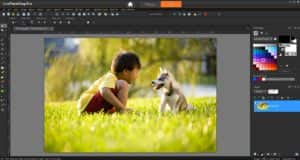
In this tutorial we will show you how to edit and adjust these masks to add your own creative flair. To begin, open the photo of the boy and dog in the Edit workspace.
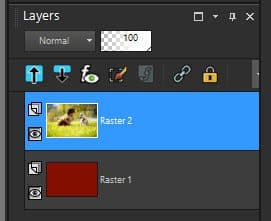
- In the Layers palette right-click on the Background layer and select Promote Background Layer.
- Click the New Layer icon and select New Raster Layer.
- Activate the Flood Fill tool and fill the new layer with a dark red color (or any color you wish).
- In the Layers palette, drag the red layer below the photo layer.
- Click on the photo layer to make it the active layer, so the mask will be applied to the photo.
Applying and adjusting masks
- Go to Layers > Load/Save Mask > Load Mask from Disk.
- In the Mask library in the top left, choose the Edge Ripples mask.
- Set the Orientation to As Is, which keeps the mask at its original size.
- Under Options, choose Show all mask. This means that all parts of the photo outside the mask limits will show.

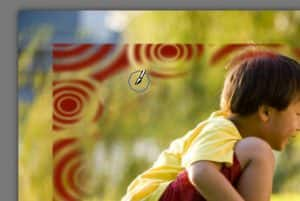
Click Load, and here is the result. The mask appears in the top left corner, and the black areas of the mask block the photo, allowing the red layer to show through.

- In the Layers palette, click on the mask layer to make it the active layer.
- Activate the Pick tool.
- Drag the handles to adjust the size of the mask so that it covers most of the photo.
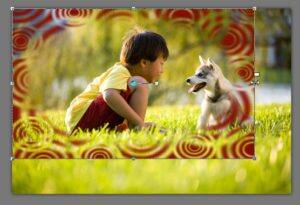
Go to Objects > Align > Center in Canvas to center the mask. Now the border is even all the way around.
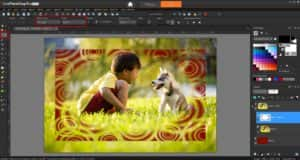
Editing masks with the Paint Brush tool
Now say we want to eliminate some parts of the mask, to show more of the photo. We can use the Paint Brush tool to do this.
- Painting with white will erase parts of the mask, so more of the photo shows through.
- Painting with black will add to the mask, so more of the photo is blocked.
- Painting with any shade of grey will add a translucent area to the mask, so that part of the photo will be partially blocked. The lighter the shade, the more transparent it will be.
Try this out for yourself:
- Make sure the mask layer is active.
- In the Materials palette, set the Foreground (top) swatch to white.
- Activate the Paint Brush tool.
- Hold down the Alt key and drag your mouse up or down to change the brush size.
- Now paint over part of the mask and you will see it is being erased.
It’s a little hard to see in the Layers palette, but the changes you make with the Paint Brush tool now show on the mask image here as well.
- Press Undo (Ctrl + Z) if you don’t want to keep the changes you made.
- Change the Foreground swatch in the Materials palette to black and paint on the image.
You will see that where you paint, the photo is blocked, and the red layer shows through. These changes are easier to see in the Layers palette when using black.
Here is another option to add a border effect to the mask.
- Press Undo (Ctrl + Z) to remove your practice paintbrush strokes.
- In the Materials palette, set the Background (bottom) swatch to a light gray color.
- Activate the Selection tool, with Selection Type set to Rectangle and Mode set to Replace.
- Draw a selection marquee around the outside of the mask
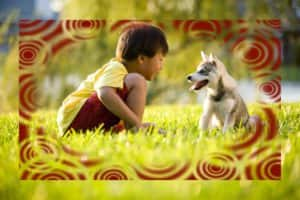
Now go to Selections > Invert and you will see that the border around the mask now becomes the selected area. Press Delete to replace the selected area with the gray background color. This makes the border partially translucent.
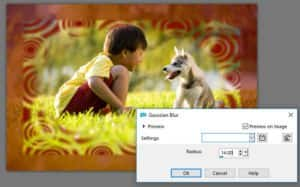
Option: if you want to add a softer look to your mask you can blur the edges a bit. With the mask layer still active, go to Adjust > Blur > Gaussian blur. Keep Preview on Image checked and adjust the radius for a nice soft effect.
Advanced mask editing
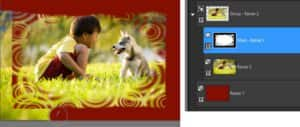
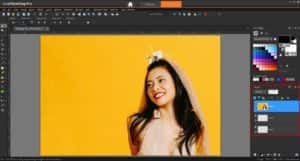
In this example we will use 2 photos, both with masks, on a textured background. Begin by opening the bride photo.
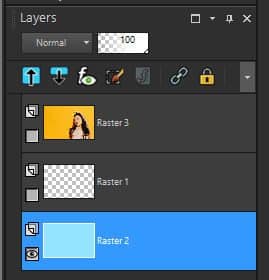
- In the Layers palette, click on the New Layer icon and add 2 new raster layers.
- Right-click on the bride layer and choose Promote Background Layer.
- Drag the bride photo to the top of the Layers palette.
- Click on the Visibility (eye) icon beside the top two layers to hide those layers, so that the bottom layer is the only visible layer.
- Click on the bottom layer to make that layer active.
- Activate the Flood Fill tool and fill this layer with a light blue color (or any color you wish).
- Click on the Visibility icon beside the middle layer and click on that layer to make it the active layer.
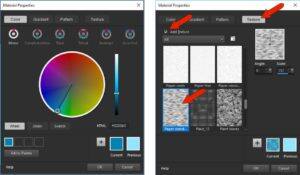
- In the Materials palette, click on the light blue Foreground swatch to open the Material Properties window. Change the light blue color to a darker shade of blue.
- Then click on the Texture tab and check the Add Texture box. Choose the texture you would like to use (in this example we used the Paper Standard texture). Textures are grayscale repeating images that act just like masks.
- Activate the Flood Fill tool and fill the middle layer with this textured color. The black areas of the texture are blocked, showing the lighter layer below.

- Click on the Visibility icon beside the bride photo layer and click on that layer to make it the active layer.
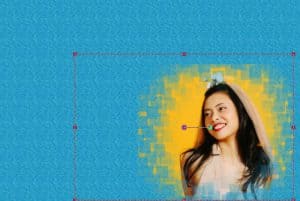
- Go to Layers > Load/Save Mask > Load Mask from Disk and choose the Edge Squares mask.
- Set the Orientation to As Is and set the Options to Hide all mask, so that the entire photo will be blocked except in the white and gray parts.
- Click Load to apply the mask and this is the result:

- Click on the mask layer to make it the active layer.
- Activate the Pick tool and use it to move the mask to the lower right corner and resize it.
- To make the bride fit inside her mask, activate the bride photo layer inside the layer group and use the Pick tool to move and resize the layer.
The groom will go in the top left corner, and his mask should be the same size as the bride’s, so right-click on the bride’s mask group layer and select Duplicate.
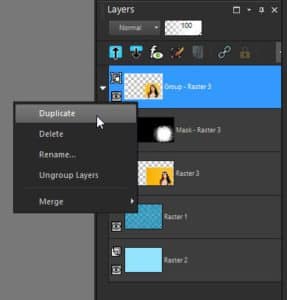
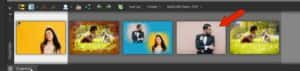
To add the groom’s photo, locate it in the Organizer and then drag it into the duplicate layer group you just created, right below the mask.
Note: if you are not using the Organizer, you can drag and drop the groom’s photo from your desktop directly into the Layers palette.
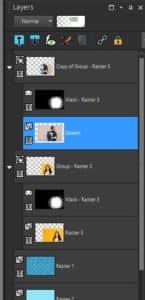
The bride photo layer isn’t needed in this duplicate layer group, so right-click on it and choose Delete. Your Layers palette should now look like this:
Now repeat the same steps with the groom mask layer and photo layer as you did earlier with the bride mask layer and photo layer.
- Click on the groom mask layer to make it the active layer.
- Activate the Pick tool and use it to move the mask to the top left corner and resize it.
- To make the groom fit inside his mask, activate the groom photo layer inside the layer group and use the Pick tool to move and resize the layer.
Once you have finished resizing and re-positioning, you will see that the masks lend an interesting effect where they overlap.

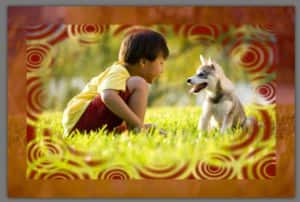
Now that you have learned how to edit and adjust masks, you can experiment with different masks, effects and layouts to create your own unique images!
Download your FREE 30-day trial and make every shot your best shot with PaintShop Pro 2023, your all-in-one photo editing and design software.

Reader Interactions