
Learn how to create an eye-catching cinemagraph with VideoStudio in a few simple steps. A cinemagraph is an image in which one element has animation while the rest of the image remains still. In this tutorial we’ll show you how to take a snapshot of a video clip and then use masking tools to block out all areas of the snapshot except the part that you want to remain animated. The result is striking image with subtle motion sure to grab attention on your website or social media pages.
Thanks for watching! We hope you found this tutorial helpful and we would love to hear your feedback in the Comments section at the bottom of the page. You will find a written version of this tutorial below, and a printable PDF copy to download on the Download Resources tab above.
Download a FREE 30-day trial and turn your best moments and life experiences into unique movies with this easy and fun video editor packed with intuitive tools and creative effects.
Download these free resources:
Written tutorial (PDF, 578 KB)
Sample video clip (MP4, 7 MB)
VideoStudio User Guides and Help files
For VideoStudio X9 to 2023, languages include English, Deutsch, Français, Italiano, Nederlands, 简体中文, 繁體中文, 日本語
What’s New in VideoStudio
Speed and Motion Editing Techniques
Advanced Video Editing Projects
Featured products
 VideoStudio Pro 2023
 Studio Backlot Membership
 VideoStudio Ultimate 2023
 Vision FX
How to Make a Cinemagraph in VideoStudio
In this tutorial, you’ll learn how to make a beautiful cinemagraph using video footage you’ve taken.
Click on any of the images below to view full-size.
A cinemagraph is created by combining a video clip with a still image to create a unique animated photo.
- Open up VideoStudio under the Edit
- Import the video clip you’re going to create a cinemagraph from.
Note: Choose a video clip that you’ve shot using a tripod in order to get the best results.
- Drag the video clip onto the Video Track on your timeline.
In this project, I am using a video of a milk bottle pouring milk into a teacup. I want to make the bottle stationary as the milk pours out and fills the cup.
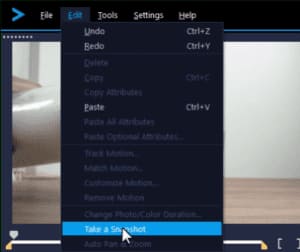
- Drag the playhead to the point on the clip where you want to take a snapshot.
- Go to Edit and select Take a Snapshot. The snapshot of this still image is now saved in our library.
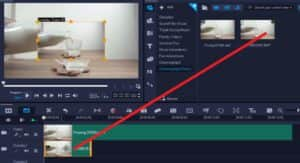
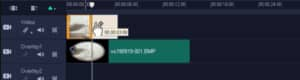
- Drag the snapshot from the library onto the Overlay Track on your timeline.
To resize the overlay to full screen to match the dimensions of the video on the video track:
- Right-click on the video clip on the timeline and select Copy Attributes.
- Then right-click on the overlay and select Paste All Attributes.
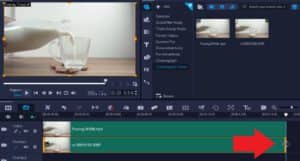
- Scroll your mouse to the edge of the snapshot until the arrow pops up and click and drag to the right to resize the snapshot until it matches the length of the video clip.
How to Create a Mask
- Select the overlay on the timeline and then click on the Mask Creator icon.

- Brush over the area of the video where you want to show movement using one of the brush tools.
- Adjust the brush size as needed to be more precise with your selection.
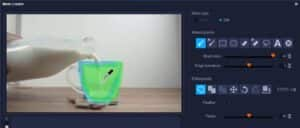
- Select Invert Mask and press OK.

And now if you preview this video, you’ll see how the milk pours into the mug from the stationary bottle giving the video a really cool look and feel.
You can experiment with the masking tools to create different effects within the same video. For example, I could take this same video and image snapshot and this time make the mug stationary so that it looks like the milk is endlessly pouring and never filling up the mug.
- Go to the Mask Creator and again use the brush tool to brush over the mug.
- This time, I won’t select Invert Mask and I’ll keep it as Mask.
- Then click OK.

And now if you preview this video, you’ll see the milk jug keeps pouring milk into the mug without ever filling it.

How to Loop or Lengthen your Cinemagraph
You may choose to play the entire video on loop or choose a specific section to loop.
To split the video track into a section you want to play on loop:
- Drag your playhead to where you want to split the video clip and click the scissors icon under the preview pane.
- Delete the remaining video clip by clicking on it and pressing the Delete key on your keyboard.
- Right-click on the video clip and click Copy, and then click once with your mouse beside the video clip to paste it next to it.
Repeat this same process for as long as you want to run your loop for.
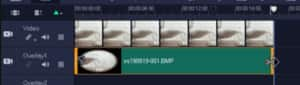
Resize the snapshot to match the length of the video clips:
- Click on the snapshot on the timeline and hover your mouse at the edge of the clip until the arrow icon pops up.
- Then click and drag the snapshot until it matches the length of the clip.
Now if you press preview, you’ll see the cinemagraph repeats on loop.

You can have fun experimenting with these tools in different ways to create unique cinemagraphs to add eye-catching elements to your website or social media page or to share with your friends and family!
Download a FREE 30-day trial and turn your best moments and life experiences into unique movies with this easy and fun video editor packed with intuitive tools and creative effects.

Reader Interactions