
Learn how to use animated video overlays to enhance your video productions and grab the attention of your audience. In this tutorial we’ll walk you through the installation process and demonstrate basic adjustments such as resizing and rotating. See how overlays can be looped to create a longer clip or stacked on top of each other to create denser effects. For advanced creative options, you can customize the overlays by adding filters, cropping and more.
If you are using Pinnacle Studio 23 or higher, download a free overlay sample to try it out yourself.
Thanks for watching! You will find a written version of this tutorial below, and a printable PDF copy to download on the Download Resources tab above.
Download a FREE 15-day trial and discover all the essential and advanced video editing features that Pinnacle Studio delivers to make your videos look their best.
Download these free resources:
Written Tutorial (PDF, 539 KB)
What’s new in Pinnacle Studio
Advanced video editing projects
Overlays, templates, and graphics
Featured products
 Pinnacle Studio 26 Ultimate
 Studio Backlot Membership
 Pinnacle Studio 26
 Vision FX
How to use animated overlays
In this tutorial, we’ll teach you how to install animated overlay files into Pinnacle Studio. You’ll learn how to add them to your timeline, rotate and resize them, add multiple layers and more! I’ll also show you how you can get creative with the overlays using a few advanced options.
Click on any of the images below to view full-size.
How to install overlay files
Most overlays packs are delivered in the form of an .exe file, which is a program that will install the overlays onto your computer.
- Open the folder where you downloaded the .exe file.
- Double-click on the file to run the installer.
- Review and accept to the terms of the license agreement.
- Click Finish once the installation is complete.
The overlays will be installed in a folder located on your desktop and you’re ready to import them into Pinnacle Studio. These overlays can be imported into either a Project Bin or Collection.
- Click on the Project Bin
- Then click on Create a New Project Bin.
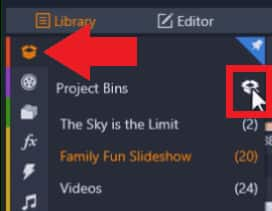
- Enter a name for your new project bin and then click OK.
- Click on Quick Import.
- Browse to your desktop where the overlay files have just been installed.
- Select the files and click Open.
Now you’ll see the overlays have been added to your new project bin and are ready to use. You can click on one and then press Play in the preview pane to see what it will look like.
How to adjust animated overlays
To begin working with overlays, drag the overlay file from the project bin onto A/V Track 2 on the timeline.
To resize, reposition, and rotate overlays:
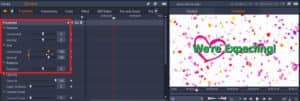
Double-click on the overlay to bring up the Editor tab and select Properties. The overlay will automatically fill the entire screen.
- Resize the overlay by adjusting the Size
- Adjust the placement of the overlay by adjusting the Position
- Rotate the overlay by adjusting the Rotate tab to the left or right.
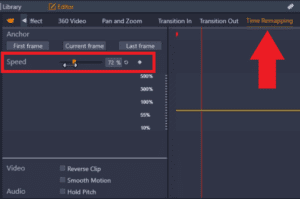
To adjust the speed of overlays:
In the Editor, click on Time Remapping. Then drag the slider left or right to speed up or slow down the overlay.
How to loop and layer animated overlays
The overlays are short, and you may want to adjust the duration, so they play throughout a longer video clip. You can easily make them loop without affecting the speed.
- Right-click on the overlay on the timeline and select Copy.
- Drag the playhead to where you want to paste the overlay on the timeline then right-click and select Paste.
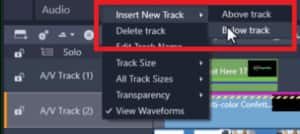
Let’s say you want to layer a second confetti overlay on top of the first one to create an even bigger confetti explosion.
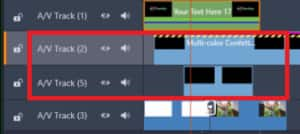
- Right-click on a track on the timeline and then select Insert New Track either above or below track.
- Now you can add more animated overlays to the new overlay tracks.
How to change the color of animated overlays
With the color tools in Pinnacle Studio you can change the color of the overlay files, from a slight adjustment to a completely different color.
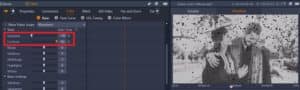
Double-click on the overlay to bring up the Editor, and click on the Color tab. From here you can adjust any of the bars to alter the color levels of the overlay.

To create a black and white effect, adjust the Exposure level all the way down and the Contrast level all the way up.
How to add effects to animated overlays
You can also add effects to the animated overlays, using filters from the Effects library. In this example we will add a motion effect.
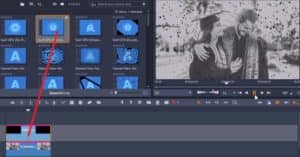
- Click on your overlay on the timeline to select it.
- Click on the FX tab on the left.
- Select an effect such as Swirl GPU Moving Swirl and drag that on top of the overlay on the timeline.
- Press Play to preview the effect and you’ll see a swirl pass through the confetti as it falls down.
How to crop animated overlays
If you want your overlays to cover only a certain portion of your image or video clip, you can use Crop Mode to make them fit. By cropping the overlays instead of resizing them to fit, you can retain the proper size and proportion of the elements in the overlay.
In this example we have an image of a girl on the train looking out the window, and we want to add a rain overlay. Drag the rain overlay onto A/V Track 2.
If you preview this, it looks like it is raining inside the train, and that’s not the effect we want. We need to crop the overlay to fit in the window portion of the image.
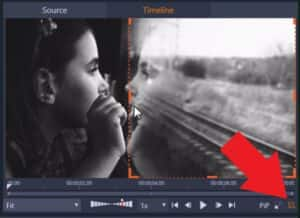
- To do this, click on the Crop Mode icon under the preview pane.
- Drag the edges of the overlay on the preview pane so that they are cropped to the size of the window.
Now it looks like it is just raining outside the window.

These are just a few ways you can have fun using and customizing overlays to add great effects to your projects!
Download a FREE 15-day trial and discover all the essential and advanced video editing features that Pinnacle Studio delivers to make your videos look their best.

Comments (3)
Reader Interactions
Comments
Sehr gute Erklärungen -praxisnahe Bescheibungen
No se inglés por lo que no puedo utilizar los tutoriales, ya que ni siquiera puedo utilizar los subtítulos porque también están solo en ingles; a la edad que tengo no es uno de mis propósitos aprenderlo y tendría que pasar mucho tiempo para poder traducirlos. ¿Existe alguna manera de encontrar los tutoriales en español? agradecería una solución. Gracias por su atención.
Hola Ana,
Para ver subtítulos en tu idioma:
– Haga clic en el ícono “Settings” en la esquina inferior derecha del reproductor de video.
– Haz clic en “Subtitles” y selecciona tu idioma.
– Si su idioma no aparece en la lista, haga clic en “English (auto-generated)”, luego haga clic en “Auto-translate” y seleccione su idioma.
Saludos
Discovery Center team