
In this tutorial, you’ll learn how you can use consecutive motion arrows together to make circular and spiral animations with PhotoMirage. We’ll show you a handy tip to continuously plot motion arrows in a sequence by holding down the Spacebar on your keyboard as you click, drag and release motion arrows. This allows you to plot consecutive motion arrows in a circle or spiral pattern.
Thanks for watching! We hope you found this tutorial helpful. You will find a written version of this tutorial below, and a printable PDF copy to download on the Download Resources tab above.
Download your FREE 15-day trial of PhotoMirage and start creating stunning animations from your photos, digital designs and artwork in just a few simple steps.
Download these free resources:
Written tutorial (PDF, 663 KB)
Sample images (Zip file, 4.89 MB)
PhotoMirage resources
User Guide (PDF, 4 MB)
Keyboard shortcuts (PDF, 518 KB)
PhotoMirage Tutorials
Tools and resources
PhotoMirage animation software
With PhotoMirage you can effortlessly transform any image into a captivating animation in only a matter of minutes.

PhotoMirage free trial
Download your FREE 15-day trial of PhotoMirage and start creating stunning animations from your photos and images.

PhotoMirage gallery
Visit the PhotoMirage gallery and upload your animations. Browse the gallery for inspiration and see what other users are creating.
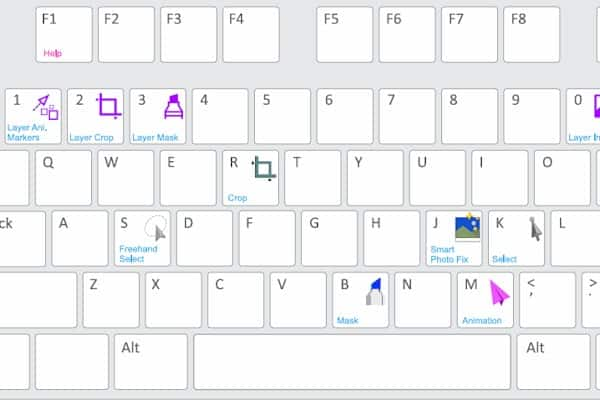
Keyboard shortcuts
Shave time off your most frequently performed tasks with this handy reference sheet for all the PhotoMirage keyboard commands.
How to make circular and spiral animations
In this tutorial, you’ll learn how you can use consecutive motion arrows together to make circular and spiral animations with PhotoMirage.
Click on any of the images below to view full-size.
To begin, open PhotoMirage and click on the Open button to upload an image that you want to animate.
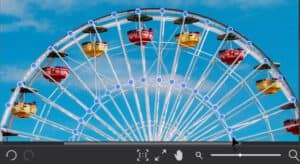
Making a circular animation over a round object
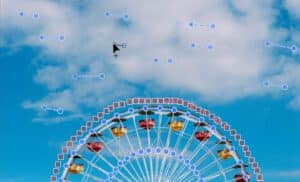
In this example, I’ll use a Ferris wheel against a sky background and create a circular animation to make it look like the Ferris wheel is spinning around.
We will plot a number of standard motion arrows following the frame of the Ferris wheel to create a circular motion.
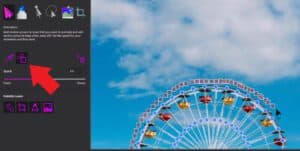
- Click on the Motion Arrow icon and zoom in on the image.
- Plot a motion arrow from the bottom of the image up to the first point on the Ferris wheel.

Important Note: To continuously plot motion arrows in a sequence, hold down the Spacebar on your keyboard as you click, drag and release motion arrows. This will let us continue to plot more motion arrows in a sequence.
- Repeat this process until you have created enough motion arrows to follow the circular frame of the Ferris wheel and connecting the arrows at the end.
- Repeat this on the circular frame on the lower half of the Ferris wheel to create a more even spin and make sure that the arrows follow the same direction as the first set.
- Select the Anchor Point icon and plot anchor points around the Ferris wheel so that motion is restricted to just the wheel.
Press Play to preview and you’ll see that the motion arrows formed in a circular sequence give the illusion that the Ferris wheel is spinning!
Another cool thing you can do to enhance this photo is add some standard motion arrows in the clouds.
Now when you press Play again, you’ll see that the clouds appear to be moving to the left while the Ferris wheel is spinning to the right.
How to make a spiral animation
You can also use this technique to create a spiral effect on images – either with or without any circular elements – to create some really amazing animations.
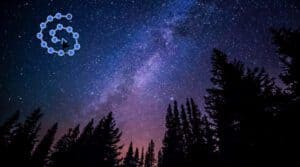
In this example, we’ll use an image of the stars over the forest. You can also add a spiral animation to images of seashells, spiral staircases, whirlpools, the inside of a rose in bloom and much more.
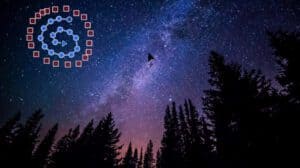
- Use the same technique as before to plot Motion Arrows in a small spiral in the sky in a counter clockwise direction.
- Plot Anchor Points all around the circle to prevent the other areas of the image from animating.
- Create another spiral using Motion Arrows going in a clockwise direction on the other side of the sky.
- Again, plot Anchor Points around it to isolate the animation to within the circle.
Create as many of these spirals as you like!
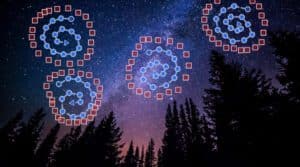
Now if we press Play to preview, you’ll see how the stars swirl in both directions bringing the image to life in a magical way!
Download your FREE 15-day trial of PhotoMirage and start creating stunning animations from your photos, digital designs and artwork in just a few simple steps.
