
View, identify, and alter the color profile of clips with the Selective Vectorscope – only available in Pinnacle Studio Ultimate. Correct color shifts between clips to keep skin tones looking natural, draw attention to objects, improve project cohesion, and ensure that your color saturation is optimized for TV broadcast, or online viewing.
The Selective Vectorscope color grading tool allows you to easily view the colors in your video clip to ensure the skin tones of subjects in your clip appear natural. The Vectorscope is selective, which means you can use the selection brush to limit the vectorscope to an area of color that you select in your clip. Skin tones of all colors should fall along this line. If you notice a shift away from this line, manipulate the colors in your footage until they draw back towards the Skin Tone Line, reducing the sense of detachment between clips caused by variations in warmth and lighting.
The same method can be applied to use the Selective Vectorscope to ensure color consistency of other objects across your project. If a subject always wears a red coat or carries a blue umbrella, shifts in those colors caused by different cloud cover, lighting or color adjustments can be monitored and adjusted by comparing the positions of that color on the Selective Vectorscope.
Thanks for watching! We hope you found this tutorial helpful. You will find a written version of this tutorial below, and a printable PDF copy to download on the Download resources tab above.
Download these free resources:
Written tutorial (PDF, 673 KB)
Download a FREE 15-day trial and discover all the essential and advanced video editing features that Pinnacle Studio delivers to make your videos look their best.
What’s new in Pinnacle Studio
Color effects and corrections
Featured products
 Pinnacle Studio 26 Ultimate
 Studio Backlot Membership
 Pinnacle Studio 26
 Vision FX
How to use the Selective Vectorscope
Selective Vectorscope is a color grading tool introduced in Pinnacle Studio 23 Ultimate. It can help you get skin tones to look correct, accurately match a clip’s colors to another clip for continuity or ensure that you aren’t boosting color saturation that would be displayed improperly for either broadcast or internet viewing.
Click on any of the images below to view full-size.
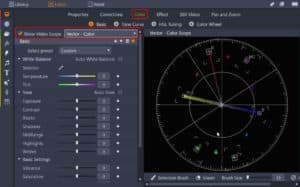
To access the vectorscope, select a clip on the timeline then go to the Editor panel and click on the Color tab. Enable Show Video Scope and select Vector – Color from the dropdown list. A vectorscope shows information about the current frame’s color, which in this case is an image of color bars – with both the color hue, and the saturation of the color, with 100% saturation shown at the center of each of the small targets for Red, Magenta, Blue, Cyan, Green and Yellow.
If you increase any of the colors beyond these 100% saturation limits, you are likely to have inaccurate colors once you export.
NOTE: the outer targets show the limit for TV broadcast safe levels, which is usually at 75% of total saturation. So, if you are editing for TV broadcast it is wise to check your footage doesn’t fall beyond these 75% limits, as your edit may be automatically rejected for broadcast, and you’ll need to re-edit your project.
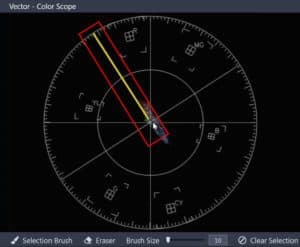
The vectorscope in Pinnacle Studio is selective, which means you can use the Selection Brush to limit the vectorscope to an area of color that you select in your clip. This is really useful for checking skin tone accuracy. All skin types should fall along this line between red and yellow if you want them to look realistic.
In this clip we can use the Selection Brush to draw some areas of the two subjects’ skin, and we can see that the clip looks a little too much towards the blue and magenta side of the spectrum.
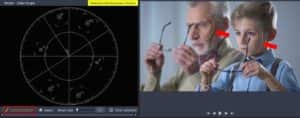
We can then just move the temperature towards yellow, and maybe the tint towards green a little until the skin is on the skin tone line. But the saturation has increased a bit, so we can dial down the saturation to compensate.
The skin tone line is the same for all skin colors, for European, African and Asian skin tones, as we can see in the next two clips – if we select the skin of both subjects in this clip, we can see that again we’re slightly towards red. You can also see their white shirts are ever so slightly pink. So in this instance, we can use White Balance on the brightest part of one of the shirts – which makes their shirts whiter and pulls the skin tones onto the skin tone line.

Remember of course that sometimes you don’t need or want skin tones to look accurate. For example, in this clip the subject is lit by the warm light of the flares she is holding, so you wouldn’t want to try and get her skin to look accurate. You should judge when you need to use the vectorscope on a case by case basis.

Another application of the vectorscope is to match the colors of consecutive clips, to get a consistent look between shots that are of the same subjects. For example, in these two clips the blue smoke effect is slightly more purple in the first clip, and slightly greener in the second clip. If we use the Selection Brush to paint similar areas on both clips, we can see the color difference reflected in the scope – the first clip is more towards magenta, and the second is more towards green.


The problem is, if we just adjust the tint of the second clip back towards magenta, it’s going to alter the whole clip in the same way, so our subjects faces become pinker. And if we add a portion of skin to our selection, you can see it’s WAY off the color line. So instead go to HSL Tuning, and we can use the click and drag tool to alter the hue of just the blue smoke colors. As we do so, we can see the blues moving towards magenta but the skin tones staying where they are.

Let’s fix the skin tones as well here, as they are too red. Now I don’t need the skin tones anymore so I can use the Eraser to remove that part of my selection.
The blues are still looking a little green in the second clip, so to match these two clips I’ll need to adjust the temperature and tint a little. In this case, it’s a fine balance between accurate skin tones and color matching the two clips.
Now the blues seem to match, as I flick between both clips, but the second clip is now a little more saturated in the blues than the first clip, so I can dial back the overall saturation of the clip, affecting all the colors, or I can jump back into HSL Tuning and just dial back the saturation of the blues. Whichever I think looks best or works best for the skin tones.
Download a FREE 15-day trial and discover all the essential and advanced video editing features that Pinnacle Studio delivers to make your videos look their best.
Color grading in Pinnacle Studio

