
This video will highlight the some of new features in CorelDRAW Graphics Suite 2024
Thanks for watching! We hope you found this tutorial helpful and we would love to hear your feedback in the Comments section at the bottom of the page. You will find a written version of this tutorial below, and a printable PDF copy to download on the Download Resources tab above.
Start your FREE 15-day trial and embark on a design journey with powerful tools for vector illustration, layout, photo editing, typography, and collaboration.
Download these free resources:
Written tutorial (PDF, 1 MB)
CorelDRAW Graphics Suite Resources
Quick Start Guide (PDF, 2 MB)
Keyboard Shortcuts (PDF, 3.5 MB)
CorelDRAW and Corel PHOTO-PAINT user guides
For CorelDRAW Graphics Suite subscription and perpetual licenses (2018 to 2024), languages include English, Português do brasil, 简体中文, 繁體中文, Čeština, Deutsch, Español, Français, Italiano, 日本語, Polski, Русский
What’s New in CorelDRAW Graphics Suite
CorelDRAW Tools
Introduction to PHOTO-PAINT
 CorelDRAW Graphics Suite
 Ultimate Vector Bundle Vol. 1
 CorelDRAW Standard 2021
 Ultimate Vector Bundle Vol. 2
 Corel Vector
What’s New in CorelDRAW Graphics Suite 2024
Introducing CorelDRAW® Graphics Suite 2024, your gateway to endless possibilities for creative expression without hindering productivity. This tutorial will highlight some of the new features and enhancements.
Click on any of the images below to view full-size.
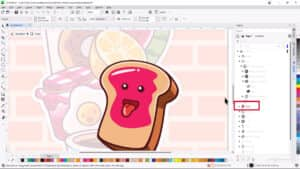
The Painterly Brush Tool
Built on world-famous Corel® Painter® brush technology, the Painterly Brush tool is a graphic design game-changer.
Unlike brush tools in other applications that are either vector-only or pixel-based only, the Painterly Brush tool combines the best of both worlds—a pixel-based brush tool that is controlled by vector curves.
The Painterly Brush tool is now the first tool in the Artistic Media tool group. When activated, the property bar features a Brush picker, which lists dozens of brushes in several categories. Each category can be expanded and collapsed. Hovering over each brush displays a preview below the list.
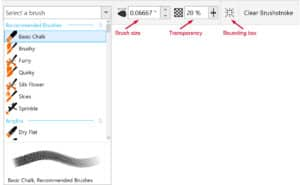
To apply a Painterly brushstroke to a selected vector object, simply choose a brush. Once the effect is applied, you can adjust the Brush size and Transparency settings on the property bar and change the color by right-clicking a color swatch on the color palette.

With nothing selected in advance, choose a brush then click and drag to create a Painterly brushstroke from scratch.
Painterly brushstrokes are non-destructive, which means you can use the Shape tool to adjust nodes along the vector object, and the brushstroke updates accordingly. You can also use the Pick tool to resize, move, or rotate the object.

Clicking the Clear Brushstroke button on the property bar removes not only the brushstroke but also the outline properties of the object. If the object also had no fill properties, it won’t be visible until you increase the Outline width and/or add a fill.
Painterly brushstrokes can be applied to text as well, and when you edit the text, the brushstroke will update accordingly.

To learn more about the Painterly Brush tool, watch the full tutorial.
Remote fonts
You can now access remote fonts, such as Google Fonts, directly in CorelDRAW and Corel PHOTO-PAINT™.
By default, remote fonts are not enabled. To enable remote fonts:
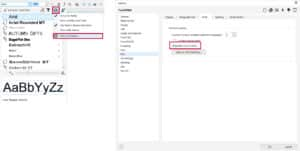
- Open the Font list box that appears on the property bar when the Text tool is activated.
- Click the Font Options icon and select Font List Options.
- On the Fonts tab of the Text section, click the checkbox Enable remote fonts.
This setting can also be accessed under the Tools menu by clicking Options > CorelDRAW and then navigating to the Fonts tab of the Text section.
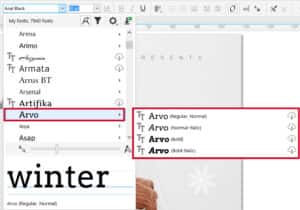
Once remote fonts have been enabled, the Font list box displays a cloud icon for online fonts that aren’t downloaded and installed, as well as any font that’s found on your system but not installed. An example is the Google Font family Arvo.
When a remote font is used, it will be automatically downloaded and installed, and will no longer show a cloud icon in the Font list box.
If you don’t want remote fonts to appear in the Font list box, click the Filter icon and then enable the Hide remote fonts checkbox.
In CorelDRAW, this feature saves you time when opening a document containing fonts that are not on your system, or fonts embedded in the file but available in an online library. Those missing fonts are automatically installed, eliminating any font-substitution steps.
Non-destructive effects workflow
The non-destructive bitmap effects workflow has been streamlined to provide a consistent, hassle-free experience.
In CorelDRAW, adding a bitmap effect from the Effects menu now automatically opens the FX tab of the Properties docker/inspector. Here you can access all tools and settings for these non-destructive effects, for quick, real-time adjustments, and endless experimenting.
In PHOTO-PAINT, the Effects docker/inspector has been reorganized to serve as your one-stop shop for non-destructive effects. In both applications, you can apply multiple special effects to the same object, toggle individual effects on or off, and reorder effects. With a single click, you can reset an effect, or flatten all effects.
To learn more about non-destructive effects, watch these full tutorials:
Apply AI-based effects to bitmaps and vectors
Apply effects in PHOTO-PAINT
New design templates
Browse through a whole new selection of 300 customizable cloud templates, exclusively for subscribers and trial users. Craft beautiful brochures, logos, infographics, web graphics, and more, with double the creative templates available to subscribers.

To learn more about working with templates, watch the full tutorial.
Enhancements from September 2023 subscriber update
As with every release, we continue to focus on product quality, performance improvements, and addressing top customer requests. Several improvements have been added to this release, based on loyal customer feedback, including driver update notifications, intuitive file names for recovered documents, and more.
Here are a few other enhancements that were first introduced to subscribers in the September 2023 subscriber update and are now available in CorelDRAW Graphics Suite 2024 for everyone.
Focus mode
With Focus mode, you can isolate a single object, or group of objects, in order to edit only those elements of your artwork.
Right-click on the object you want to edit, either directly in the workspace or in the Objects docker/inspector and choose Bring into Focus. This keeps the selected object in full display and full color, even if other design elements are placed above it. All other objects are faded in the background and grayed out in the Objects docker/inspector.
Another way to bring nested groups or single objects into focus is by double-clicking on them with the Pick tool. Any new objects created will be added to the group currently in focus.
Double-clicking with the Pick tool to enter Focus mode is the default behavior, but this setting can now be disabled. Under the Tools menu, select Options > CorelDRAW. Select Edit in the left menu and then disable the checkbox Double-click to activate Focus mode.
The floating breadcrumb toolbar lets you know where you are in the group hierarchy and can be used to shift focus to other objects or exit Focus mode.
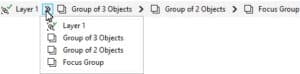
If you use Focus mode on a single object that’s not part of a group, a temporary Focus Group will be created. If no objects are added, the temporary group will disappear when you go back one level. But if additional objects are added to a temporary Focus Group, that group will remain.
To learn more about Focus mode, watch the full tutorial.
Enhanced print merge
With the enhancements to CorelDRAW’s advanced print merge workflow, variable data print jobs are now much easier, with support for Excel data, as well as files in CSV, TXT, or RTF formats.
In this example we’re using a business card design document. To link a design file to an Excel spreadsheet containing employee details, choose File > Print Merge > Create/load Print Merge. Then click the Import Data Source button and select the data file to use.
Once the data has been imported you can make changes to the records directly in the Configure Data Source window, rename or delete columns, and add or remove entire records. You can also add data from another source, such as a second spreadsheet that contains path links for the employee profile photos.
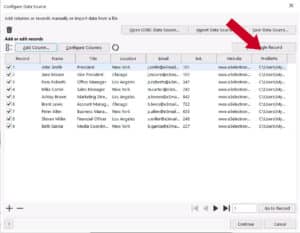
Once you are finished configuring the data, click the Continue button to open the Print Merge window. From the Data source columns dropdown list, choose a print merge field and then click Insert Field. The field, such as <Name>, will be inserted into your design document and then you can move, resize, and change the field’s formatting properties.

Another enhancement to the print merge workflow is the ability to add images and QR codes.
Once you’ve finalized your document, click Create Merged Document and a new CDR file is generated, with one page for each linked record.

To learn more about variable data printing and print merge, watch the full tutorial.
Enhanced Assets docker
The Assets docker/inspector has been redesigned to provide a familiar and intuitive method for browsing files. Clicking the Browse icon opens a tree folder structure with two resizable panes. Choose a folder in the top Folders pane, and thumbnails of the assets in that folder are displayed in the bottom Content pane.
To learn more about the Assets docker, watch the full tutorial.
Enhanced Export workflow
With the enhanced export workflow, it’s easier than ever to output objects and pages. The Export docker/inspector has simplified options to export the selected objects, the current page, or all pages.
New export formats have also been added, including bitmap (BMP), CorelDRAW (CDR), Computer Graphics Metafile (CGM), Adobe Photoshop Document (PSD), and Google Web Picture (WEBP).
To learn more about the Export docker, watch the full tutorial.
Enhanced PDF import
PDF import capabilities have also been improved. Open a PDF in CorelDRAW, and the resulting CDR file has improved text flow and editability, plus improvements to the preservation of formatting elements, columns, paragraphs, and more.
To learn more about PDF import and editing PDFs, watch the full tutorial.
Start your FREE 15-day trial and embark on a design journey with powerful tools for vector illustration, layout, photo editing, typography, and collaboration.

Comments (4)
Reader Interactions
Comments
it is helpful
gostei muito
Ich finde auf meiner Seite nicht die Leiste Arbeitsleiste, zum Effekt und so weiter.
Hallo Arnim
Welche Version von CorelDRAW verwenden Sie? Viele dieser Funktionen sind nur mit einem CorelDRAW-Abonnement verfügbar.
Weitere Informationen zu den Funktionen in diesem Video finden Sie in dieser Sammlung von Tutorials auf Deutsch.
https://www.coreldraw.com/de/learn/tutorials/
Wir hoffen, dass dies hilft.
Discovery Center team
Dieser Kommentar wurde mit Google Translate übersetzt