

This video covers following topics:
0:27 How can photos or objects placed outside the workspace appear on every page?
1:26 Is there a digitizing application for embroidery in CorelDRAW?
1:55 Why do your products require Internet Explorer 11?
2:20 I use CorelDRAW X8 and engrave on an Epilog laser. To get a 1″ letter I need to make the letters 1.125” What’s causing this? What can I do to fix it?
3:00 How do I get text frames to resize accordingly when resizing an entire page?
4:09 What resources are available for beginners to learn how to use CorelDRAW from the ground up?
4:55 How do I enlarge an object but keep the same thickness?
6:00 Why is the Export command not working?
7:16 I need to create numbers from 1 to 300 (20cm high each) and to save me time I would like to do it automatically, not typing each one. How do I do this?
You can use the video time stamps if you only want to view a particular question and answer. Below is a written version of this session, with links to related tutorials that provide more details on some of the topics.
Resources
Download a printable PDF of the written tutorial (PDF, 618 KB)
Find the CorelDRAW Graphics Suite User Guide for your version
View our full collection of CorelDRAW tutorials to learn more
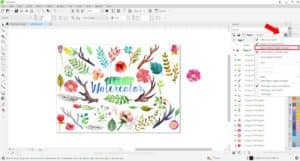
How can photos or objects placed outside the workspace appear on every page?
If you are using CorelDRAW 2019 or later, we now keep the objects associated to the layer that they were created on. So, if you drag an object off the page or import an object and place it off the page, it will still be on the layer that is specific to that page. Therefore, when you switch to a different page, you will not see it.
To change this action, open the Objects docker (Window > Dockers > Objects) and click on the Options icon in the top right corner. Uncheck the Keep Desktop Objects on Layer option and now when you switch to a different page you will see any objects that are placed off the page.
Is there a digitizing application for embroidery in CorelDRAW?
CorelDRAW Graphics Suite does not include a digitizing application for embroidery. Embroidery Studio E4 by Wilcom is embroidery and multi-decoration software for professional digitizers, embroidery shops, industry trainers and educators. It uses CorelDRAW as the design engine and can be purchased from the Wilcom website.
Why do your products require Internet Explorer 11?
The framework of the sign-in process and communications requires IE 11 updated libraries to provide the most security when online. Internet Explorer is also used for the Help system as well as other aspects of the Get More screens.
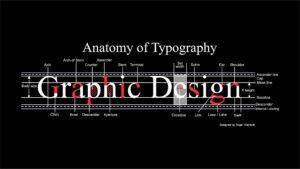
I use CorelDRAW X8 and engrave on an Epilog laser. To get a 1″ letter I need to make the letters 1.125” What’s causing this? What can I do to fix it?
When placing text on the page and resizing it you need to remember that the measurement is not that of the font, but rather the line height which also includes an area called Internal leading. This spacing is to accommodate ascenders and descenders, accents such as grave (ù), acute (ý), umlaut (ë) or ogonek (ę), and so on.
If I design a brochure with pictures and text to page size A5 for example, is it possible to adjust the entire contents to A4 including text size adjustment? I select all elements and adjust size, pictures obviously no problem but text remains the original font size. Text is in text frames.
It certainly is possible to resize a design and have the text resize as well. If you have Artistic text in a design, it is simply a matter of selecting everything and resizing it. In your situation you have text in frames, also called Paragraph text. To resize these text frames and the text within, simply hold down the Alt key while resizing.
I am a beginner and want to learn how to use CorelDRAW from the ground up.
There are a number of different resources available to help you build a better understanding of the tools and features within CorelDRAW:
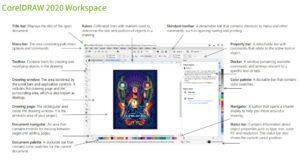
The Quick Start Guide can be accessed from the Help menu in CorelDRAW. This PDF can help you get started quickly with the suite by introducing you to useful tools and features. Here is a sample of page 1.
The Hints docker can be turned on either from the Help menu or Window > Dockers menu. Hints provide information about tools in the toolbox from within the application. When you click a tool, a hint appears in the Hints docker on the right side of the application window, telling you how to use the tool. If you need additional information about a tool, you can access relevant learning resources such as a Help topic, video, or written tutorial.
On the Welcome Screen, the Learning tab has a selection of tutorials and other resources.
The Discovery Center website has a vast collection of CorelDRAW and PHOTO-PAINT tutorials.
And finally, there is a CorelDRAW Essential Training course available through LinkedIn Learning that includes 70 instructional videos that will teach you everything you need to know about using CorelDRAW.
How do I make a wreath on CorelDRAW? I want the same one multiple times but each time slightly bigger, however I want it to stay the same thickness as the smaller one?
To keep the thickness at the same size, you would use the Outline properties. Select your wreath object with the Pick tool and then double-click on the outline swatch in the Status bar along the bottom of the interface. This will open the Outline Pen dialog box.
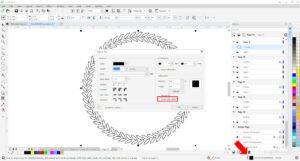
There are many settings you can adjust but the important one in this case is Scale with object. The Scale with object setting will increase the outline width as you increase the size of the object. Therefore, if you wish the outline to maintain the original width then make sure the Scale with object option is NOT selected.
Why is the Export command not working?
There are two scenarios where the Export command may not be working. The first is that if a user is using the trial version of CorelDRAW and it has reached the end of the trial period. At this point, CorelDRAW becomes a viewer only and the Save, Export and Print functions have all been disabled.
The second scenario is if Enable Print and Export option is disabled for the layer(s) your object or design is on. You can find this option in the Objects docker (Window > Dockers > Objects).

If the Enable Print and Export icon is crossed out, as in the image above, simply click on it to enable and you should now be able to export.
I need to create numbers from 1 to 300 (20cm high each) and to save me time I would like to do it automatically, not typing each one. How do I do this?
The easiest way to do this would be to use page numbering. Here is how I would set it up.
Create a new document and in the New Document dialog box set the number of pages to 300 and the page size to 19 x 13 inches (landscape). This page size will accommodate a 20cm high number.
Next, from the Layout menu, select Insert Page Number > On all layers.
On the Property bar, enter 20 cm in the Height field. This will automatically convert to inches.

Place the number in the center of the page by tapping the letter “P” on the keyboard.
On the Property bar, set the Horizontal Alignment to Center.
Now if you select the Page Sorter View option under the View menu, you will see the numbers 1-300 each on their own page. If you want to change the font style or color, simply change it on one page and it will update on all 300 pages.
