This video covers the following topics:
0:27 How can I get creative content from past versions?
2:19 How do I darken brush outlines?
3:12 Can I still use the older version of the Materials palette in PaintShop Pro 2021?
3:37 The Convert Text to Curves and Convert to Path options are grayed out so I can’t use them, why?
5:40 I can’t find the Crop tool, where did it go?
6:19 I’m trying to change a color in a gradient fill but it’s not working, am I missing a step?
You can use the video time stamps if you only want to view a particular question and answer. Below is a written version of this session, with links to related tutorials that provide more details on some of the topics.
Resources
Download a printable PDF of the written tutorial (PDF, 1.7 MB)
Find the PaintShop Pro User Guide for your version
View our full collection of PaintShop Pro tutorials to learn more
Is there a way to get all the creative content from past versions? I have a picture tube from an earlier version, and I’d love to add past content like this to my current version.
Click on any of the images below to view full-size.
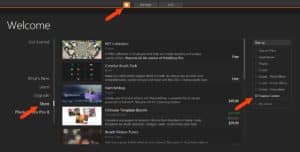
Creative Content packs are unique to the version of PaintShop Pro you’re using. To see what’s available, click the House icon to open the Welcome Book, and choose Store, or Get More in earlier versions. Then check the Creative Content filter.
These packs are part of the user license agreement and therefore can’t be distributed on their own. But if you owned previous versions of PaintShop Pro, you can migrate old content to the current version.
There are three places to look for previously downloaded creative content. In these file paths, you would replace 2021 with the older version you have installed.
- C:\Users\YOURNAME\Documents\Corel PaintShop Pro\2021. Within this folder are sub-folders for Brushes, Masks, Picture Tubes, etc.
- C:\Program Files\Corel\Corel PaintShop Pro 2021 (64-bit)\Languages\EN. Here you can find Palettes, Presets, Scripts, etc.
- C:\ProgramData\Corel\Corel PaintShop Pro 2021. In this folder, each different type of content is in a different numbered sub-folder. For example, the Corel_01 folder contains brushes, Corel_06 is for gradients, Corel_07 has masks, etc.
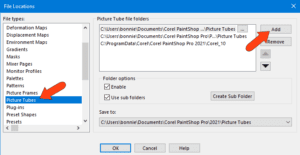
For any older content you want to migrate into your newer version, here’s how to tell PaintShop Pro where to find it. First, make sure that you are working in the Complete workspace (File > Workspace > Complete). Next, go to File > Preferences > File Locations. If it’s previous picture tubes you want, then choose that file type, and the folders listed are for the current version. Click Add, browse to where your old content is, and add that folder to the list.
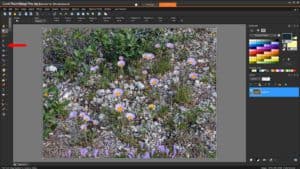
How do I darken brush outlines so that I can view the area I’m working on? If there is not enough contrast, it’s difficult to see the brush.
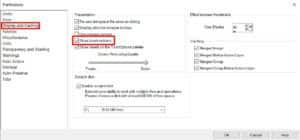
Check to see that the brush outlines are turned on by going to File > Preferences > General Program Preferences and select Display and Caching from the list on the left. Under the Presentation section, add a check beside Show brush outlines.
The brush outline will change color depending on the color of the image below: over a light area the brush outline is dark; over a dark area the outline is light; and when both light and dark are present, the color changes along the tool outline.

I just bought PaintShop Pro 2021, after using Version 9 forever. How can I get a color palette like the standard one from Version 9?
Go to File > Preferences > General Program Preferences and select Palettes from the list on the left. Under the Materials palette section add a check beside Use classic Material Properties.
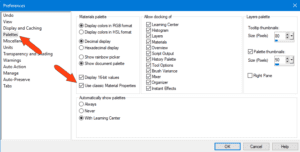
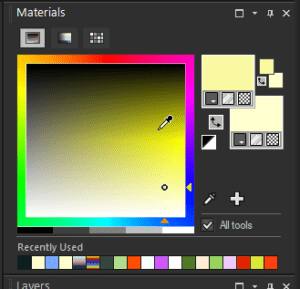
After clicking OK you should have the familiar Frame and Rainbow palettes.
I want to convert text to a curve, but the Convert Text to Curve options are grayed out in the Options menu. Fit Text to Path is also grayed out.
There are a couple reasons why these options could be greyed out. The first reason is that the text has not been created as a vector object.
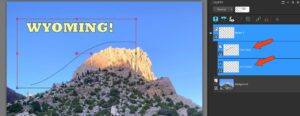
When you are creating new text, make sure that Create As is set to Vector on the Tool Options palette.

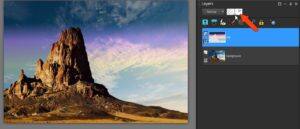
Type in your text then click the Apply checkmark on the Tool Options palette. The text is placed on its own vector layer, which you can see in the Layers palette. As long as the text layer remains the active layer in the Layers palette, the Convert Text to Curves and Convert to Path options will be available under the Objects menu.
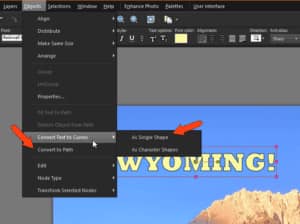
You can also access these same options from the context menu, which appears when you right-click.
The second reason that the Convert Text to Curves and Convert to Path options are grayed out is that you don’t have the proper text layer selected.
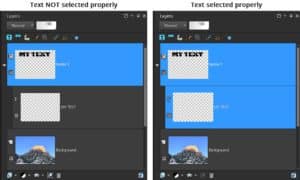
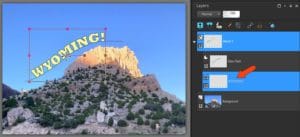
A vector layer is actually a layer group, and the text is on a sub-layer within that group. You can create several individual text sub-layers in the same vector layer group. You can expand the layer group by clicking on the arrow beside the layer in the Layers palette. If you look at the icons beside each layer, you will see that the vector layer has a shapes icon, and the text layer has a T icon.
If the layer group is not expanded in the Layers palette and you just click on the top layer level, the text sub-layer isn’t selected, so therefore the Convert Text to Curves and Convert to Path options will be grayed out. Expand the layer group and make sure that your text sub-layer is selected and then you will be able to access the options.
NOTE: Once you convert text to curves, you can no longer use the Text tool to edit it.
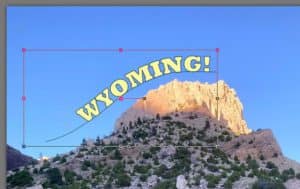
Fitting text to path is similar – you need to start with two vector objects: text and a curve. With the Pick tool you can either select both objects directly on the image while holding Shift, or you can select both sub-layers in the Layers palette while holding Shift.
The Fit Text to Path command will be available in the Objects menu, or in the context (right-click) menu.
If you want to move the text to a different spot along the path of the curve, make sure that only the text layer is selected with the Pick tool, then move the text as needed.
To learn more, watch our full tutorial Fitting Text to a Path.
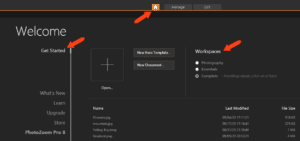
The new workspace is great for touch screens, but why can’t I find commonly used tools such as Crop?
If your PaintShop Pro workspace looks like this…

… you’re using the touch-screen friendly Photography workspace and the Crop tool is in the lower right corner.
If your PaintShop Pro workspace looks like this…
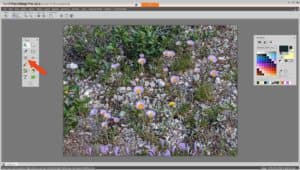
… you’re in the Essentials workspace. The Crop tool is part of the Tools toolbar, which can be opened by choosing View > Toolbars > Tools.
If you’re looking for the full set of tools and palettes, you want the Complete workspace, and the Crop tool is on the Tools toolbar at the left.
At any time, you can change your workspace by going to File > Workspace, or by opening the Welcome screen and choosing your workspace on the Get Started tab.
To learn more, watch our full tutorial Overview of PaintShop Pro Workspaces.
When using the Gradient Fill tool, I can’t seem to change the color of the outer edges of the gradient. I select a color from the palette, but when I return to the area I want to change, instead of the cursor displaying a plus sign, my cursor is a pointing hand. I click on the gradient square and nothing happens. Am I missing a step somewhere?
The missing step here is probably that you’re clicking a color swatch instead of dragging it onto the gradient.
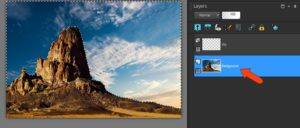
We’ll demonstrate on a landscape photo. We’ve added a raster layer above the background to contain the new sky gradient.
Our next step is to create a selection area in which we will apply the gradient fill. This is not a mandatory step when using the Gradient Fill tool, but it will allow us to apply the gradient to only a portion of the image (in this case, the sky) instead of the whole image.
Starting on the background layer, we activate the Smart Selection Brush tool and use it to brush around the sky area to select the sky and clouds.
To learn more, watch our full tutorial Making a Fine-detail Selection.
The new raster layer is the one we want to fill with a gradient, so we click on it in the Layers palette to make that layer active. Then activate the Gradient Fill tool. In the Materials palette, the foreground (top) swatch displays your most recently used gradient – in this case, a dusky sky gradient. If you want to change the gradient fill, click on the swatch to open the Material Properties window, and choose a different gradient.
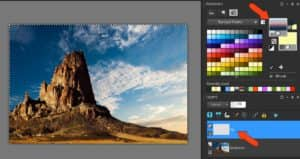
To apply the gradient, drag a straight line from the top of the sky to the lowest point along the ground.
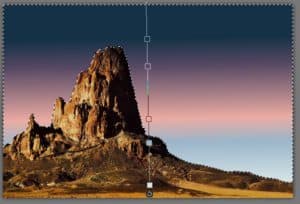
This gradient has 5 color change points, which you can drag up or down to new spots along the gradient line.
To remove a color from the gradient, drag its swatch off the gradient line.
To add a new color to the gradient, drag a color swatch from the Materials palette onto the gradient line.
To change any of the gradient colors, you need to first select it on the gradient line. Your cursor becomes a pointing hand, and the swatch is outlined in blue.
Now you can drag a new color swatch from the Materials palette into the blue square and the color will be changed.

TIP: for a more realistic effect, try lowering the opacity of the gradient layer so that the sky and clouds in the original photo show through.