
In this tutorial you will learn how to use the Smart Selection tool and Edit Selection mode to create a fine-detail selection, allowing you to replace backgrounds, isolate objects and combine images. We will review how the Smart Selection Brush works and how it differs from other selection tools. Once you have made your preliminary selection, you can then use the Edit Selection mode to fine tune the selection area to add or remove parts of the selection.
Thanks for watching! We hope you found this tutorial helpful and we would love to hear your feedback in the Comments section at the bottom of the page. You will find a written version of this tutorial below, and a printable PDF copy to download on the Download Resources tab above.
Download your FREE 30-day trial and make every shot your best shot with PaintShop Pro, your all-in-one photo editing and design software.
Download these free resources:
Written tutorial and Sample Images (ZIP, 688 KB)
PaintShop Pro resources
Keyboard shortcuts (PDF, 173 KB)
PaintShop Pro User Guides
Partner and User websites
PaintShop Pro User Forum
Scrapbook Campus (Tips and tricks, workshops, master classes, and more)
Creation Cassel (Scripts, picture tubes, and other PaintShop Pro tools, plus weekly freebies)
PaintShop Pro Maniacs (Facebook group)
PaintShop Pro (Facebook group)
What’s New in PaintShop Pro
PaintShop Pro Tools
Working with Selections
Featured products
 PaintShop Pro 2023 Ultimate
 AI HDR Studio 3.0
 PaintShop Pro 2023
 Vision FX 2.0
Making a Fine-detail Selection
In this tutorial you will learn how to use the Smart Selection brush and Edit Selection mode to create a fine-detail selection, allowing you to replace backgrounds, isolate objects and combine images. We will review how the Smart Selection brush works and how it differs from other selection tools. There are multiple selection options and multiple ways to edit selections. Your preferred methods will come from what your needs are, the layout and composition of your images along with practice and trial and error.
Click on any of the images below to view full-size.
Before you get started, if you haven’t already downloaded the sample images you can download them here. Download the sample images >>
Step 1: Setup
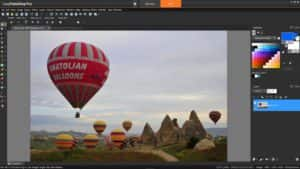
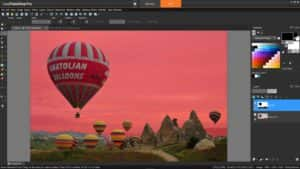
To begin, open the sample images Balloon.jpg and StarrySky.jpg in PaintShop Pro’s Edit workspace. Make sure you have your Materials palette and Layers palette open (go to View > Palettes).
Step 2: Creating a Fine-detail Selection with the Smart Selection Brush
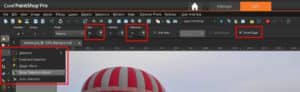
Activate the Smart Selection brush from the Selections tool group flyout on the Tools toolbar. In the Property bar, set the Tolerance to 15, Size to approximately 85 and enable Smart Edge.
The Smart Selection brush works by clicking and dragging over the area you want to select. It will automatically add all other connected areas into the selection as set by your parameters in the Property bar.
You want to select the sky and none of the balloons or near mountains. Starting in the lower left corner of the sky, hold your mouse button down, go up, over and around the balloon and end in the opposite corner. The brush size we set makes it perfect for getting around the balloon.

You can see the selection area is surrounded by the selection marquee, often called “marching ants”. The selection marquee will be easier to see on your screen than in the screenshot above.
Step 3: Editing a Fine-detail Selection
A quick glance in the lower right shows that it didn’t select some of the faded distance mountains. You can try adjusting the settings for the Smart Selection brush and redoing the selection or hold down the Ctrl key and click on the missed area to add it. But an easier way is to use Edit Selection mode.
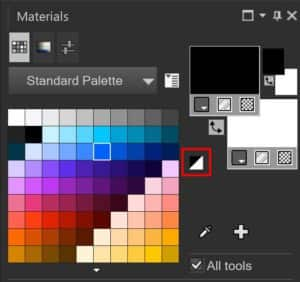
Note: Before activating the Edit Selection mode, make sure your Materials palette is set to black and white. Do this by clicking the small black/white square.
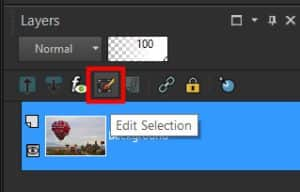
To activate Edit Selection mode, go to Selections > Edit Selection. Or click on the Edit Selection icon in the Layers palette.
Once you activate Edit Selection mode, you will see that your selection is now identified by the reddish hue, a bit easier to see than the marching ants. Now we can add and delete areas of the selection by using the Eraser tool.
As an example, we will remove one of the small hot air balloons from the selection. Activate the Eraser tool and set the Size to 45. Brush over the balloon with the Eraser tool and it will be covered with the red tint, indicating that it is now part of the larger selection area (which is the background sky).

If you wanted to remove parts of a selection area, right-click with the Eraser tool and the red tint will disappear, indicating that the area is no longer part of the selection.
Once you have fine-tuned your selection, you can exit the Edit Selection mode by clicking the same icon in the Layer palette, or by going to Selections > Edit Selection.
Step 4: Removing and Replacing a Photo Background
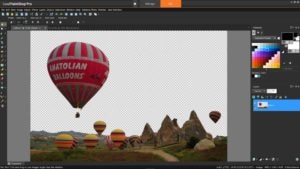
We’re now ready to replace the background of the balloon image. First, we need to raise the image up from the background, so you can slide the starry sky background in behind it. In the Layers palette, right-click on the Background layer and choose Promote Background Layer.
The background layer will be renamed Raster 1. Now press the Delete key and the area you have selected will be deleted and you will see a checkerboard pattern in its place (this indicates the area is transparent). You can now press Ctrl + D to remove the selection marquee.
Go to the starry sky image and copy it (Ctrl + C or go to Edit > Copy). If you have the Pan tool (hand icon) activated, you can also right-click on the image and select Copy.
Return to the balloons image and paste in the starry sky image (Ctrl + V or go to Edit > Paste as New Layer or right-click and select Paste > Paste As New Layer).
In the Layers palette, drag the starry sky layer underneath the balloons layer and congratulations, you’re done!

Download your FREE 30-day trial and make every shot your best shot with PaintShop Pro, your all-in-one photo editing and design software.
