
Shutterstock image by Minerva Studio
Part 1 | Save time importing, sorting and rating your photos
So… you’re thinking about making the move from Lightroom to Corel AfterShot Pro.
Well, my name is Eric, a new contributing writer to the Corel team and a professional portrait and travel photographer. I recently took the leap and let me tell you why exploring a Lightroom alternative was such a great decision.
I know jumping to a new software can be a big step, and you might be a bit apprehensive about it; but—take it from me—there are all kinds of advantages to making the switch.
In this article, part 1 of my introduction series, we’re going to see how AfterShot Pro will actually help you cut down on time spent in front of the computer by streamlining your workflow and getting you back where you belong—behind the lens making photos!
Finding your best shots… There HAS to be a faster way!
Like all photographers, I take way more photos than I’ll ever turn over to a client or need for myself. Now, I have no doubt that your workflow is different from mine, which will likely be different from many other photographers out there. That said, no matter what software you use, one of the most important first steps of any workflow is culling your images down to your best shots.
In my opinion, this is one of the other guy’s biggest downfalls… and one of the main reasons I started searching for an alternative to Lightroom.
First, you have to import your images… which, on its own, takes forever.
Then, as you review each photo you’ve just finished importing, you have to wait again for the thumbnail preview to load fully before finally getting a peek at the image in high resolution.
For me, this alone was enough to kick-off a search for a something different.
After all—time is money and we all want more of it. If you agree, then you’ll be pleased… because this is where AfterShot Pro first shows its prowess.
No Catalogs…? No Problem.
From my perspective, an alternative to Lightroom should be more than a simple clone, it should give you an advantage, like new and faster ways of working with your images.
As we’ve discovered, importing to Lightroom’s catalogs slows down the whole editing process. In AfterShot Pro, there is no importing required – meaning little to no wait time before you start editing.
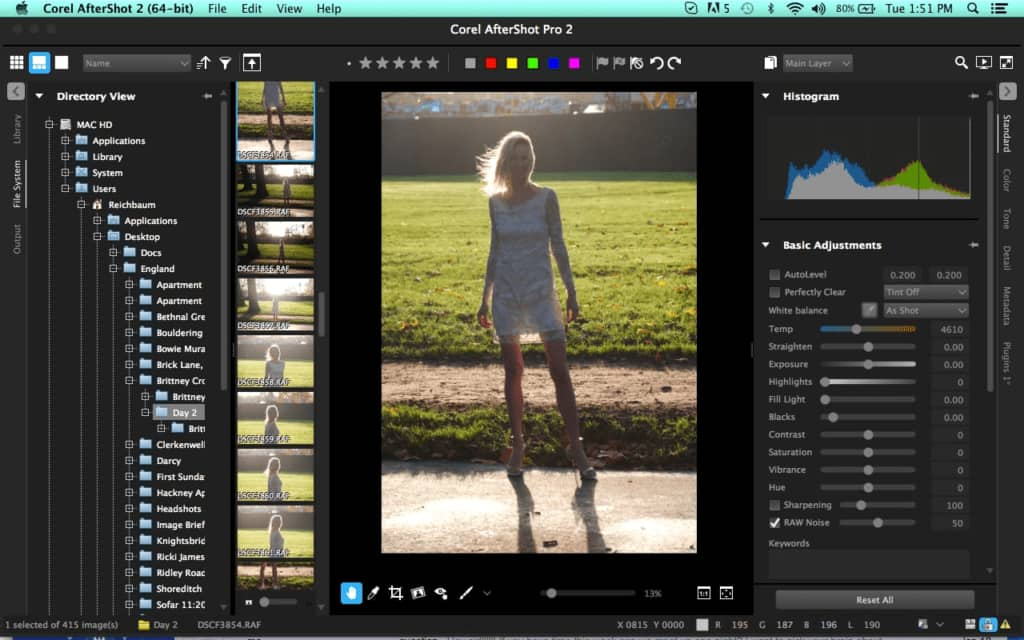
With the intuitive file tree panel on the left side of the interface, you have the ability to quickly navigate to the folder containing your images, and start editing.
With a double-click of the mouse, the images in the folder appear as thumbnails, and are available for instant viewing, even if they are RAW files.
Now, instead of either using a separate tool for culling and rating such as Photo Mechanic… or waiting for Lightroom to slowly load each individual photo… you can quickly and easily sift through, sort, and rate all of your images.
You still have the ability to work with catalogs in AfterShot Pro and they’re pretty darn powerful… but, thankfully, this is a choice the folks at Corel leave up to you.
How I Sort & Rate Photos in AfterShot Pro
Like I mentioned earlier, we all have different workflows and what works for one photographer, might not work for another. For those of you just getting started with AfterShot or photography in general, I’ll share my workflow for sorting and rating images after the shoot.
My first step is to go through all of the images and flag the rejects for deletion. Maybe they’re out of focus, or the model is blinking. Whatever the case, I try to trim the fat first, so that I can get down to a workable number of images. During this process, I often give a high star rating (4 or 5 stars) to any photos I know I like and want to work on.
QUICK TIP: Activate the Magnifying Tool (with the ` key) then hover your mouse over a section of the image for an instant magnification preview—great for quickly checking focus and sharpness.
After my initial run through of all of the images, it’s time to take a breather. I like to give my eyes and brain a break, so that when I go back for each consecutive round of ratings, I have a bit of a fresh start.
When I’m back at it, I give one star to any images that I think might be contenders. For the next round of culling, I look only at the starred images. I repeat this process, giving higher stars each round until I get the batch down to the final images I’m happy with. This might be 1,000+ if I’m editing a wedding, or maybe just 2-5 images if I’m working on a personal portrait project.
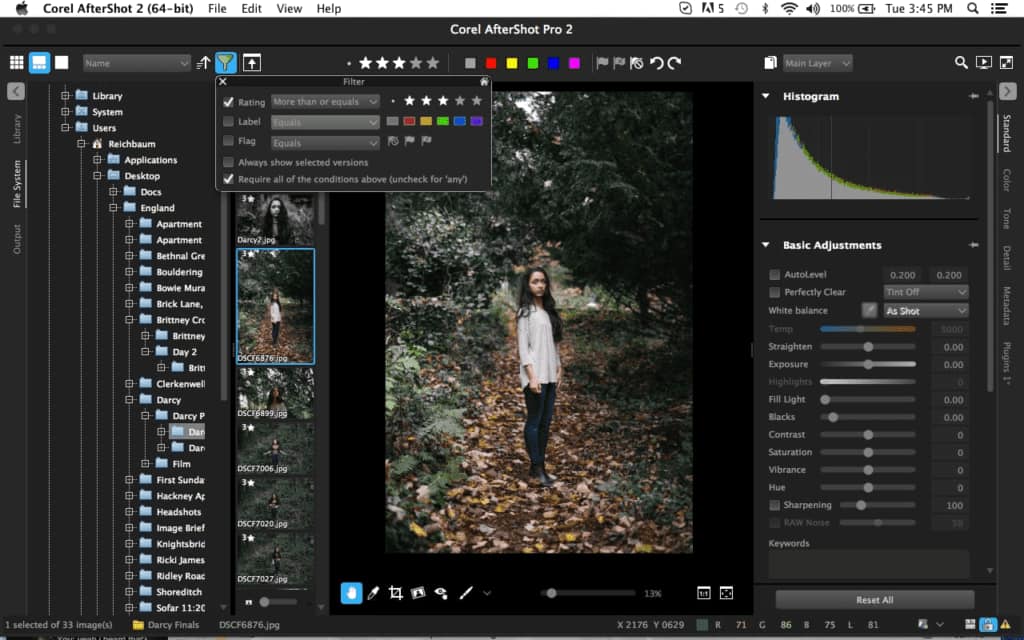
Once my picks are selected, I always copy them to my backup drives so that I have the selects in more than one place. It takes a long time to narrow the images down, so it would be quite a shame if I had to go through the process all over again.
Now, since AfterShot Pro 2 is a lot more than just a system to rate and cull your images, you don’t have to take them to another piece of software, you can simply take your selects and do all of your non-destructive editing right in the same interface.
Be sure to check back soon. In part 2 of this series, I’ll show you how to take the next step in your workflow, including correcting white balance and exposure, adding sharpness, and other simple ways to make your images look their best.
Try AfterShot Pro today! Download the free 30-day trial and discover the faster way of working with your photos.







22 Comments