
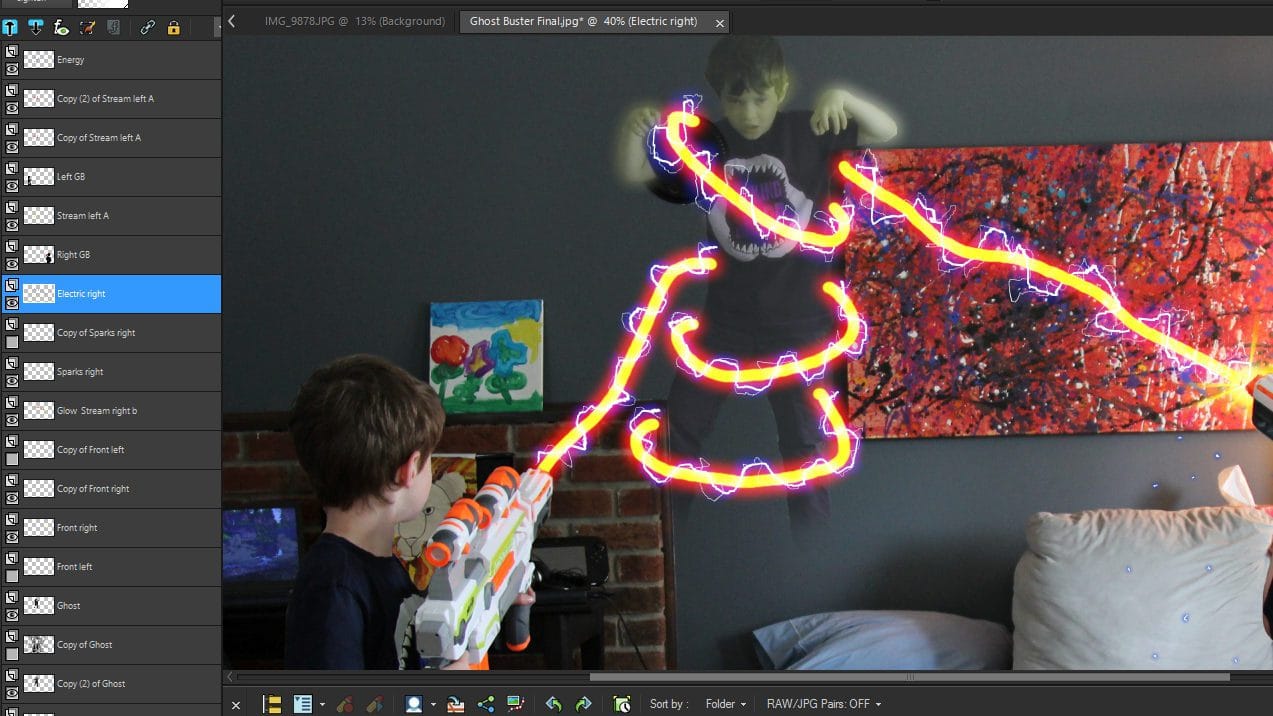
30 years ago the original Ghostbusters movie was released and I thought it would be fun to create a Ghostbusters-inspired picture. Here is how to create the proton pack energy stream effect using PaintShop Pro (these steps will work with most photo editors as long as it supports layers).
You will need to know how to:
Set up your shot
Your ghost should be a separate image, added in another layer so that you can make it translucent and ghost-like. I will get into that later in a different post. If you don’t want to do that, or you are adding this effect to an existing image then anyone can be the ghost, it’s all good fun.
I also only had one helper for my photo so he got to be everyone in this picture. Check out my other post on how to take a picture of yourself with yourself. But you can add this effect to existing pictures or plan it out from scratch. I like to add these special effects to pictures that have already been taken, it can be a lot of fun showing them to friends afterward.
So let’s get started with why we are here!
Steps to create the Ghostbusters proton pack energy stream
Part 1 – The Energy Stream
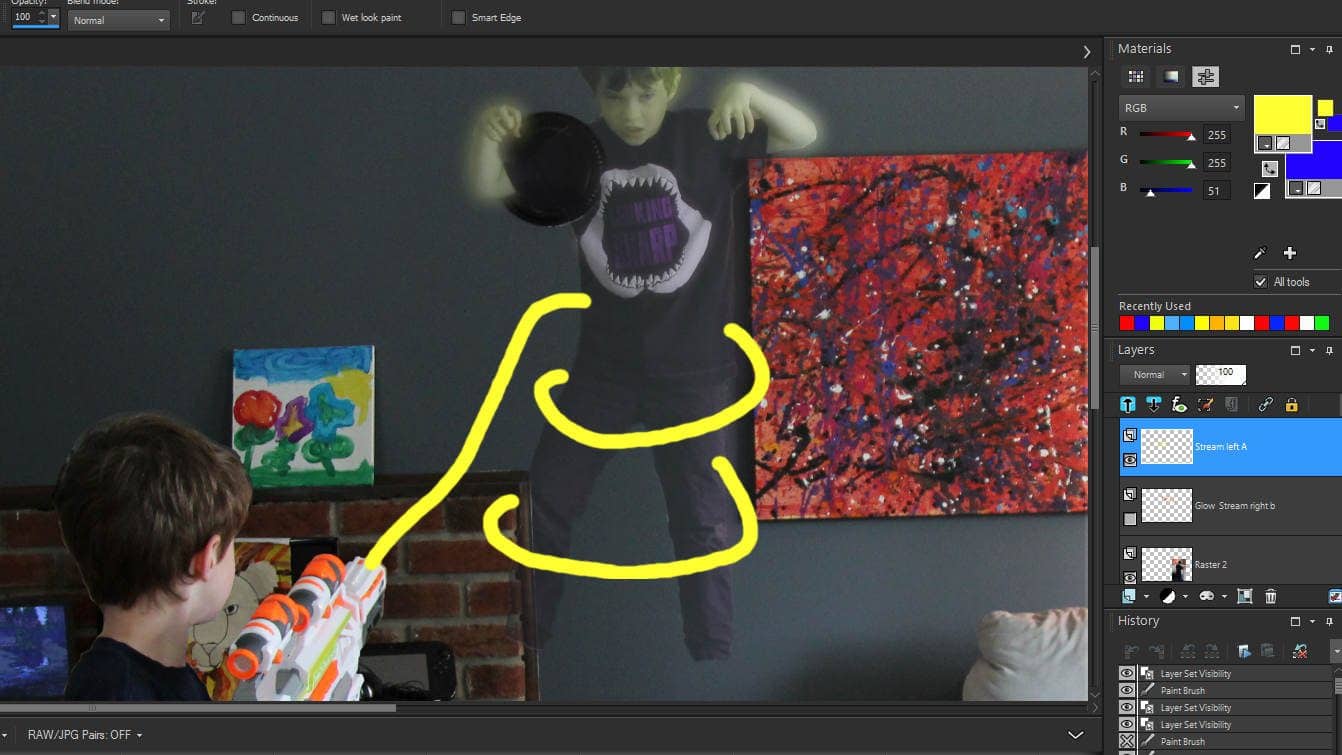
- Start by creating a new layer. It should be a raster layer and give it a name that is going to mean something. Like “Stream Right”
- Draw your main beam, it should be yellow, I used RGB values of 255, 255, 51 and a brush size of 30px (adjust your size to fit your photo. Remember that the stream bends and wraps around the ghost, so start and end it so that you get that sort of effect.
- Now duplicate that layer and add “Glow” to the name so you can tell it apart from the others.
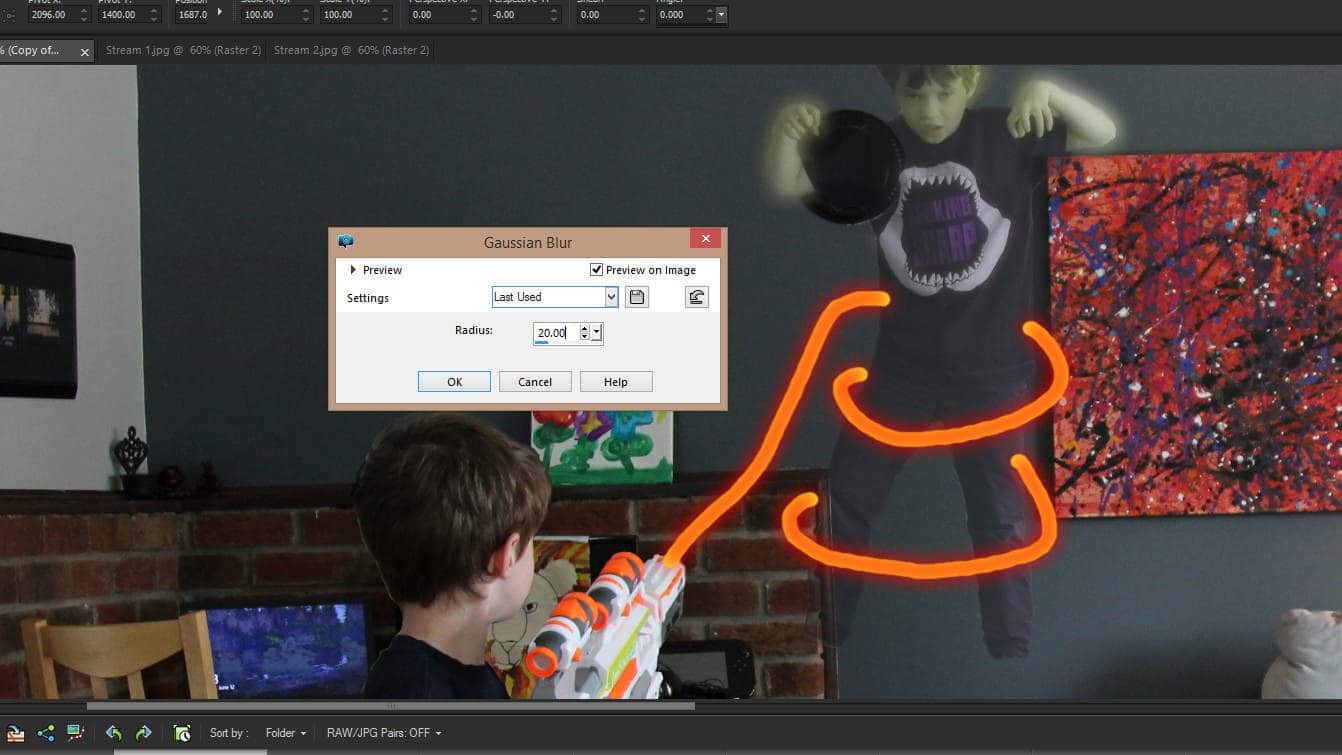
- Using the color changer tool, change the line color of the new Glow layer to red (RGB values 255, 0, 0).
- Now from the “Adjust” menu at the top, go to “Blur”, and select “Gaussian blur”
- Change the setting to “20” and then click OK.
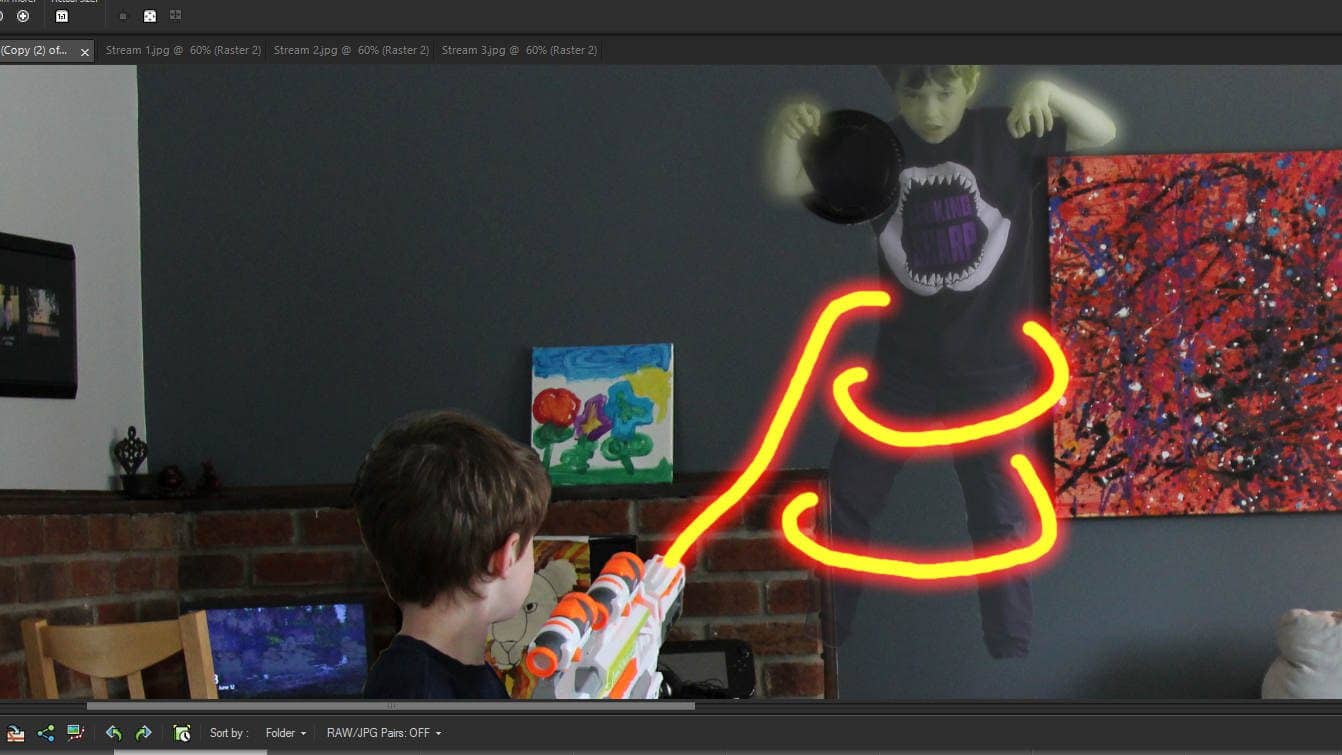
- Now change layer properties to lighten. You should see the color of your stream brighten and start to have a glow.
- Lastly duplicate glow layer. We have our main stream now.

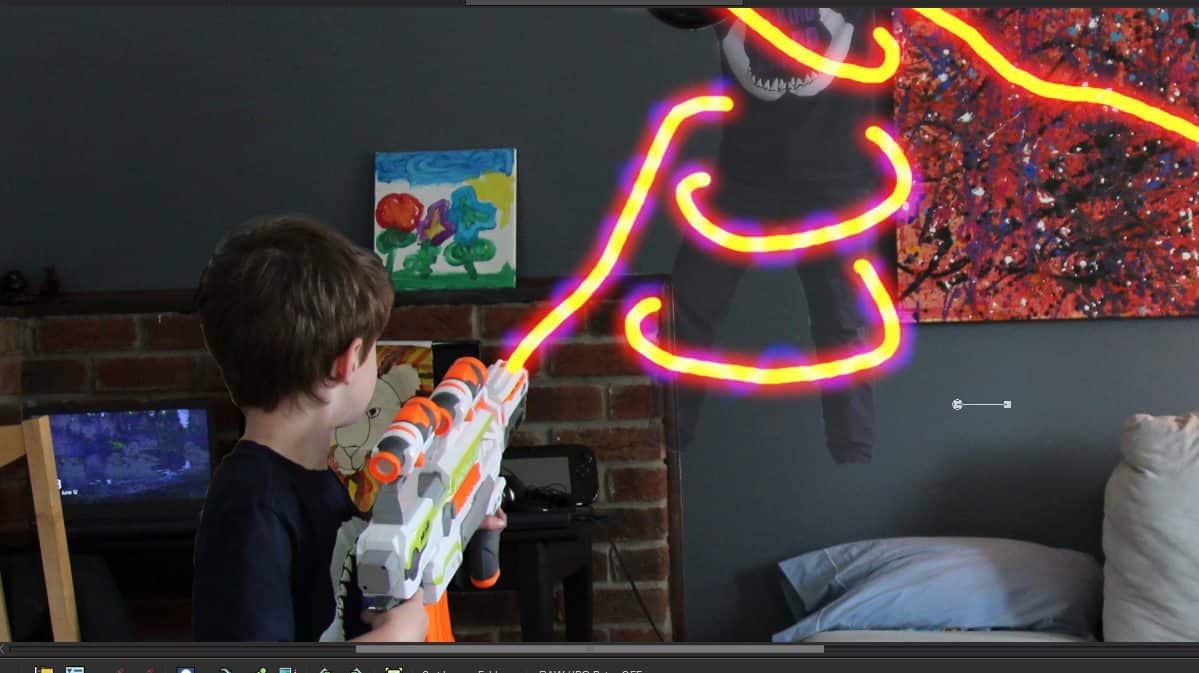
Part 2 – The Electrical Effect
- Next is that electricity that arcs around the main stream.
- Create a new raster layer, call it something like “Electric right” or what ever makes sense to you
- We will need the brush again but change the color to white (255, 255, 255) and a brush size of 5px.
- This one should roughly follow the main stream, circling it. Because this is an electrical arc, it can be done rougher and edgy.
- Next on the same layer you are going to reduce the brush size to 1px and then follow the first white line adding in some finer details.
- Now we need to add the glow like we did before with the main stream. Duplicate your Electric Layer and add “Glow” to the name.
- Change the color of your duplicate to blue (same as above), I used this RGB values 0, 51, 255
- Add the Gaussian blur, using the same setting as last time.
- Change the layer setting to Lighten.
- Then duplicate the glow layer again.
- Optionally you can add a distortion effect. Go to Effects, Distortion Effect, Wave… This has a nice effect of making the electric line more organic and natural looking. You will have to play with the settings a bit to get something you like. I left it off my example but some other tutorials out there use it and it does look good in some cases.
- If you now merge your electric layers down to just one layer, you can take the eraser brush and erase every other time the electric line crosses the main stream. This will further enhance the look that it’s circling around the main stream.

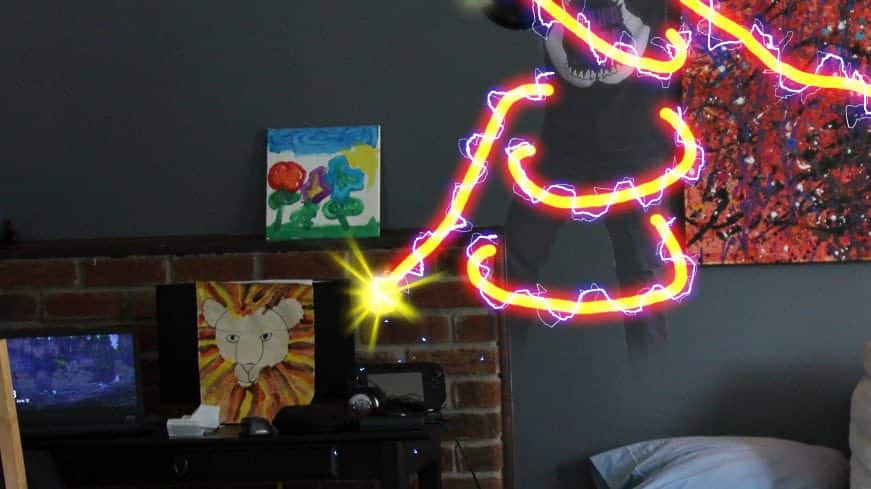
Part 3 – Finish Up
Lastly, I added a few details to complete the mood:
- A flash at the front of the stream using ParticleShop (but you can draw that with the brush tool)
- Added in some small sparks falling from the blasters
- And some texture and a vignette to the background to make it a little more creepy looking
Hopefully, I’ve given you enough details to get started. Try it yourself and let us know how it goes in the comments below. Feel free to share your images with us on your favorite social media platform (don’t forget to tag us so we can find it), I’d love to see how your images turn out.
Have Fun!
Don’t have a photo editor but want to try this out, download a free trial of PaintShop Pro and give it a shot.
| What is ParticleShop? Create one-of-a-kind effects with ParticleShop, a powerful NEW Adobe® Photoshop® , CorelDRAW, and PaintShop Pro brush plugin powered by Painter. Experience living grab-and-go Particle brushes that are easy to use with a pressure sensitive tablet, touchscreen or mouse and allow you to artistically enhance photos, designs and illustrations with strokes of genius. Marketing speak aside, ParticleShop is a great plugin that lets you add professional-looking effects to your images without the risk of harming your original. Something that could be impossible for a novice in the past is now achievable with a couple clicks of a mouse. You can get ParticleShop directly from PaintShop Pro – just go to Help > Welcome and then click on the Get More tab in the Welcome screen that pops up. |


0 Comments