

This video covers the following topics:
0:28 The Shape tool is missing from the toolbox, how do I get it back?
2:26 Where is the Color Chart Creator extension/macro?
4:02 How do I turn a frequently used graphic into a symbol?
5:12 Why can’t I embed a font when saving a file?
6:12 What language is scripting done in?
6:38 How do I turn off the page shadow?
7:24 How do I share a file with a client who doesn’t have CorelDRAW?
8:52 Why do I get an error when trying to fit text to path?
You can use the video time stamps if you only want to view a particular question and answer. Below is a written version of this session, with links to related tutorials that provide more details on some of the topics.
Resources
Download a printable PDF of the written tutorial (PDF, 864 KB)
Find the CorelDRAW Graphics Suite User Guide for your version
View our full collection of CorelDRAW tutorials to learn more
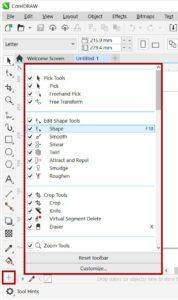
The Shape tool is missing from my toolbar. How do I get it back where it belongs?
It is possible to inadvertently remove or delete tools from the Toolbox. If this should happen, there are a couple of ways to get them back.
First, try using the Quick Customize icon, which is the plus sign at the bottom of the left toolbar (called the Toolbox). Make sure there is a check mark beside any tool that you want displayed in the Toolbox.
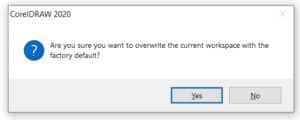
If that doesn’t work, try resetting the defaults for the CorelDRAW application. There are two ways to do this, make sure CorelDRAW is closed first.
1. Hold down the F8 key while launching CorelDRAW. You will be asked if you want to overwrite the current workspace, click Yes.
2. Hold down the Windows key (to the left of the spacebar) and press R on your keyboard. In the Run dialog box, enter %appdata% and click OK. This will open the application data folder in Windows. Open the Corel folder and rename the folder for your version of CorelDRAW Graphics Suite (i.e. add the word “old” to the file name). Hold down the F8 key and launch CorelDRAW, it will completely reset the defaults as though you have freshly installed the application.
How do I download the Color Chart Creator extension and is it available in CorelDRAW 2019? The macros menu is not under Tools in this version.
If you are using CorelDRAW 2017 or later, you don’t need to download the Color Chart Creator as an extension – it is included in the product as a macro.
This script works with any color palette that you currently have open in CorelDRAW. To open a color palette, first go to Window > Dockers > Palettes to open the Palettes docker. In the Palettes docker, place a check mark beside the toolbar(s) you want to open.
To use the Color Chart Creator, go to Tools > Scripts > Run Script.
From the Macros In dropdown list, select Color Chart Creator then click Run.

In the Color Chart Creator window, select the palette that you want to use. You can also set the spacing between thumbnails on your color chart.
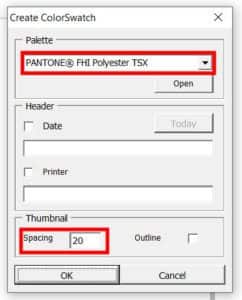
Click OK and the script will create a document with swatches and color information.
NOTE: The Color Chart Creator is not available in CorelDRAW Home & Student or CorelDRAW Standard.
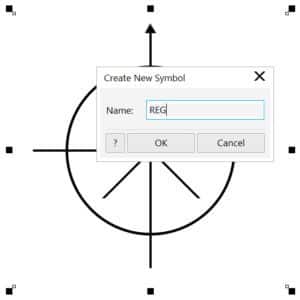
I have a graphic that I use for a registration mark. How can I set it up as a symbol so that it is always available?
You can save any of your frequently used graphics as symbols. This is a great way to speed up the design process and reduce file size.
To create a symbol, select the object or set of objects that you want to use. Right-click on it and select Create New Symbol. Give your symbol a name and click OK.
To use your new symbol, open the Symbols docker (Window > Dockers > Symbols). Then just drag and drop from the docker into your document.
Learn more about creating and editing symbols, and how to use symbol libraries in this full tutorial Creating and Using Symbols.
When saving a file, I get a message stating that the font cannot be embedded. This is a font that I have loaded on my computer, and a new file that I created.
There are four categories of Embedding Rights for fonts: Editable, Installable, No Embedding, and Preview and Print. Any font in the No Embedding category cannot be embedded. To see which fonts cannot be embedded, click on the Filter icon in the font list box, scroll down to the Embedding Rights section, and check No Embedding.
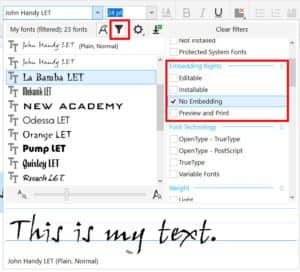
A work-around to not being able to embed the font would be to convert it to a curve (Object > Convert to Curves or Ctrl + Q), however you won’t be able to edit the text with the Text tool after this.
What language is scripting done in?
Scripting in CorelDRAW is done in Visual Basic for Applications (VBA) or Visual Studio for Applications.
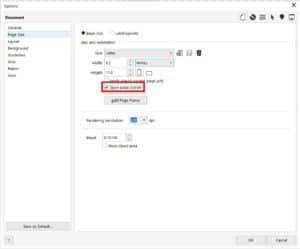
Is there any way to turn off the shadow on the right and bottom of the page in CorelDRAW?
To turn off the page shadow, double-click on it or go to Layout > Document Options. In the Page Size section, uncheck Show page border.
How do I share a file with a client if the client does not have CorelDRAW?
There are a couple of ways you can share a file. Publish to PDF is a good one. Go to File > Publish to PDF or use the Publish to PDF icon. In the Publish to PDF window, enter your file name and save. You can also open the PDF Settings if you want to make adjustments, such as embedding fonts, adding a PDF password or including printer’s marks.
To learn more about PDF settings, watch our full tutorial Publishing PDFs for Print Output.
The other way to share a file is to use the collaboration tools that were introduced in CorelDRAW 2020 and are available only with a CorelDRAW subscription.
First, open the Comments docker (Window > Dockers > Comments). Click on the Save and Share icon in the top right corner of the docker.

In the Save to Corel Cloud window, click the Save and Share button. This launches CorelDRAW.app in a browser. In the Share File window, you can copy the file URL and send it to your client, or you can enter an email address and click Add to send automatic email with link to open the file in CorelDRAW.app.
To learn more about the collaboration tools introduced in CorelDRAW 2020, watch our full tutorial Understanding CorelDRAW’s Collaboration Workflow.
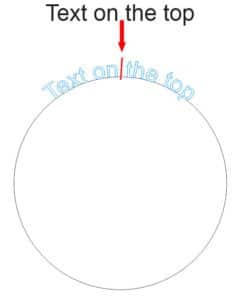
I am trying to align text to a path, it’s a circle, but when I click on Fit Text to Path and then the object I get “the object you selected is invalid”. What is happening?
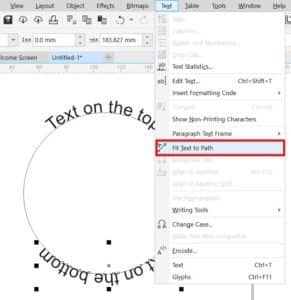
There are a couple of reasons why this would happen.
- The path you have selected is a group of objects – you need to select a single vector object that is not grouped with anything else.
- The text you are using is Paragraph text – only Artistic text can be fit to a path.
There are two ways to fit text to a path. Activate the Pick tool, select the text and:
1. Under the Text menu, select Fit Text to Path, then drag the text to the object and release when it is positioned how you want it.
2. The second way to fit text to path is to right-click on the text, hold down the mouse button and drag to the object. Release the mouse button and click on Fit Text to Path.

Once you have fit one string of text to a path, the object and text become a compound object. So, if you want to fit a second string of text to a path of that same object, you can only use the Fit Text to Path command under the Text menu.
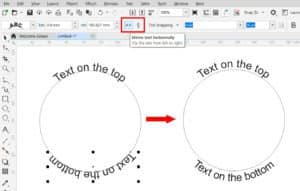
NOTE: if you wish to change the orientation of the text on the bottom path, use the Mirror text horizontally or Mirror text vertically buttons on the property bar.
To learn more about fitting text to a path, watch our full tutorial on Adding and Editing Text in CorelDRAW.
