
This tutorial demonstrates how to add both types of text to a document: artistic and paragraph. Then, once text has been added, you’ll learn about how text objects can be edited, from changing fonts and colors to editing the characters themselves. And you’ll see how artistic text can be placed along a curve, and paragraph text can fit inside any closed shape.
Thanks for watching! We hope you found this tutorial helpful and we would love to hear your feedback in the Comments section at the bottom of the page. You will find a written version of this tutorial below, and a printable PDF copy to download on the Download Resources tab above.
Start your FREE 15-day trial and embark on a design journey with powerful tools for vector illustration, layout, photo editing, typography, and collaboration.
Download these free resources:
Written tutorial for Windows (PDF, 711 KB)
Written tutorial for Mac (PDF, 767 KB)
CorelDRAW Graphics Suite resources
Quick Start Guide (PDF, 2 MB)
Keyboard Shortcuts (PDF, 3.5 MB)
CorelDRAW and Corel PHOTO-PAINT user guides
For CorelDRAW Graphics Suite subscription and perpetual licenses (2018 to 2024), languages include English, Português do brasil, 简体中文, 繁體中文, Čeština, Deutsch, Español, Français, Italiano, 日本語, Polski, Русский
CorelDRAW Community
CorelDRAW learning center
Facebook
X (formerly Twitter)
YouTube
What’s New in CorelDRAW Graphics Suite
Working with Text
CorelDRAW Tools
 CorelDRAW Graphics Suite
 Ultimate Vector Bundle Vol. 1
 CorelDRAW Standard 2021
 Ultimate Vector Bundle Vol. 2
 Corel Vector
Adding and Editing Text in CorelDRAW
In this tutorial, you’ll learn how to create and edit both types of text: artistic and paragraph. We’ll also see how to fit text to curves and shapes.
Click on any of the images below to view full-size.
Adding and Editing Artistic Text
There are two types of text that you can create with the Text tool – artistic and paragraph. Adding artistic text is simple: activate the Text tool, click once where you want to start the text, change the font or size from the default if you want, and start typing. You can include line breaks by pressing Enter. Clicking in a blank space completes the text.

After selecting the text with the Pick tool, you can perform some standard edits, such as moving, resizing, or stretching in one direction.
- If you click again, you can rotate the text.
- The arrows along the sides of the bounding rectangle can be used to shear and skew the text.
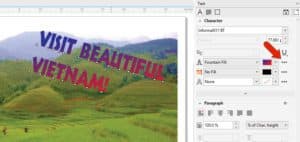
- To change the color of the text, click on a color swatch in the Color palette.

When the Text docker is open (go to Window > Dockers) you can do even more. In the Character section you can switch to a vector fill and choose the pattern, or try a texture fill, or a fountain fill. For any of these fill options, clicking the Fill Settings icon opens the fill properties.
Editing Text Characters
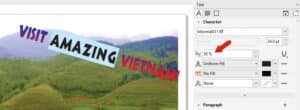
When you double-click a text object, you can edit the characters of the text.

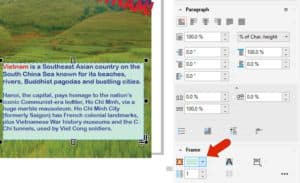
Another way to edit text is to activate the Text tool and click once in the text. After dragging to highlight some of the characters, you can use the settings on the Property Bar or Text docker to change just those characters. When text is selected, you can also change the kerning, which is the spacing between characters.
Adding and Editing Paragraph Text
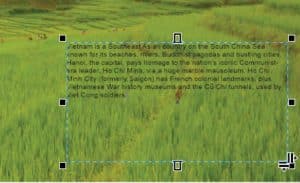
Paragraph text is generally used for larger amounts of text, which is placed inside a text frame. You can type out the paragraph text, if you don’t have too much to say, but usually it’s easier to have the text available in another application, where you can use Ctrl + C to copy it first.
To add paragraph text, activate the Text tool. As with artistic text, you can change the paragraph font settings now, or after the text is added.
Click and drag to set the text frame that will contain the text, then press Ctrl + V to paste your copied text.
While paragraph text is selected, you can move it or use the handles to adjust the frame size. You can also change text properties for the entire frame, such as changing the text color to blue.
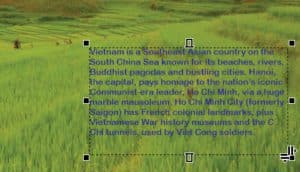
Or you can double-click to edit the text and make changes just to selected characters.
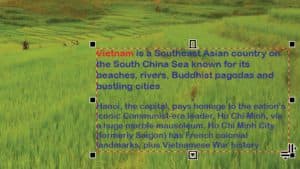
If the text frame turns red, this indicates that the frame is too small to contain all the text. To fix this, select the text again and expand the frame until it turns blue. In this example, the frame was also filled with a background color.
Adding Text to a Path or Curve
With both kinds of text, you’re not limited to straight lines and rectangular frames. Let’s start with adding artistic text to a path. Use the Bezier tool (which you can find in the Freehand tool group flyout on the left toolbar) to trace the mountain ridges.

Then select the text and go to Text > Fit Text to Path. Now place your cursor along the curve and click to fit. You can still make changes to the text itself.

Or say you have a curve but no text yet. Activate the Text tool and move the cursor over the curve so that its cursor icon changes to a curve symbol.

Start typing, and the text will automatically fit the curve.

When this text is selected, you can move it by dragging a white square, or you can scale it. The red diamond, or glyph, can be used to move the text anchor point.
Adding Paragraph Text to a Shape
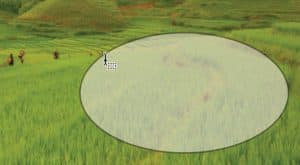
You also don’t have to use a rectangular frame for paragraph text. Any closed shape can be used. Use the Ellipse tool to draw an ellipse on the page and use the Properties docker to give it a wider outline and a transparent fill.
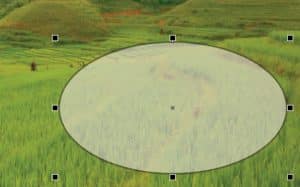
Let’s say that in this ellipse you want to place some text that’s in a Word document, which already has some formatting. This document must be closed before it can be used for importing.
With the Text tool activated, when you move the cursor to the ellipse you can get two cursor icons. If you click when you see the curve icon, you’d be placing text along the outline of the ellipse, as we saw above with the Bezier curve. But as long a closed shape is identified, then when you move a bit inward, the icon changes to a frame – this means that paragraph text will fill the shape.
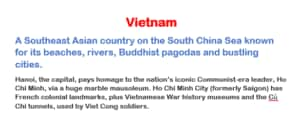
Click when you see the frame icon. Then add text by typing, pasting or importing. To import text, go to File > Import. Because you’re importing while the Text tool is activated, CorelDRAW filters the search to show only file formats that support text, and not image formats.
Select the file with the text you want to use. You will then be presented with options to maintain or discard fonts and formatting from your text document. Choose the options you want and click OK.
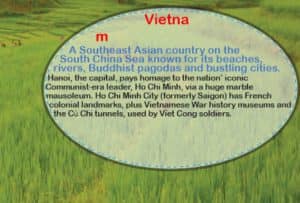
In this example, the shape isn’t quite right for this text, so we will convert the ellipse to a curve by activating the Pick tool, right-clicking on the ellipse and choosing Convert to Curves. Then we use the Shape tool to change the curve’s shape and the text updates accordingly.
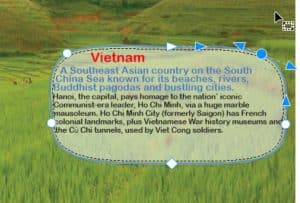
With the Pick tool, you can double-click in the frame to edit the text itself. You can make changes directly, or you can use the Edit Text window to change the text while it’s presented as easy-to-read paragraphs.
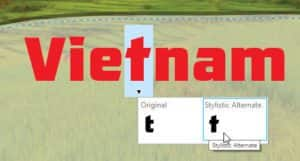
Finally, if you’re using OpenType fonts, you can take advantage of CorelDRAW’s interactive OpenType feature. If you drag to select a character for which there are OpenType alternatives, you’ll see a small triangle below the character. Clicking on this triangle displays some of the stylistic sets that can be used instead.
Start your FREE 15-day trial and embark on a design journey with powerful tools for vector illustration, layout, photo editing, typography, and collaboration.
