This video covers the following topics:
0:30 I upgraded to a new version of PaintShop Pro. The interface does not look the same and I can’t find my favorite tools.
1:15 How can I open multiple photos in the same workspace? Why can’t I drag a layer into the workspace to create a new image?
1:33 How can I cut apart a file of scanned images and save them individually?
1:55 I have 8.5×11” photos that I’ve scanned and touched up. How can I print these at 5×7”?
2:58 How can I merge two shots – one with me and one with just the background?
3:53 How can I download pictures from my phone or camera into PaintShop Pro?
5:04 Can I increase the font and/or size of layer names?
5:38 Can I remove a sticker or emoji that’s blocking part of a photo?
6:27 How do I use Perfectly Clear SE in PaintShop Pro 2020?
You can use the video time stamps if you only want to view a particular question and answer. Below is a written version of this session, with links to related tutorials that provide more details on some of the topics.
Resources
Download a printable PDF of the written tutorial (PDF, 1 MB)
Find the PaintShop Pro User Guide for your version
View our full collection of PaintShop Pro tutorials to learn more
I upgraded from an earlier version and I am so lost. Why can’t I open multiple photos in the same workspace? Why can’t I drag a layer into the workspace and save it as a new image?
We often get questions from users who have upgraded from an older version of PaintShop Pro and find the workspace unfamiliar, or can’t find some of the tools they are used to. This is usually because they are using one of the new workspaces – Photography or Essentials. You can switch to the Complete workspace by going to File > Workspace and choosing Complete.
You can also select your preferred workspace on the Get Started tab in the Welcome Screen.
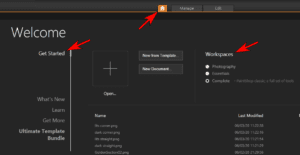
Once in the Complete workspace, you will find the layout and tool placement that you are familiar with.
To open multiple photos in the same workspace, make sure Tabbed Documents is NOT checked under the Window menu. This will allow you to see all your open images in the same workspace.
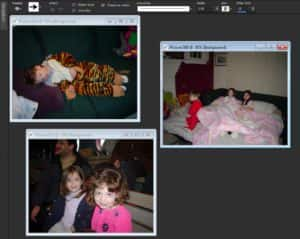
As long as you are not using Tabbed Documents view, you can drag a layer from the Layers palette onto a blank space in the workspace to create a new image.
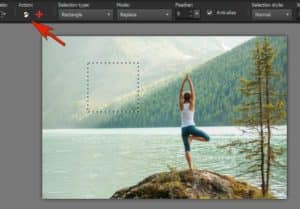
How can I cut apart a file of scanned images to save them individually?
To cut apart a file that contains multiple images, you can use one of the features of the Crop toolbar to make new images from each photo.
Activate the Crop tool, drag out the area you want to crop, and click Crop as New Image.
I have 8.5 x 11 photos that I’ve scanned and touched up. How can I print these at 5 x 7?
To print to a different size than the original, go to Image > Resize. Choose the By Print Size option along the top. The original size is displayed along the left, in inches by default. You can enter a new width and height or click on the Standard Sizes dropdown list and select the print size you want.
NOTE: If you resize your photo with dimensions that are not proportionate to your original image, the aspect ratio will not be preserved, and this could result in your image being distorted.
If you want to avoid any distortion, make sure that Lock Aspect Ratio is checked in the Advanced Settings section. Now when you enter a new width, the height will adjust accordingly.
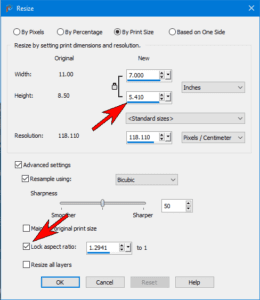
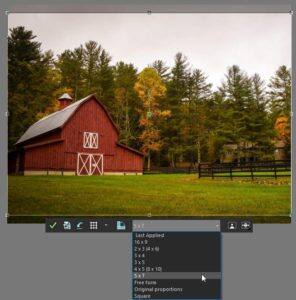
Click OK and the image will be resized. Activate the Crop tool and select the 5×7 print size from the presets dropdown list. If necessary, you can move the crop area to change which parts of the image will be cropped. Then check the green Apply checkmark to crop.
The following tutorials provide more information about cropping and resizing images:
How to Crop Photos
How to Resize Images
Cropping Photos for Better Composition
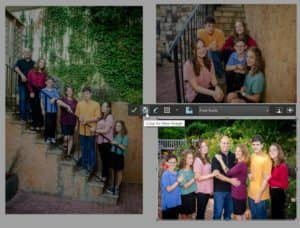
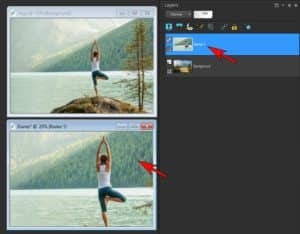
How can I merge two shots – one with me, and one with just the background?
The simplest way to combine a photo of yourself with a new background photo is to use the Background Eraser tool. For example, we’ll place the person in the photo with the mountain lake background onto the Dunes background in the other photo.

With both photos open in PaintShop Pro, select the photo of the person and copy it onto the new background photo. You can do this by using Ctrl + C to copy and Ctrl + V to paste, or you can drag the photo of the person right into the Layers palette above the new background layer.
Use the Pick tool to resize or reposition the photo of the person if necessary.
Make sure the photo of the person is the top layer in the Layers palette and click on it to make it the active layer you’ll be working on.
Select the Background Eraser tool, which can be found on the left toolbar in the Eraser tool group flyout. You can change the brush size by holding down the Alt key while dragging up and down. On the property bar, set the Sampling to Continuous.
Now with a very large brush, erase most of background except the areas close to the person.
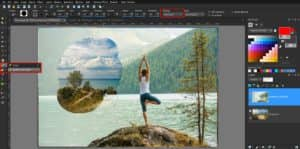
Then decrease the brush size and carefully erase all around the edge of the person.

TIP: it is best to erase in short segments, releasing your mouse in between. This way, if you make a mistake and have to undo, you won’t lose all your erasing work.
Once the background is fully erased, you can use the Pick tool to move or resize the person if needed.

Learn more about background removal in our full tutorial Creating Transparent Backgrounds with the Background Eraser.
How can I download pictures from my phone or camera into PaintShop Pro 2020?
If your photos aren’t already uploaded to your computer, PaintShop Pro can bring them in directly. First, make sure that your phone or camera, or the memory card that has the photos is connected to your computer. Then choose File > Import > From Scanner or Camera.
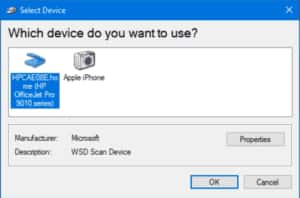
Choose the device to import from, click OK, and all the photos appear as thumbnails. Select the one you want or hold down Ctrl or Shift to select multiple photos, or click Select All. Then click Get Pictures.
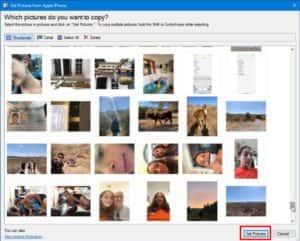
All the photos you selected will open in PaintShop Pro and you can use File > Save As to save photos to your computer.
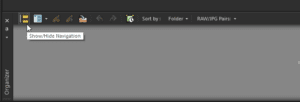
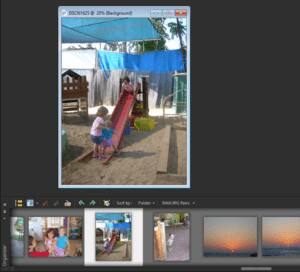
Or, if you’ve already moved or copied photos from your camera into Windows, you can browse through that folder using the Organizer palette in PaintShop Pro. If the Organizer palette is not open, go to View > Palettes > Organizer or press Shift + F9. In the Organizer palette, click on the Show/Hide Navigation icon to open Navigation.
In the Navigation area, click on the folder that has your photos and they will be loaded into the Organizer palette. From here, you can drag them up into the PaintShop Pro workspace to crop, resize, enhance, or make other edits.
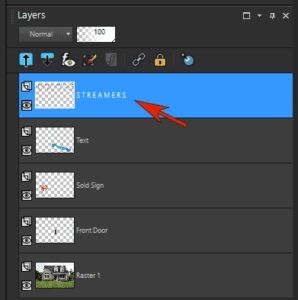
Can I increase the font and/or size for layer names?
The names of layers in the Layers palette are indeed displayed in a rather small font. You can change the name of any layer by clicking on it, and it might help to use capital letters, or even to add spaces between letters.
You can also go to User Interface > Text Size > Large. This makes all the text in the interface larger, not just layer names, which isn’t a bad option if you’re trying to reduce eye strain in general.
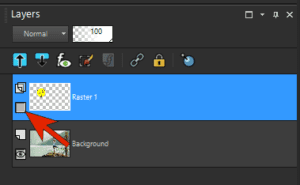
Can I remove a sticker or emoji that’s blocking part of a photo?
If the sticker or emoji is on its own separate layer, you can simply delete it or turn off the visibility for that layer by clicking the Visibility (eye) icon beside the layer in the Layers palette.
This is one good reason to keep photos that you’re working on in .PSPimage format, so that layers will be maintained. As soon as you save an image as a JPG, PNG, or other raster format, all layers are merged into one.
When an image does have everything on a single layer, the Magic Fill tool may be able to help. First, use one of the Selection tools to select the sticker/emoji or whatever object you want to remove.

With the Selection tool still active, click the Magic Fill icon on the Property Bar. This will erase whatever is inside the selection area and attempt to replace it with a background that matches the surrounding area.
Learn more in our full tutorial Removing Unwanted Objects from Photos.
In a previous version I had access to Perfectly Clear SE. How can I use this In PaintShop Pro 2020 Ultimate?
PaintShop Pro 2019 included Perfectly Clear 3.5 SE, which doesn’t work with PaintShop Pro 2020. But we’ve replaced Perfectly Clear with the Corel version of GRFX Studio, which can be found in Effects > Plugins > AutoFX Software.
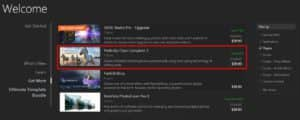
If you want to continue working with Perfectly Clear, you can purchase the full version, which contains more features than the version included with PaintShop Pro 2019. To find this version, go to the Welcome Book, click Get More, filter the list to show Plugins, and purchase Perfectly Clear Complete 3.