
The Background Eraser in PaintShop Pro is a very effective tool to create a transparent background on your photos. In this tutorial, we’ll first review how the regular Eraser tool works in comparison to the Background Eraser, and then show you how to remove a background from one photo and replace it with a background from another photo. Once you master this technique, you will be able to create amazing composite images.
Thanks for watching! You will find a written version of this tutorial below, and a printable PDF copy to download on the Download Resources tab above.
Download your FREE 30-day trial and make every shot your best shot with PaintShop Pro, your all-in-one photo editing and design software.
Download these free resources:
Written Tutorial and Sample Images (Zip, 2 MB)
PaintShop Pro resources
Keyboard shortcuts (PDF, 173 KB)
PaintShop Pro User Guides
Partner and User websites
PaintShop Pro User Forum
Scrapbook Campus (Tips and tricks, workshops, master classes, and more)
Creation Cassel (Scripts, picture tubes, and other PaintShop Pro tools, plus weekly freebies)
PaintShop Pro Maniacs (Facebook group)
PaintShop Pro (Facebook group)
What’s new in PaintShop Pro
Working with transparency
PaintShop Pro tools
Featured products
 PaintShop Pro 2023 Ultimate
 AI HDR Studio 3.0
 PaintShop Pro 2023
 Vision FX 2.0
Creating transparent backgrounds with the Background Eraser
The Background Eraser is a very effective tool to create a transparent background on your photos. We’ll review how the regular Eraser tool works in comparison to the Background Eraser, and then show you how to remove a background from one photo and replace it with a background from another photo. Once you master this technique, you will be able to create amazing composite images.
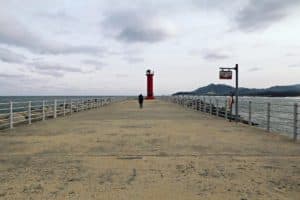
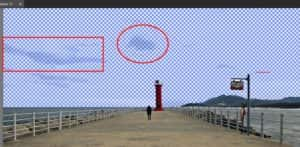
We will start with this image of a pier. Open the sample image Pier.jpg in the Edit tab of PaintShop Pro.
Let’s quickly review the differences between the regular Eraser and the Background Eraser.
Select the Eraser tool from the Tools toolbar. In the Property Bar, select a size of about 100.
TIP: You can adjust the eraser size by entering an exact figure into the Size box on the Property Bar, or by holding down the ALT key and dragging your mouse up or down on your screen.
The Eraser is an all-or-nothing tool, it doesn’t distinguish between colors like the Background Eraser does. On the Pier image, click and randomly move the Eraser around to see how it erases anything and everything.
Click Undo (Ctrl + Z) to return the photo to its original state.
The Eraser does have an option called Smart Edge, which acts like a basic background eraser in that it automatically finds the edges of irregularly-shaped areas as you erase. This can provide a shortcut if desired.
To see how this works, check the Smart Edge option on the Property Bar.

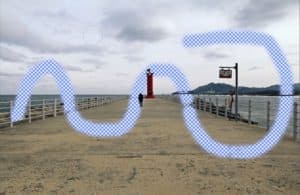
With your Eraser activated, place most of the circle (including the center eraser) into the sky portion but overlap the lower part of the circle into the ocean.
Click and drag from either direction along the horizon where the sky meets the ocean. You can see that with the Smart Edge option enabled, the Eraser does a good job of making a clean distinction between the ocean and the sky.
Now that we’ve had a look at how the Eraser works, let’s move on to the Background Eraser. Click the Undo button (or Ctrl+ Z) to get rid of your eraser marks until you are back at your original image.
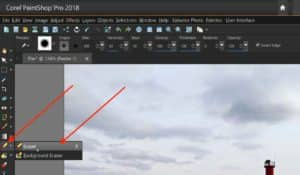
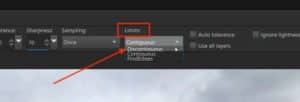
Select the Background Eraser, which is in the same tool group flyout as the Eraser. In the Property Bar, set the Size to 200, Opacity to 100, and Tolerance to 100. Keep rest of the settings at their defaults. Under the Limits drop-down list, select Contiguous. This will only erase colors that are connected to the main sample area.
TIP: If you aren’t able to adjust the Tolerance setting, check to make sure that the Auto Tolerance check box is not checked.

You will see that the Background Eraser is represented by a large circle, with a small eraser icon right in the center. It is important that you keep the center icon from touching any area that you don’t want to remove.
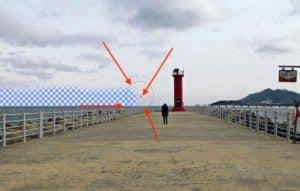
Start on the far left with the center of the tool in the sky and the outer circle just overlapping into the sea. Click and drag horizontally from the left going straight to the right. Go up, over and around the lighthouse, being careful NOT to place the center icon on the lighthouse itself.
If you make any mistakes, just use Undo (Ctrl+ Z) and try again. Until you get familiar with using the Background Eraser, you might want to do your erasing with a series of short strokes instead of one long stroke. This way, you won’t lose all of your work if you make a mistake and have to Undo.
Continue to erase along the top of the mountains and around the sign. With the brush settings as they currently are, there are some areas that you won’t be able to easily erase, such as the top railing of the lighthouse or between the sign hinges. In a few steps below, we’ll show you how to get at these areas.
If you notice some erased areas are not fully transparent after your first pass, just go over them again with the Background Eraser.
Once you have erased all of the sky, your image will look like this:
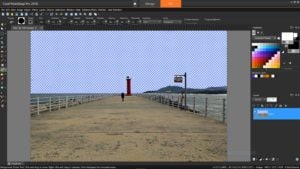
If you want to save this image with the sky completely erased, make sure to save it as either a .PNG file or .PSPIMAGE file, to preserve the transparency you created.
Now that you’ve had a chance to try out the basics of the Background Eraser, we’re going to do a fun project to replace the dull grey background with a gorgeous sunset.You have 2 options on how to continue:
- If you want some more practice with the Background Eraser, close the Pier image without saving any of the erasing you did, then re-open it to return to the original image (or you can undo as many times as necessary to return to the original image).
- If you want to preserve the erasing you have already done, just keep the modified Pier image open and continue with the next steps below.
Open the sample image Sunset.jpg. Switch back to the Pier image and copy it using one of the following methods:
- With the Pan tool (hand icon) activated, right-click on the Pier image and select Copy; or
- Go to Edit>Copy; or
- Use keyboard command Ctrl +
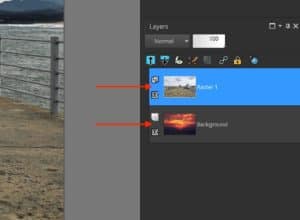
Switch to the Sunset image and paste the Pier image using one of the following methods:
- Right-click and select Paste>Paste as New Layer; or
- Go to Edit>Paste as New Layer; or
- Use keyboard command Ctrl + V.
The Sunset is now designated as the Background layer and the Pier image is on top of it.
Select the Background Eraser, leaving all the settings on the Property Bar as they were set earlier. If you are starting over, erase the sky on the Pier image as you did previously. You will see the sunset image now showing through the areas that you have erased. Again, you will still not be able to erase inside the lighthouse’s railing, nor between the sign hangers…yet.
Select the Discontiguous option under the Limits drop-down. As opposed to the Contiguous option, the Discontiguous option will erase colors that still fall into the eraser’s limits but are disconnected from the main area.
Using the same technique as before, erase around the lighthouse railing. The circle of eraser should reach in and now also erase what’s inside the railing.
Repeat this for inside the hinges of the hanging sign. Remember not to touch the center of the tool on either the lighthouse or the sign itself.
Finish erasing the rest of the sky. Try using the following shortcut technique:
- Hold down the Shift key and click in the upper left corner of the sky
- While still holding the Shift key, click in the upper right corner.
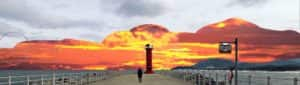
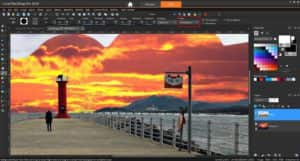
This will erase a strip of the Pier image all the way across and you should now see a strip of sunset stretching all the way across the top.
Continue erasing the sky of the Pier image until it is completely replaced by the sunset image behind it.
TIP: If you hold down your right mouse button while using the Background Eraser, it will “unerase” or restore any parts that you erased. This can be helpful if you’ve made a mistake but don’t want to use Undo and lose all of your erasing work.

Background Eraser Tool Settings
The following is a quick overview of the settings and options for the Background Eraser. You can find more information in the PaintShop Pro Help files.
- Opacity — a lower setting erases pixels to partial transparency.
- Tolerance — determines how closely the selected pixels match the sampled pixel.
- Sharpness—specifies the softness of the erased edge. A softer brush crates anti-aliased edges.
- Sampling — specifies the basis on which pixels are erased. This control has the following options:
- Once — samples the point at which you first click and then erases all matching pixels for the duration of the stroke.
- Continuous — samples continuously and erases all matching pixels it encounters, including foreground colors if the sampled pixel falls into the foreground area.
- BackSwatch — erases all pixels that match the current background color on the Materials palette
- ForeSwatch — erases all pixels that match the current foreground color on the Materials palette
- Limits — specifies whether erased pixels are adjacent to each other with the following options:
- Discontiguous — erases all pixels in the tool’s path that match the sampled pixels, even if they are nonadjacent. We used this on the lighthouse and the sign.
- Contiguous — erases only contiguous pixels that match sampled pixels. This setting would’ve skipped the areas inside the lighthouse and the sign.
- Find Edges — similar to Contiguous, but better for areas with sharp edges where you want to keep the sharpness.
- Auto Tolerance — determines what is erased based on the color range from the first color you click on. You can uncheck this manually set the tolerance level instead.
- Use all layers — samples data from all layers merged together. Only pixels in the current layer are erased. To sample data from the current layer only, you can unmark the check box.
- Ignore Lightness — ignores sharp differences in color lightness and saturation. You can mark this check box when the colors in the object that you want to isolate are strongly saturated and the background is unsaturated, or vice versa.
Download your FREE 30-day trial and make every shot your best shot with PaintShop Pro, your all-in-one photo editing and design software.
