

This video covers the following topics:
0:27 I want to center an object inside an area. How do I do this?
1:38 How do I set a background color using the sliders in the Materials palette?
2:40 Can you demonstrate how to use textures in the Materials palette?
4:50 How do I change a brown roof to black in a photo?
6:06 What is the step-by-step process for removing the sky in a photo and replacing it with another sky?
You can use the video time stamps if you only want to view a particular question and answer. Below is a written version of this session, with links to related tutorials that provide more details on some of the topics.
Resources
Download a printable PDF of the written tutorial (PDF, 1.87 MB)
Find the PaintShop Pro User Guide for your version
View our full collection of PaintShop Pro tutorials to learn more
I want to center an object inside an area. How do I do this?
The Objects menu is where to look for alignment options. In this example, text as a vector object has been added to this photo.

To center the text within the photo, select the text with the Pick tool and go to Objects > Align. From this menu you can center it vertically, then horizontally, or you could simply choose Center in canvas.

If you want to align an object to another object, rather than align to the entire canvas, both objects need to be selected. For example, we want to center the text in the white rectangle.

NOTE: Keep in mind that the first object you select won’t move, and any objects you select after this will move to align with the first.
With the Pick tool, select the rectangle, then press Shift and select the text. The Align options are also in the context menu, which opens when you right-click. Choose Align > Vertical Center, then Align > Horizontal Center.

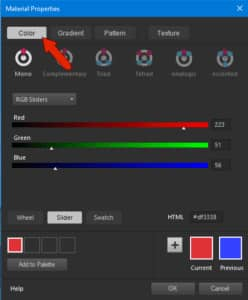
In the Materials palette, it’s easy to assign foreground and background colors by using swatches or HSL maps. But how do I set a background color using the sliders?
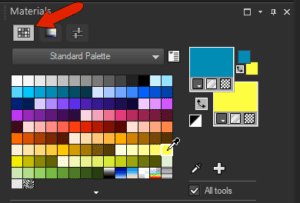
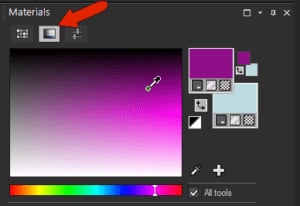
There are three ways to select colors in the Materials palette.
1. Swatches: Left-click a swatch to set the foreground color; right-click a swatch to set the background color.
2. HSL Map: First, choose a hue on the rainbow gradient color bar along the bottom then select the exact shade of saturation and lightness in the HSL (Hue/Saturation/Lightness) window. When using this method, it’s best to set the background color first by right-clicking, because when you choose a new hue, the foreground color changes. As before, a left-click sets the foreground color.
3. Sliders: Drag the arrows or enter a numerical value if you know the RBG (or CMYK, HSL, etc.) values. The color produced by the sliders only goes to the foreground.
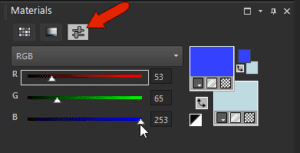
One workaround is to use the sliders to set your background color, then click the Swap Materials icon to move that color from foreground to background.
Then use the sliders again to set your foreground color.
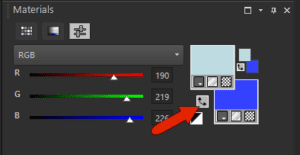
Or you can click the background swatch itself to open the Material Properties window. Here you can adjust the sliders on the Color tab, then click OK.
To learn more, watch our full tutorials How to Use the Materials Palette and How to Use the Material Properties Window.
Can you include a short demo on how to use textures in the Materials palette?
Textures are pretty easy to apply. Any vector object, such as a shape or text, has both an outline color, which is the foreground swatch, and a fill color, which is the background swatch. As an example, the text in this photo is filled with the solid background color. The foreground color is the color of the text stroke, or outline, which you will only see if you have set a stroke width of 1 or higher.
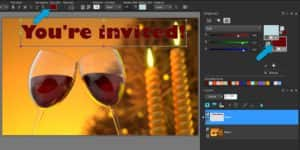
To add a texture, you would apply this to the background color of the text. Select the text, then click on the Texture icon at the bottom of the background swatch. Your most recently used texture will be applied to the background color.

When the text is not selected, it is easier to see that parts of the text fill are now translucent, allowing the background to show through.

To change the texture, select the text again and click on the background swatch. In the Material Properties window, open the Texture tab. All the pre-installed texture images are grayscale. You can use the Angle and Scale fields to adjust a texture.
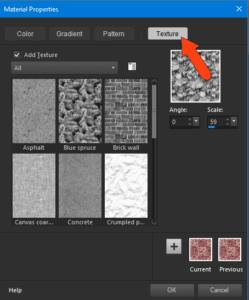
If you switch to a mostly light texture, such as “Crumpled paper,” and click OK, you’ll see more of the background text color. This is because it’s the darker areas of a texture image that become translucent or transparent.

If you switch to a darker texture image, such as “Grid”, more of the photo below the text shows through.

NOTE: if you change the background color by right-clicking on a swatch, the texture disappears, and you’ll have to reapply it.
You can also save your own image as a texture. A texture doesn’t have to be a grayscale image, but it will be treated as a grayscale image when used as a texture.

To make an image into a texture, go to File > Save As. In the Save As window, set the file type to BMP (bitmap) and save it in the following location, changing 2021 to your version number if necessary:
C:\Users\YOURNAME\Documents\Corel PaintShop Pro\2021\Textures
Now your new texture will be available on the Textures tab in the Material Properties window and you can apply it to an object like a shape or text.
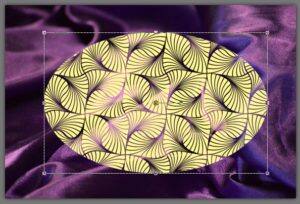
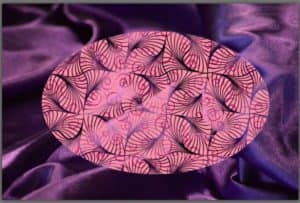
You can even combine textures with patterns. Click on the background swatch again to open the Material Properties window. Select the Patterns tab and choose a pattern.
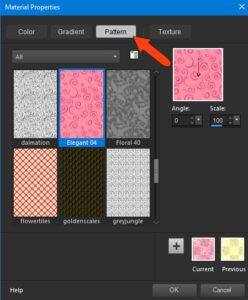
Then click OK to see both the pattern and the texture applied to your object.
How do I change a brown roof to black in a photo?
There are a couple of different methods for changing the color of an object or area, and the best method depends on your photo.
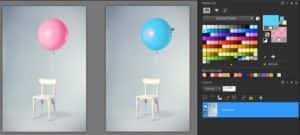
1. Color Changer: You can use the Color Changer tool to change colors with just one click. This works best when the original color of object (the pink balloon in this example) is limited to the object and not part of the background or other areas of the image.
Set the Foreground swatch to the new color (blue), activate the Color Changer tool, and click on the original color (pink) in the image. There were no other pink pixels in the photo, so nothing else changed except the balloon.
To learn more, watch our full tutorial How to Use the Color Changer.
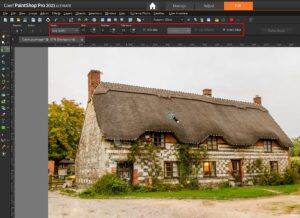
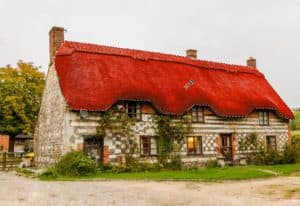
2. Color Changer with Selection: Now take this photo of a house with a brown roof. We are going to change it to red instead of black, so it is easier to see in this demonstration.
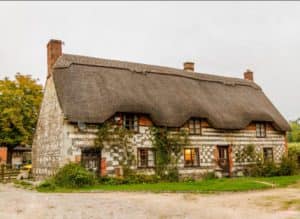
There are lots of brown pixels throughout the photo, so if you were to use the Color Changer tool, the roof and many other areas of the photo would get changed to red.

In a case like this, it’s best to start by selecting the area where you want to make changes. This will ensure that the color changes only happen in the selection area and not in other parts of the photo.
There are several selection tools to choose from but in this example, we’ll be using the Smart Selection Brush that can be found in the Selection tool group flyout on the left toolbar. Once you activate the Smart Selection Brush, the Tool Options palette along the top provides a number of settings that you can adjust. For this example, we will set a small brush size and low tolerance, then carefully outline the roof.
If you accidentally selected too much, or missed any bits that should be selected, you can change the selection Mode in the Tool Options palette to Add or Remove and then click on the areas that need to be added or removed.
Now you can use the Color Changer tool as before, making sure to click inside your selection area.
NOTE: for an object such as this roof that has varying shades of brown, you may need to increase the Tolerance setting on the Tool Options palette for the Color Changer to ensure that the whole roof gets recolored.
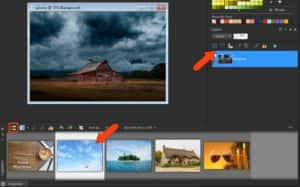
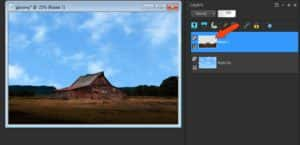
I’m having a hard time removing the sky in a photo and replacing it with another sky. I know it involves layers and selections, but I’d like to see the process step-by-step.
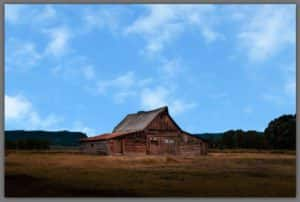
This is a question that comes up a lot. And yes, layers and selections are involved. We’ll use this photo of a cabin, with a dark and gloomy sky that we want to replace with another photo with a brighter sky.
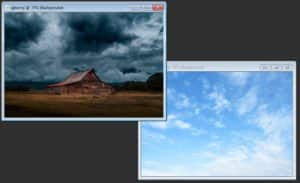
Step 1: Add your new sky background to the original photo.
The first thing you need to do is bring your new sky into the original photo. In this case, the bright sky photo is to be the new background, so we need to add it to the darker image. There are a few ways you can do this but first, make sure you have the Layers palette open (go to Palettes > Layers or press F8):
- Using Copy and Paste:
- With the new sky image active, go to File > Copy (or use Ctrl + C).
- Then switch to the original image and go to File > Paste as New Layer (or use Ctrl + V).
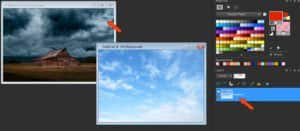
- Using Drag and Drop:
- Go to the Window menu and uncheck Tabbed Documents, so that both images are displayed in the interface.
- You can also choose Tile Horizontally or Tile Vertically from the Window menu to have both images displayed.
- Click on the new sky photo so it is the active image.
- Then drag its layer from the Layers palette right onto the original photo in the interface.
3: Using the Organizer and Navigation Palettes
- Open the Organizer palette by going to Palettes > Organizer.
- Click the Show Navigation icon to open the Navigator.
- In the Navigator, locate the folder that contains your new sky image.
- When you click on the folder, all the images in that folder will be displayed in the Organizer.
- With the original photo active in the interface, drag the new sky photo from the Organizer directly into the Layers palette above the background layer.
Step 2: Change the layer order
Once you have brought your new sky image into the original image, it will be on the top layer, covering the original image. The layer order needs to be switched, so that the new sky is below the original image.
In the Layers palette, look at the layer name of the original image. If the layer name is “Background”, you can’t move another layer below it yet. First you need to right-click on the background layer and choose Promote Background Layer.
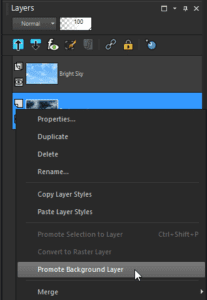
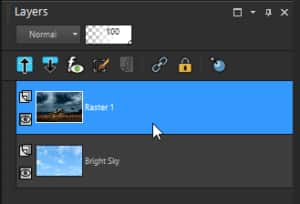
This converts it to a regular raster layer, so now you can drag it up above the new sky layer in the Layers palette.
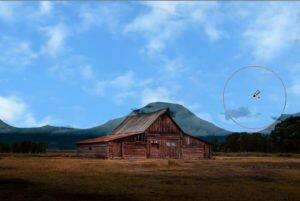
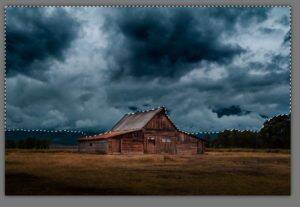
Step 3: Removing the original background
The next step is to remove the original sky, which will allow the new sky below to show through. Because the edits need to be done on the original image, that layer needs to stay active. You make a layer active by clicking on it once in the Layers palette, so it is highlighted in blue.
There are two methods for removing the original sky.
- Using the Background Eraser tool
Activate the Background Eraser tool, which you can find on the left toolbar in the Eraser tool group flyout. On the Tool Options toolbar, make sure the Hardness and Opacity settings are both set to 100, and use a high Tolerance setting.
In this particular image, we can use a large brush size to remove almost all of the dark sky, since there is a clear definition between the sky and ground, and nothing really obstructing the sky except the roof of the cabin. If your image has more objects such as trees obstructing the sky, you will need to use a smaller brush and go a bit more carefully. Once we have erased most of the sky with a large brush size, there are just some bits along the horizon left to be removed.
For the bits along the horizon, we need to decrease the brush size and lower the Tolerance setting before we continue erasing.
TIP: you can adjust the brush size by holding down the Alt key and dragging up or down.
The Background Eraser tool samples color only at the black eraser tip of the cursor, so be careful to always keep that tip within the sky.
After erasing the original sky, look at the layer in the Layers palette and you can see that the sky area is now empty/transparent (indicated by the grey and white checkerboard pattern).
- Using the Selection Tools
The second method to remove the sky uses a selection tool to select the area to erase.
The Smart Selection Brush is great for selecting parts of an image along color borders. If your sky area is large, start with a large brush size. You can also set a high Tolerance level – just make sure that your brush nib does not overlap into other areas of the image. Start on one side near the horizon and drag the brush up, across, and back down the other side. If you select too much or too little, switch to Add or Remove mode on the Tool Options palette and make the fixes with a smaller brush size.
Once you are happy with your selection, all you have to do is press the Delete key to remove what’s selected. Press Ctrl + D to remove the selection marquee.
You can also combine both methods or switch back and forth between the Background Eraser and Smart Selection Brush. For example, use the selection method to remove the main part of the sky, then use the Background Eraser to touch up any bits along the horizon.
It can be tricky to master these 2 tools. The best way is simply to practice – experiment with different images and different settings on the Tool Options palette to gain a better understanding of how to adjust these tools to suit your image and get the results you want.
Here are some additional tutorials on removing backgrounds and working with the Selection tools:
Introduction to Selection Tools
