

This video covers the following topics:
0:27 Does the Sepia Frame script only work for images in landscape orientation? When I use it on portrait or square image, the final result is distorted.
3:39 Is there a way to bend an object in PaintShop Pro? I want to make a rose look like it is wilting over.
5:15 I’ve downloaded a font from Font Fabric – how do I import this font into PaintShop Pro?
6:23 After cropping an image, how do I accept the crop so I can move on?
6:41 How do I set the size of the pictures I want to print?
You can use the video time stamps if you only want to view a particular question and answer. Below is a written version of this session, with links to related tutorials that provide more details on some of the topics.
Resources
Download a printable PDF of the written tutorial (PDF, 2 MB)
Find the PaintShop Pro User Guide for your version
View our full collection of PaintShop Pro tutorials to learn more
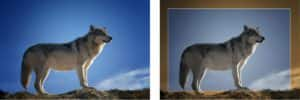
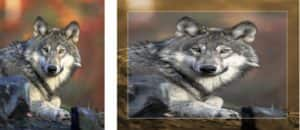
Does the Sepia Frame script only work for images in landscape orientation? When I try to use it for portrait or square images, the final image is distorted.
Yes, the Sepia Frame script is designed for landscape images, specifically 5” x 7”. Depending on the size and orientation of you image, the end result may be slightly distorted or very distorted.
The easiest way to run the script is from the Script toolbar. If this toolbar is not displayed, go to View > Toolbars and enable the Script toolbar. On the Script toolbar, click on the Select Script dropdown list and choose Sepia frame then press the blue Run icon.
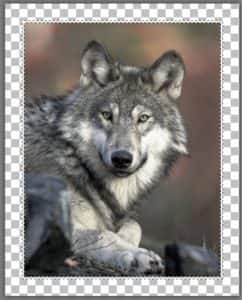
In this first example, although there is some slight distortion with the results, the framed image still looks good.
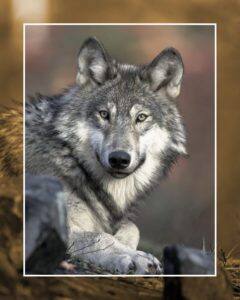
However, in this second example the distortion is quite obvious.
If you want to add the Sepia Frame script to an image that is not the proper aspect ratio or orientation, there are a few options you can explore.
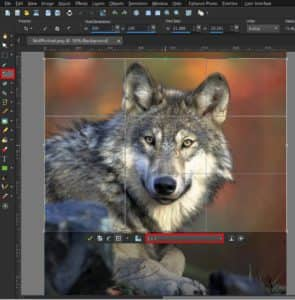
- Crop your image
Activate the Crop tool and select the 5×7 crop preset from the dropdown list. Adjust the crop area to your liking then click the green checkmark to apply the crop. Now you can run the Sepia Frame script on your cropped image.
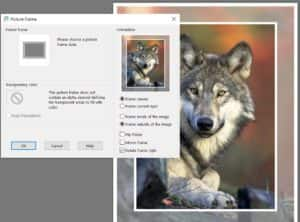
- Choose a picture frame
PaintShop Pro includes a number of picture frames that you can add to your photos. Although there isn’t one that is exactly the same as the Sepia Frame script, you might find something similar that you like.
Go to Image > Picture Frame. Scroll through the Picture Frame library and click on any of the frames to see a preview of what it would look like. In this example, the Transparent frame produces a similar look. Note that when applying a picture frame, you have options to flip and rotate the frame to see what best suits your photo.
To learn more, watch our full tutorial How to Add Picture Frames.
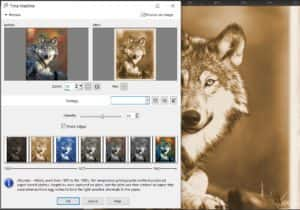
- Try the Time Machine Effect
A third option would be to use a Time Machine effect. Go to Effects > Photo Effects > Time Machine and click on any of the options along the bottom to apply to your photo. Although it is not the same as the Sepia Frame script results, the Albumen option will add a sepia effect to your photo. Note that you have options to adjust the Intensity of the effect and to enable or disable the Photo Edges.
- Recreate the Sepia Frame script effect step-by-step
You can also recreate the Sepia Frame script effect on any photo by following these steps:
- Right-click on your photo in the Layers palette and select Promote Background Layer.
- Right-click on the layer again and select Duplicate. Keep the duplicate layer as the active layer.
- Activate the Selection tool and press Ctrl + A to select the entire layer.
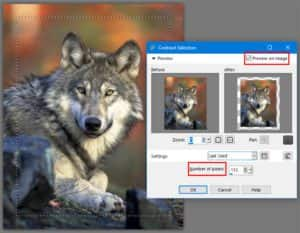
- Go to Selections > Modify > Contract and make sure Preview on Image is checked.
- Adjust the Number of pixels setting to contract the selection area, leaving a frame around the image.
- Go to Selections > Invert then press the Delete key to remove the selected area from this layer.
- Press Ctrl + D to remove the selection marquee.
- This change will not be visible because the bottom layer is showing through the area you deleted. You can click on the Visibility (eye) icon beside the bottom layer to see the transparent frame area you just created on the duplicate layer.
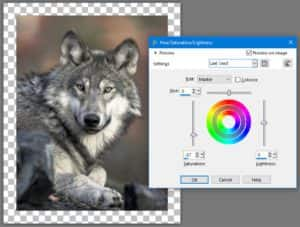
- With the duplicate layer still active, go to Adjust > Hue and Saturation > Hue Saturation Lightness. Set the Saturation value to -57, and the Hue and Lightness values both to 0. These are the values used by the Sepia Frame script but you can adjust to your liking.
- To add the thin white frame, activate the Magic Wand selection tool and on the Tool Options palette set the Match Mode to None. Now click on image to select it (making sure that the duplicate layer is still your active layer).
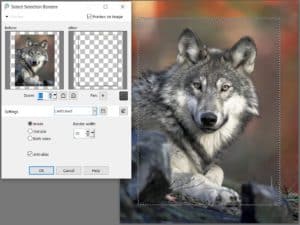
- Go to Selections > Modify > Select Selection Borders. Choose Inside and adjust the Border width setting. In this example, a Border width of 10 produces the thin border we want, but you may need to change this depending on the size of your photo.
- Once you have set your Border width, click OK but do not deselect/remove the selection marquee.
- Activate the Flood Fill tool and set the Foreground (top) swatch in the Materials palette to white. On the Tool Options palette, make sure the Match mode is set to None.
- Use the Flood Fill tool to click on the selection border to fill it with white.
- Optional: if you want the flexibility to adjust this border later, go to Selections > Promote Selection to Layer. This will put the white frame border on its own layer, so you can edit it easily.
- Press Ctrl + D to remove the selection marquee.
- In the Layers palette, click on the original image layer to make it the active layer.
- Go to Adjust > Hue and Saturation > Colorize. Set the Hue value to 25 and the Saturation value to 100. These are the values used in the Sepia Frame script, but you can adjust to your liking.
And here is the final result!
Is there a way to bend an object in PaintShop Pro? I would like to make a rose look like it is wilting over.
There isn’t one tool in PaintShop Pro that would accomplish this. Instead, you would need to create this effect by cutting off the top of the flower and then rotating it to look like it was wilting over. This would be very difficult to do if the rose is not on a separate layer with a transparent background.
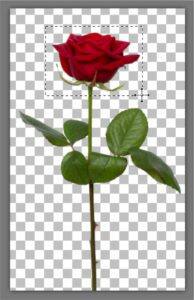
We’ll demonstrate the technique using an image of a rose on a transparent background.
Activate the Selection tool and draw a selection around the flower and a bit of the stem.
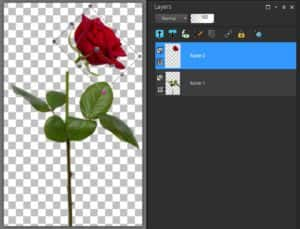
Cut the selection with Ctrl + X and then paste with Ctrl + V or Edit > Paste as New Layer. Press Ctrl + D to remove the selection marquee.
Use the Pick tool to move the flower into position and rotate it to look like it is wilting over, at whichever angle looks good to you. Leave a small gap between the ends of the stem, unless you want to give the appearance that the stem is broken.
To fill in the gap between the ends of the stem, first use the Eyedropper tool to sample the stem color.
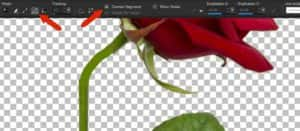
Next, activate the Pen tool. In the Materials palette the top swatch (for Foreground and Stroke color) should be the green that you sampled with the Eyedropper. For the bottom swatch (background and fill color), click on the checkerboard square to make it transparent.
On the Tool Options palette you can set the Line style to Solid and adjust the Width to match the width of the stem in your image. For Mode, you can use either Draw Freehand or Draw Point to Point. If you use Draw Point to Point mode, enable the Connect Segments checkbox and then click a few points from one part of the stem to the other.
Since the line is a solid color, you may want to make it blend in and match with the other parts of the stem. You can use the Clone Brush tool to do this.
First, we are going to merge the layers together. This is not mandatory, but it will make the cloning process faster and easier. Hold down the Ctrl key and click on each layer (the original stem, the flower, and the line drawing) to select them all. Right-click on one of the layers and select Merge > Merge Selected.
Activate the Clone Brush tool and on the Tool Options palette, choose the Shape (Round will probably work best). Adjust the brush size by holding down the Alt key and dragging up or down until the brush tip is about the same size as the width of the stem.
Right-click on a portion of the original stem to set the clone source area, then left-click on the line drawing to fill with the clone source.
You can reset the clone source at any time by right-clicking on another part of the stem. And you can make adjustments to the Hardness, Opacity, and Blend Mode settings on the Tool Options palette to make the cloned stem look more realistic.
To learn more, watch our full tutorials on cloning:
How to Use the SmartClone Tool
Once you’re happy with your “wilted” rose, you can copy and paste it into a new image if you wish.

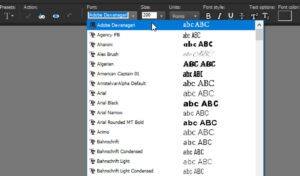
I would like to use a font that I downloaded from Fontfabric. But I don’t know how to import that font into PaintShop Pro.
Any font installed in your Windows system can be used in PaintShop Pro. To see what fonts you have on your system, open your Control Panel app, and click Fonts. In PaintShop Pro, when you activate the Text tool, the same fonts appear in the drop-down menu.
With most font download websites, the download is a ZIP file, which you’ll need to right-click and choose Extract All.
Then drill down into the extracted folders to find the font file. Right-click on the font file and choose Install.
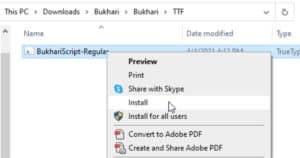
You can also double-click the font file to display a few lines in the font. This window has an Install button.
Once installed, go back to PaintShop Pro and the new font will be available for use when you activate the Text tool.
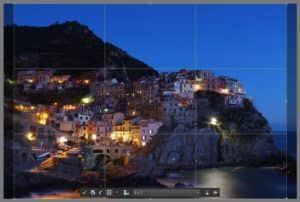
After cropping an image, how do I accept the crop so I can move on?
After you activate the Crop tool, choose the proportion you want, such as 8 x 10 or Free form. Resize and move the preview area as you wish, then simply click the green check mark icon, which applies the crop.
You can also use the Crop as New Image icon, which is right beside the green check mark. This will preserve your original image and place the cropped portion in a new PaintShop window.

To learn more, watch our full tutorial How to Crop Photos.
How do I set the size of the pictures that I want to print?
This depends on three things: your printer’s resolution (dpi), the resolution of your image, and the proportion of the printed photo. For example, a common print resolution is 300 dpi, which means that a 1200 x 900 pixel image will print at 4″ x 3″.
But modern cameras can produce images much larger than this. As an example, an image measuring 4288 x 2848 pixels, at 300 dpi, would print at about 14” wide.
If you want to print a standard print size, for example to fit a 5×7” frame, first you need to check the aspect ratio of your image to see if it is the same. The easiest way to do this is to go to Image > Resize and click on the By Print Size option. Set the units of measure to Inches and ensure the Lock Aspect Ratio is on – this is the small lock icon between the Width and Height values.
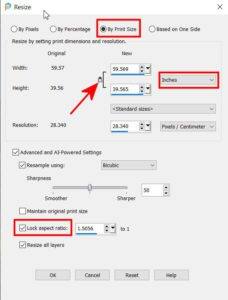
NOTE: if the Lock icon is not visible, make sure the Lock aspect ratio option is enabled further below in the Advanced and AI-Powered Settings section.
Select the 5×7 option from the Standard Sizes dropdown list and look at the Width and Height values in the New column – if they are 5 and 7 inches, then the aspect ratio of your photo matches. At this point you can set the Resolution to 300 and make sure the units of measure for resolution are Pixels / Inch.
Click OK and your image will be resized to the correct pixel dimensions for printing a 5×7” image at 300 dpi (1500px by 2100px).
However, if your image does not match the aspect ratio of a standard print size, you will need to either crop your image or choose to print at a non-standard size.
To crop your image to a standard print size, activate the Crop tool and choose a print size from the dropdown list. You can resize and reposition the crop area on your image if you wish. Then click the green Apply check mark.
Once your image has been cropped you can go back to the Image > Resize window and follow the steps above to set the print size and resolution.
To print your image at a non-standard print size, go to Image > Resize > By Print Size as before. Enter the Width or Height that you want to print and change the Resolution to 300 Pixels / Inch. Click OK and your image will be resized to the correct pixel dimensions for printing your custom size at 300 dpi.
