
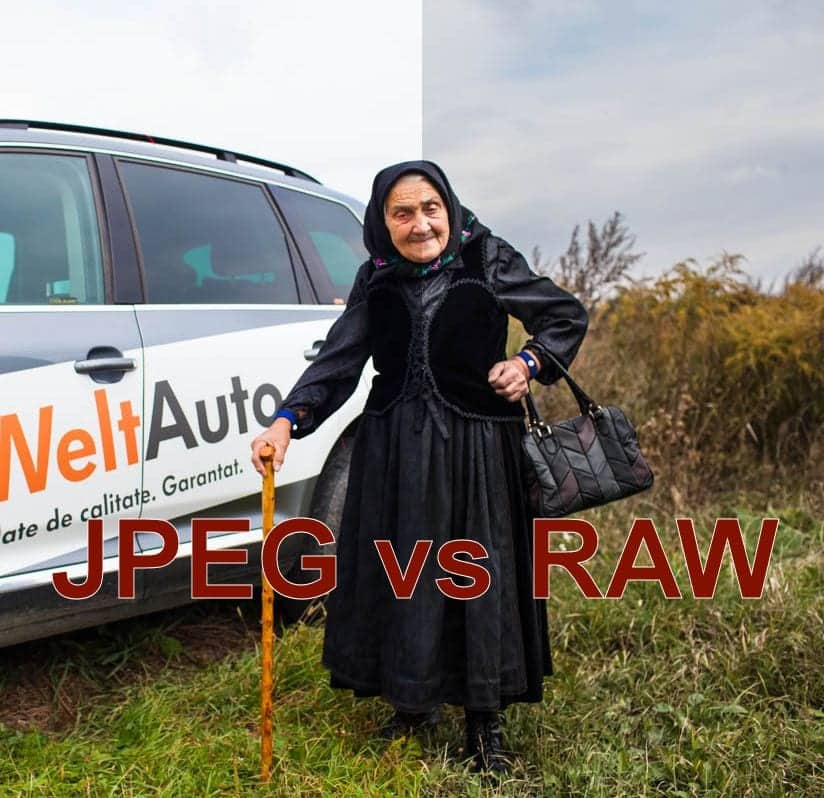
Have you ever tried to rescue a photo with your photo-editing software only to find out that the image was way too overexposed or underexposed or the color balance is beyond hope, like the one below? This can be a problem and it’s one I often faced early on as a photographer when shooting under tough light conditions or in other tricky situations. However, it’s also something that can be solved quite easily if you learn to take control of your photos by exploring the difference between JPEG and RAW. But is one photo format really better than the other? Let’s take a look at the JPEG vs. RAW debate, and a photo from Alexander Vlad of Captivate Creative Studios part of a series chronicling his recent trip to Romania, to see how making the jump to RAW can help you unlock the true potential of your photos.

What is JPEG?
Most digital cameras, like your average point-and-shoot or smartphone, save your photos in a standard image format, called JPG or JPEG. There are lots of advantages to saving your photos to JPEG, most notably, JPEGs can be opened on any device without special software. The quality can be pretty darn good in most cases and JPEGs can be compressed to take up a relatively small amount of space on your memory card or hard drive. Small JPEGs are ideal for sharing through email or posting to your favorite social media networks.
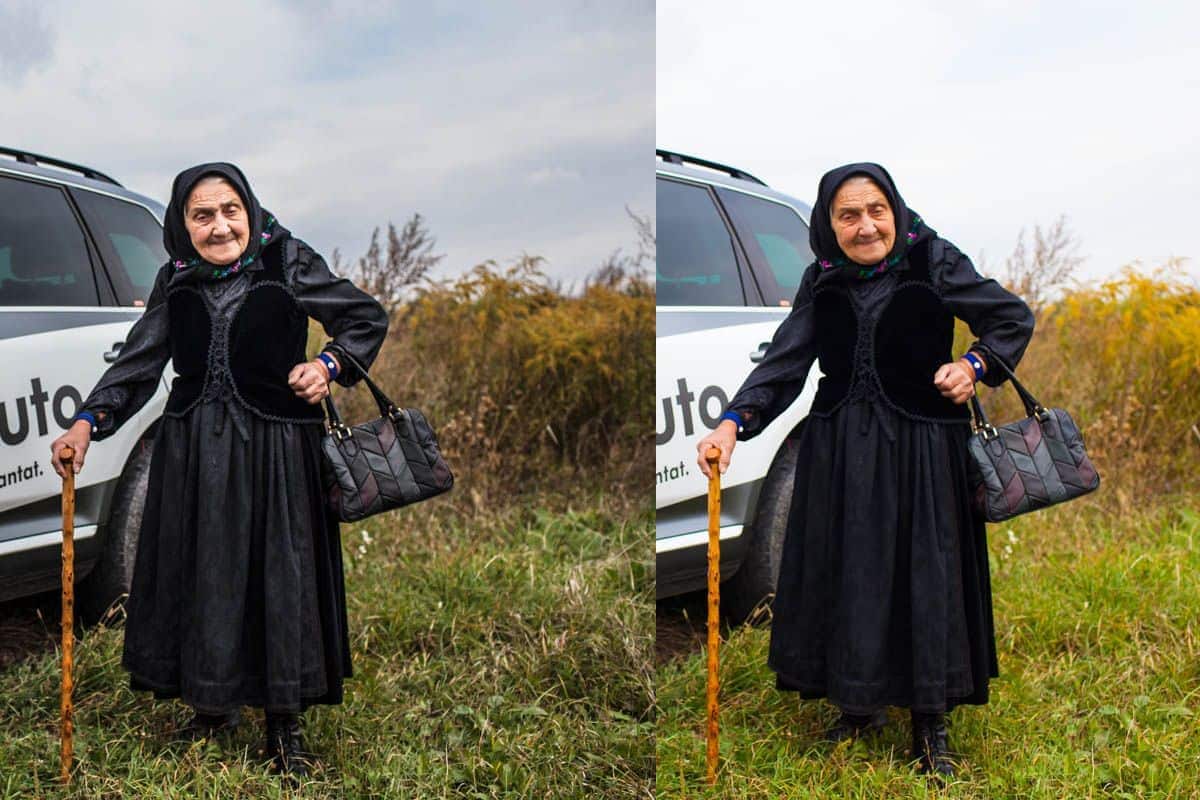
With JPEGs, your camera does some processing for you, before you even see the image on the back of your camera. The photo below is a JPEG as processed by the camera with no additional enhancements or edits. It doesn’t look too bad and lots of people are satisfied with using JPEG for all kinds of situations with no work afterwards. And while the colors in the JPEG may seem more pleasing than an untouched RAW file, lots of detail is lost in the JPEG, especially in the sky (as we’ll see in a coming photo). I find JPEG to be most useful when I’m snapping my everyday shots—like a night out with friends or the latest stuff I’m putting up for sale on Amazon. Basically, if you’re in any situation where you want to get your photos fast and with minimal effort before sharing them, then shooting in JPEG is the right tool for the job… but it’s not always the best choice.

Why would I use anything but JPEG?
While shooting in JPEG can be extremely helpful in some cases, often, those same advantages can also become limitations.
As we can see with the JPEG above, the camera does some processing itself before saving the image to your memory card. It analyzes your photo and applies a series of adjustments and enhancements, then it gets rid of all the extra information it didn’t use. Each camera is designed to process photos a little differently, applying its own unique blend of changes—like compensations to white balance, and adjustments to contrast and sharpness—before saving the smaller, optimized photo as a JPEG. This is great when you have perfect conditions, but what if you want more control over the end result because conditions are less than ideal?
Let’s say you were shooting an important birthday party or a special moment with the kids, indoors with very little natural light to work with and now the color profile in the picture is all wrong. How can you give yourself a second chance to get these settings right in post-processing if your camera automatically applied its own adjustments and then deleted all that extra information you might need? You won’t get a second chance at capturing the moment so, instead of relying on your camera to make some of the decisions, learn to shoot RAW and make the right adjustments yourself.
How can RAW make a difference?
If you’ve never used anything but JPEG, jumping to a new file format may seem a little overwhelming. That’s completely normal. But it’s actually a lot like changing your camera from auto to manual mode… once you learn the basics, you’ll see that shooting RAW makes a world of difference and gives you the control you need in almost any situation—especially when learning basics, like getting your exposure and white balance right.
Most cameras shoot JPEG, but many DSLRs, newly popular mirror-less interchangeable lens cameras, and even some high-end compact cameras, offer you the choice to take pictures in the camera’s own RAW format. The RAW file is just that, the raw, untouched and unprocessed photo exactly as it was captured by your camera. When comparing a JPEG to a RAW image, the RAW will look duller and might seem underwhelming when you first look at it (like the file below, which is straight out of the camera). RAW files give you a blank canvas to work with, so it can be a little more work to get the right look. But having access to all that extra information your camera would have otherwise thrown away during the automated JPEG-creation process makes this process much more rewarding and delivers a more pleasing photo.

Using the RAW format often gives you a second chance at getting your settings right. Did incandescent lighting mess up the color balance? Not to worry, just correct the white balance and get rid of that orangey glow. Was your photo blown out and overexposed? With all the extra data saved to the RAW file, you can adjust the exposure or the highlights and shadows to get the look you want. The recovery results can be shockingly good when using RAW, making it hard to go back to JPEG after you’ve experience the power of RAW.
How do I process a RAW photo?
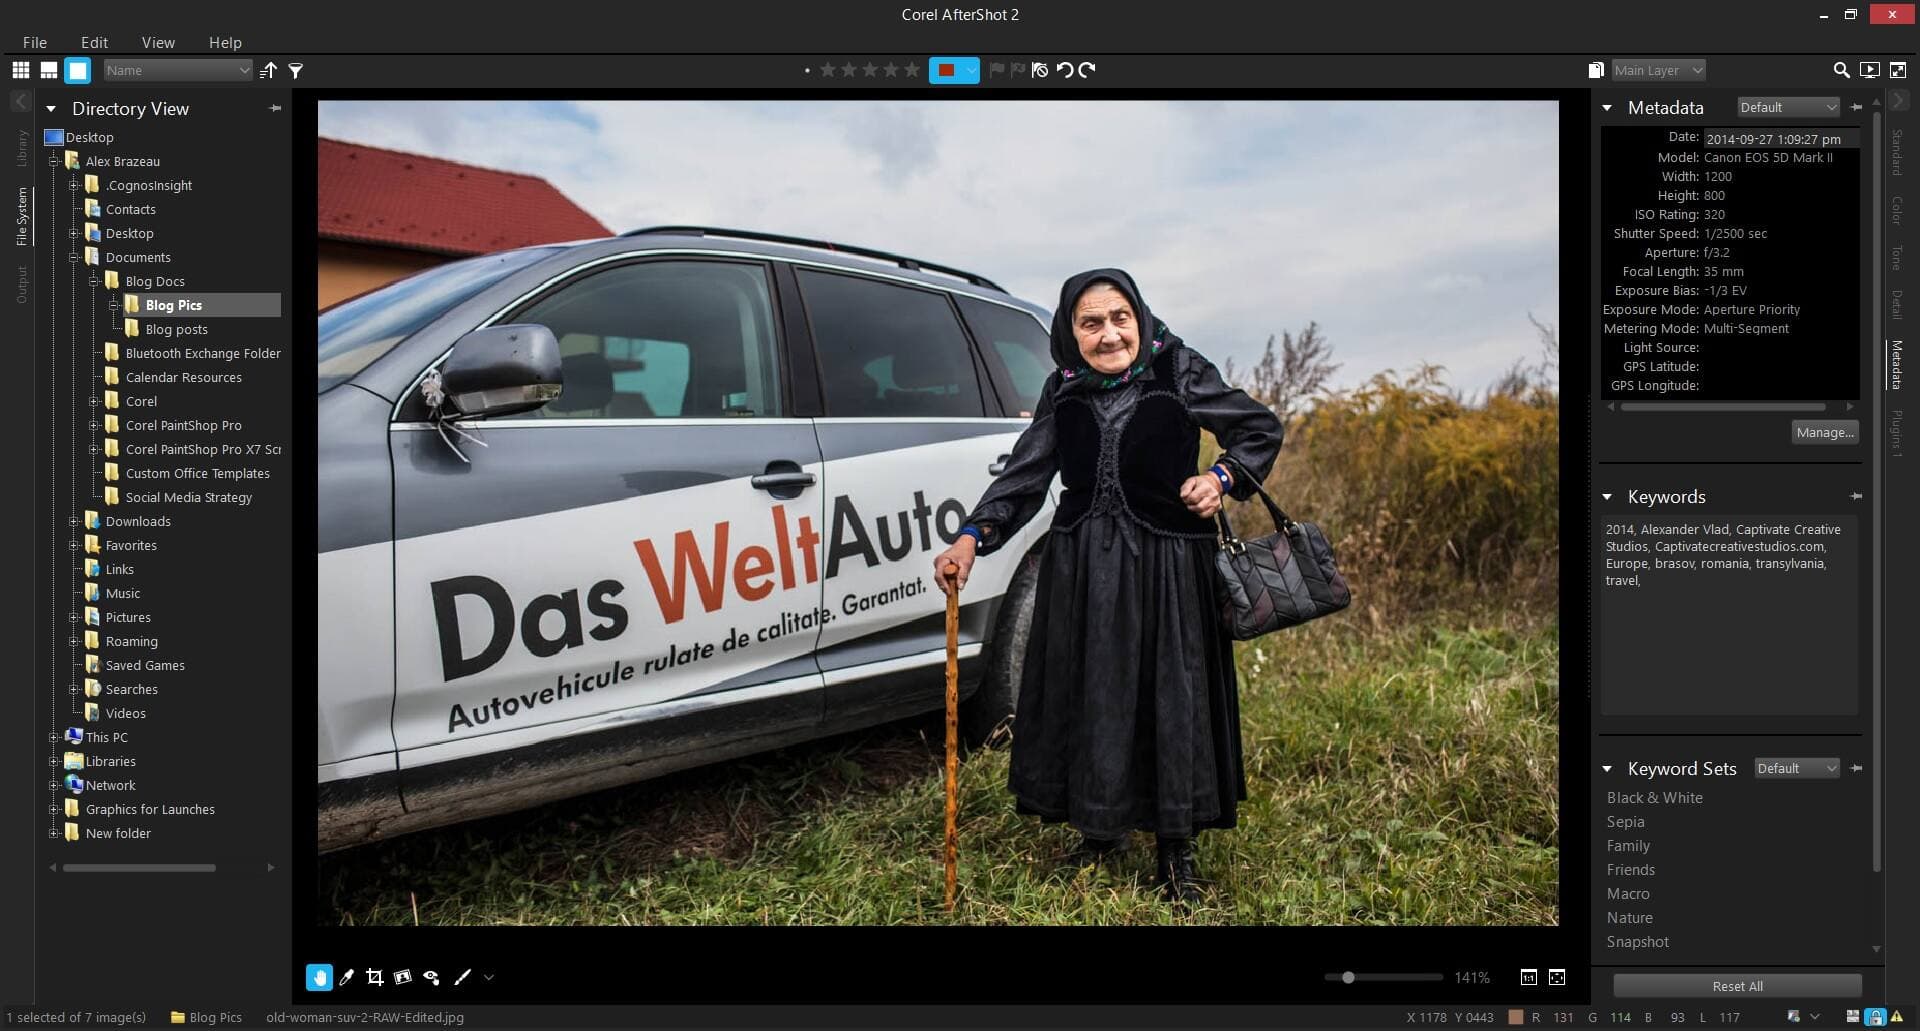
Each camera manufacturer has developed its own proprietary RAW format—Canon has the .CR2, Nikon has .NEF, Fujifilm has .RAF, and so on (check the link for more common RAW formats) [link]—and if you want access to that wealth of extra data your camera saved when you chose to shoot RAW, you’ll need a program designed to read RAW files. When I edit my photos, I use Corel’s Aftershot Pro on my Windows desktop at home and my Macbook when I’m on the go (and if you’re on Linux fan you can even use it there too). The latest update was just released and brings support for some of the newest models from Canon, Fuji, Sony and more, along with all kinds of new enhancements and improvements.
AfterShot Pro is a powerful RAW photo-editing tool available on the operating platform of your choice, whether you choose to work or play on Windows, Mac or Linux. While some programs still make subtle improvements to each file when you import the photo into the program, AfterShot Pro is designed to give you the “zeroed” RAW file, just as it would be straight from the camera with no enhancements. To get the right look, you’ll need to move each slider in the program to adjust the high dynamic range data—the highlights, shadows, contrast, noise-reduction and sharpness, and you’ll also get a chance to correct the exposure and white balance. It might sound like a lot of work, and it will take some time to get things the way you like them, but I promise you’ll love the results—and with AfterShot Pro you get the world’s fastest RAW photo-editor. AfterShot Pro is also a powerful batch processor, which means it can apply the same series of adjustments to a whole set of photos taken under the same conditions quickly and automatically—saving you time and getting you a finished photos easier and faster.
One of the biggest reasons I choose to use a RAW photo-editor like AfterShot Pro is because you get to take advantage of what’s known as “non-destructive editing”. You can change as much of the data or as little as you want and then save or export your photo. If you don’t like your adjustments or want to try something different, just start all over again with the click of a button. With RAW editing, this is easy because all your changes are saved in a file alongside your RAW data, allowing you to go back and start fresh as many times as you want. As you get more comfortable with manipulating RAW photos, you’ll learn new techniques and you’ll want to go back and edit some of your favorite shots to test out your new skills or follow along with the latest tutorials.
These are really just a few of the reasons why I think it’s worth shooting RAW. JPEG is great for everyday photos, but when you really want control and the ability to adjust, then RAW is the only way to go. But don’t just take it from me, change those camera settings and download a free 30-day trial of AfterShot Pro today!


2 Comments