Learning to edit layers is one of the most important things to understand and a fundamental feature of any serious photo editing and design tool. Layers allow you to combine multiple images, vector shapes and text into one final image file. Sound confusing? Don’t worry… the idea of layers is actually a pretty straightforward concept and, by the end of this post, you’ll know enough about how to use them that you’ll have the confidence to start experimenting with layers in your next PaintShop Pro creation. So let’s jump right in!
What Are Layers?
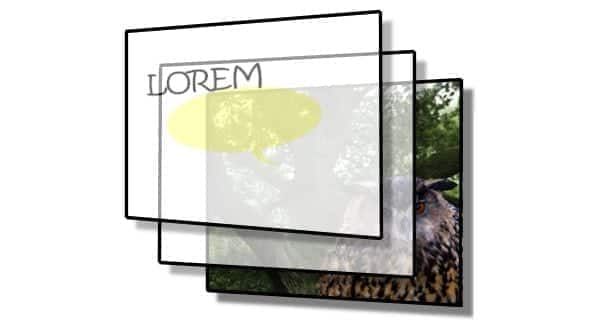
Put simply, layers are an organizational tool. You can use a layer for each element of your final image. If we take a look at the image below, we can see them in action: the photo of the owl is the bottom layer, a speech bubble shape is on a second layer, and the text is on a third layer. This is how your image would appear when printed or exported.

Now, I may be dating myself a little here but remember back to your schooldays when teachers wrote and drew on clear acetate pages and displayed them on the overhead projector? Well, that’s probably the easiest way to think about layers—they are like those clear pages. And what if you put a different element on each page and stacked the pages?
Below, you can see a breakdown of how layers come together to create the final composition above. At any time, you can change the size or style of the font. If you want to edit layers to change the color or position of the speech bubble graphic, you can. If you want to adjust the background photo, no problem. Layers give you maximum flexibility when you are editing your photos.
And that’s pretty much it in terms of a definition of what a layer is. The what, though, is only the beginning… it’s what you can do when you edit layers that makes them so exciting, so let’s see what kind of layers you can use.
Types of Layers
Since PaintShop Pro was created with photographers and digital artists in mind, it incorporates layers into photo editing as well as vector illustration. Each layer type serves a unique purpose and allows you to apply various effects and adjustments to your images and, as you’ll see below, there are various types of layers you’ll find in PaintShop Pro all used and applied in different ways—not only for different image elements, but also for different editing actions.
The background layer is the bottom layer of an image. When you import JPEG, GIF, or PNG mages into Corel PaintShop Pro, they have only this single layer, which is named “Background” on the Layers palette. The background contains raster data and must be renamed in order to be moved from the bottom-most position in your layer stack. If you create a new image with a transparent background, it does not have a background layer, and its bottom layer is a raster layer, which can be moved anywhere within the stacking order.
Raster layers are the most basic layer type. Raster layers store information by using pixels. If you zoom in on an image, you will see the individual pixels. On a raster layer a single object cannot be moved without affecting the entire layer. Raster layers are used mostly for artwork, photographs, and to edit layers pixels. They are often used when creating images in which you want to draw, add lots of effects, or command scripts you’ll have to use the Raster Layer.
Vector layers are more advanced as they do not use pixels to store information. Instead, vector layers store the all the instructions about how to draw the lines and curves in the image. They provide more capabilities, with the ability to draw lines, polygons, text and more. On a vector layer, each object is independent and can be moved without affecting the rest of the layer. Raster objects can’t be placed on vector layers and vice versa; however, the two layers can be merged to a single raster layer.
An adjustment layer is a correction layer used to alter the color or tone of underlying layers without modifying the image layers themselves. You can add adjustment layers to test various color corrections or combinations of corrections. Typically the type of adjustments you can make with adjustment layers are those which affect image brightness and color. In PaintShop Pro there are Adjustment Layers for levels, curves, invert, brightness/contrast, channel mixer, color balance, hue/saturation/lightness, posterize, and threshold.
Mask layers are some of the most powerful and useful layers you can use when using PaintShop Pro. They are designed to show or hide portions of the layers beneath them by altering the layer’s opacity. This means you are able to adjust and edit only certain areas of an image, bringing focus to a particular subject or element in your composition.
The art media layers have special properties, similar to a canvas, and enable the ability to work with art media tools, like the smear or oil brush. They are automatically created when you use any of the art media tools. Art media layers can be converted to raster layers, but not to vector layers.
The Layers Palette
The Layers palette is the central location to help keep track when you edit layers. It appears by default on the right-hand-side of your screen and it can be opened and closed with the F8 key or through View > Palettes > Layers. It’s an incredibly handy tool when you’re working with images that contain more than one layer. There are all kinds of commands and options that enable you to easily adjust layers, so becoming familiar with this palette is a huge step in discovering the power of PaintShop Pro. Let’s take a look at the screen capture below to explore the different elements of the Layers palette, starting at the top left with Blend Mode and working our way around in a counter-clockwise direction.
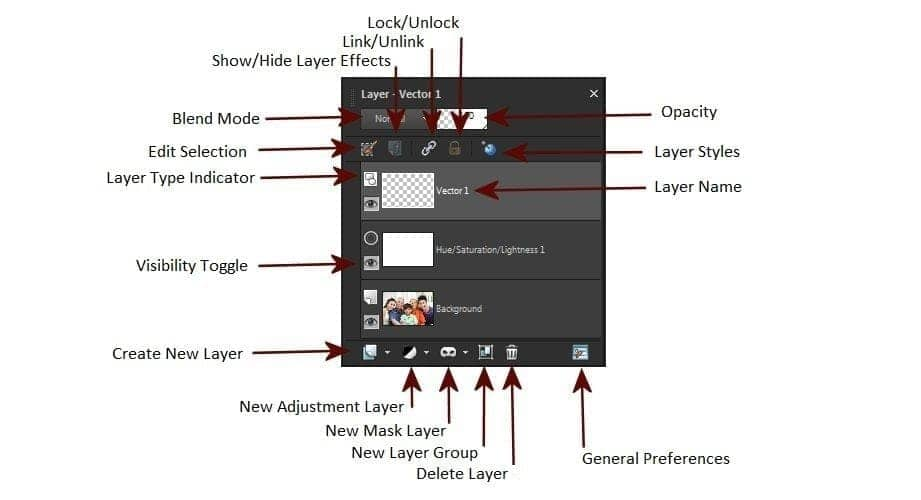
Blend Mode – Change the blend mode to adjust the way that the selected layer blends with the layers underneath it. Great for compositing and special effects.
Edit Selection – This button will highlight the selection you’ve made on your image and enable you to adjust your onscreen selection using various tools or brushes.
Layer Type Indicator – Displays the type of layer you’re working with, including Background, Raster, Vector, Adjustment, and Mask, as well as whether the layer is the parent layer of a group.
Visibility Toggle – If the eye is showing that layer is visible. Click on the eye and the layer will still be there but invisible until you click on the eye again.
Thumbnail – A small picture of the layers contents. You can click the thumbnail to drag-and-drop layers to change their order within the image or even drag them to another image open all together. Objects or text on layers closer to the bottom will appear “underneath” those layers closer to the top of the list if they overlap in the image.
Create New Layer – Click this icon to create a new layer. A pop-up menu will appear with layer options so you can select the layer type you want.
New Adjustment Layer – Enables the ability to change the color or tone of the underlying layers. All layers are affected underneath an adjustment layer (unless clipped). This is our suggested method when it comes to applying image adjustments in PaintShop Pro because adjustment layers are non-destructive and can be changed at any time.
New Mask Layer – Use this button to add a layer mask to the currently selected layer. This will enable the ability to paint away parts of your layer without damaging your original image.
New Layer Group – An option that helps keep related layers together for organizational purposes or editing purposes. For example, you could group a text layer and speech bubble graphic layer so that they can be moved and resized as a single unit. Grouped layers are put into a folder. You can choose multiple layers and put them in a group, or create a new group by clicking this icon. Layers can be dragged in or out of groups.
Delete Layer – Select the layer you wish to delete and then click this icon to remove it and all of its contents from the image.
General Preferences – This will open a pop-up menu that provides a number of program options. The same menu can be accessed through File > Preferences > General Program Preferences.
Layer Name – This is the customizable name you can give to each layer. Single left-click to select the layer, then single left-click again to rename the layer. You can also double-click the name to open the Layer Properties menu where you can change various options associated with the layer.
Layer Styles – With this feature, you can create visually interesting and creative effects for a layer in real time, and you can fine-tune the effect before applying it. The Layer Styles feature provides six effects: Reflection, Outer Glow, Bevel, Emboss, Inner Glow, and Drop Shadow.
Opacity – Determines the transparency of a layer. A setting of 1 makes the paint or layer to be nearly transparent. A setting of 100 makes it completely opaque.
Lock/Unlock – The padlock means the layer’s transparency is locked. Transparent areas remain protected when you paint, apply effects, paste selections, or make other modifications. The transparency lock feature applies to Raster layers only.
Link/Unlink: Enables the ability to link layers to have them move together on the image canvas when you move one layer with the Move tool. You can link grouped layers and individual layers from different groups so they all move in relation until they are unlinked.
Show/Hide Layer Effects – Use this button to hide all layer effects and show only the background layer, click again to show all layers again.
How Can You Edit Layers?
Now that you know what a layer is, the different types, and how you can manipulate them using the layers palette, the next step is to see how choosing to edit layers can really make a difference in your work. There are all kinds of cool ways you can use layers and, as you become more familiar with them, you’ll find more ways to apply different techniques and combine your layers in new and exciting ways. This is really just a bit of an introduction to give you an idea of the sort of things you can do when you edit layers.
Exposure Blending
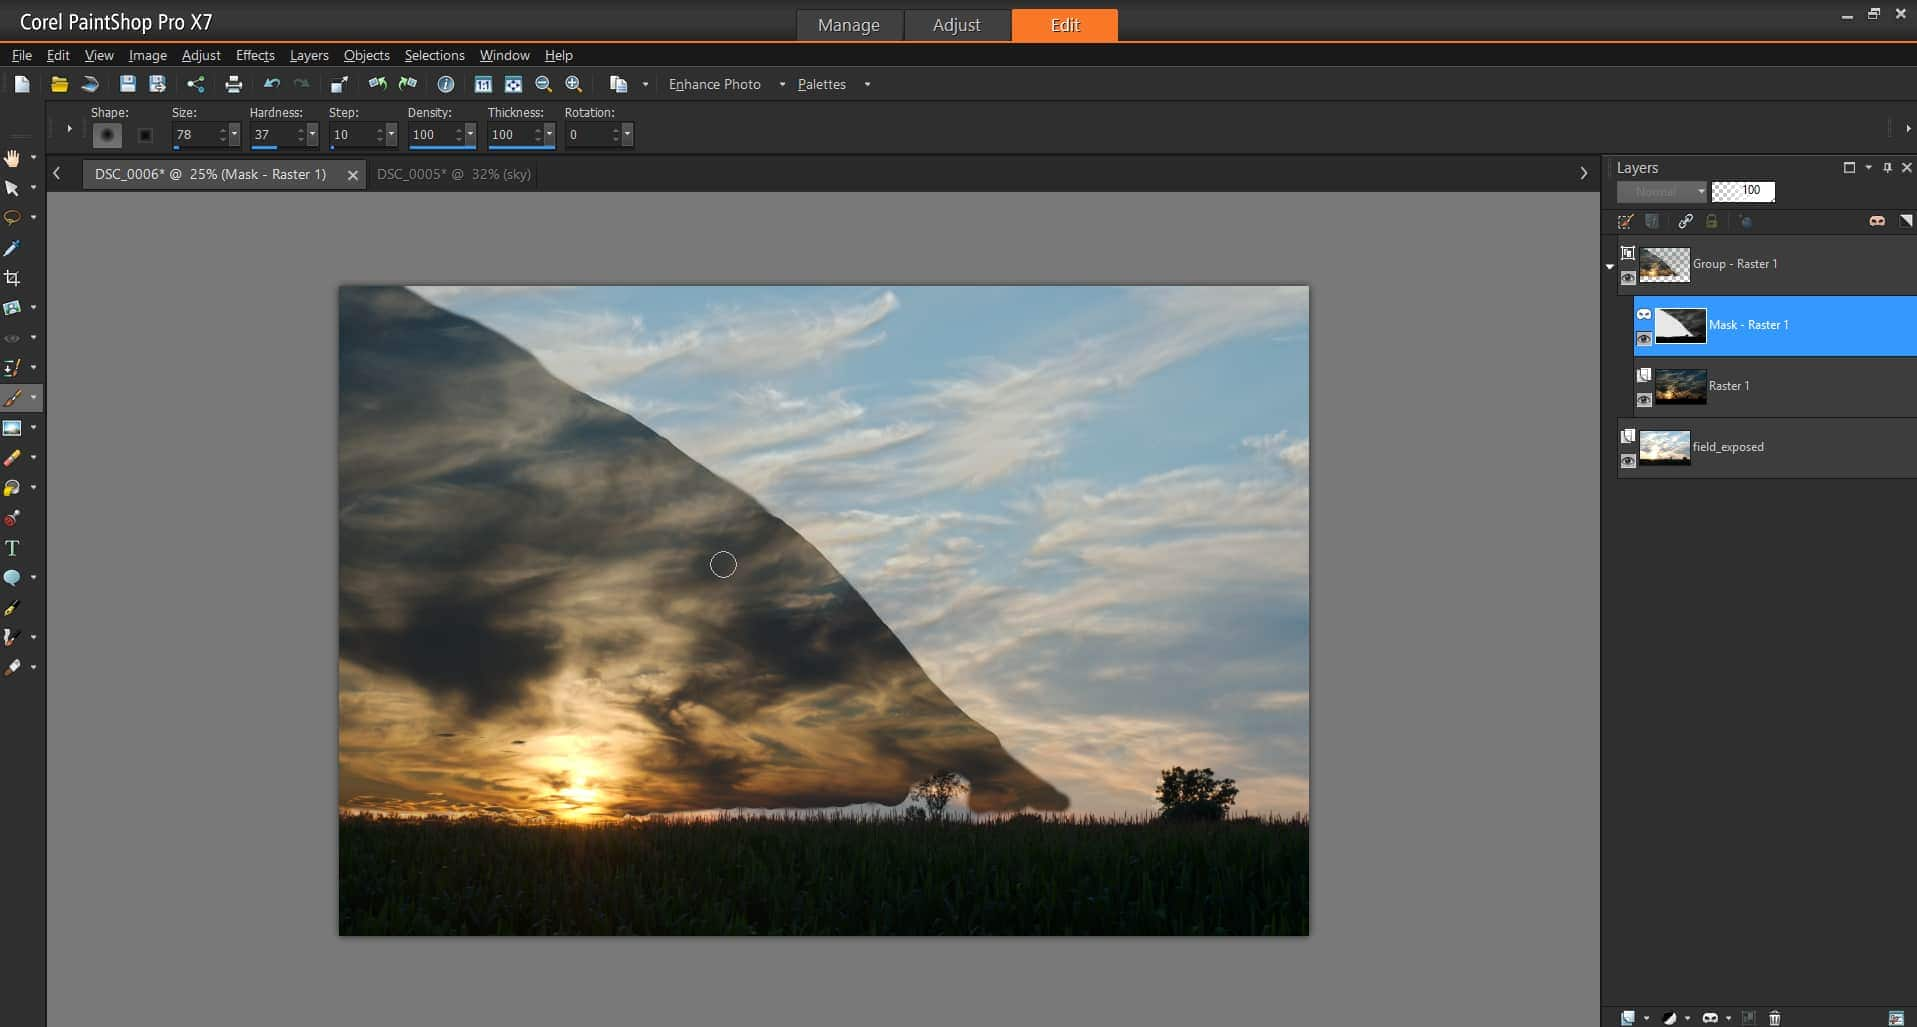
Exposure blending is a tool often used by landscape photographers. To use the exposure blending technique, you need to have a second photo that was taken at the same time and from the same angle and position, only at a lower exposure or higher exposure. In the case of the photo below, I used a lower exposure to capture the detail in the sky, and higher exposure to capture the color and detail of the field below. With layers, you can easily blend these two images to create the perfect combination of both photos in one image. See the image below to see an exposure blend I started earlier.
To achieve this effect, just take the photo with the proper exposure for the sky and layer it on top of the photo with the properly exposed grass in the foreground. Next, create a new mask layer; this allows you to paint with a brush on the mask layer to reveal the layer underneath. With the properly exposed foreground as the bottom layer, use the brush to paint out the sky and reveal a photo that captures all the detail of the sky and clouds, as well as the colors of the field as the two images blend together. You could get a similar effect using the Exposure Merge in HDR tools, but that uses a computer algorithm to make the changes; with exposure blending, you get to keep all the control over where and how the effect is applied.
Local Adjustments
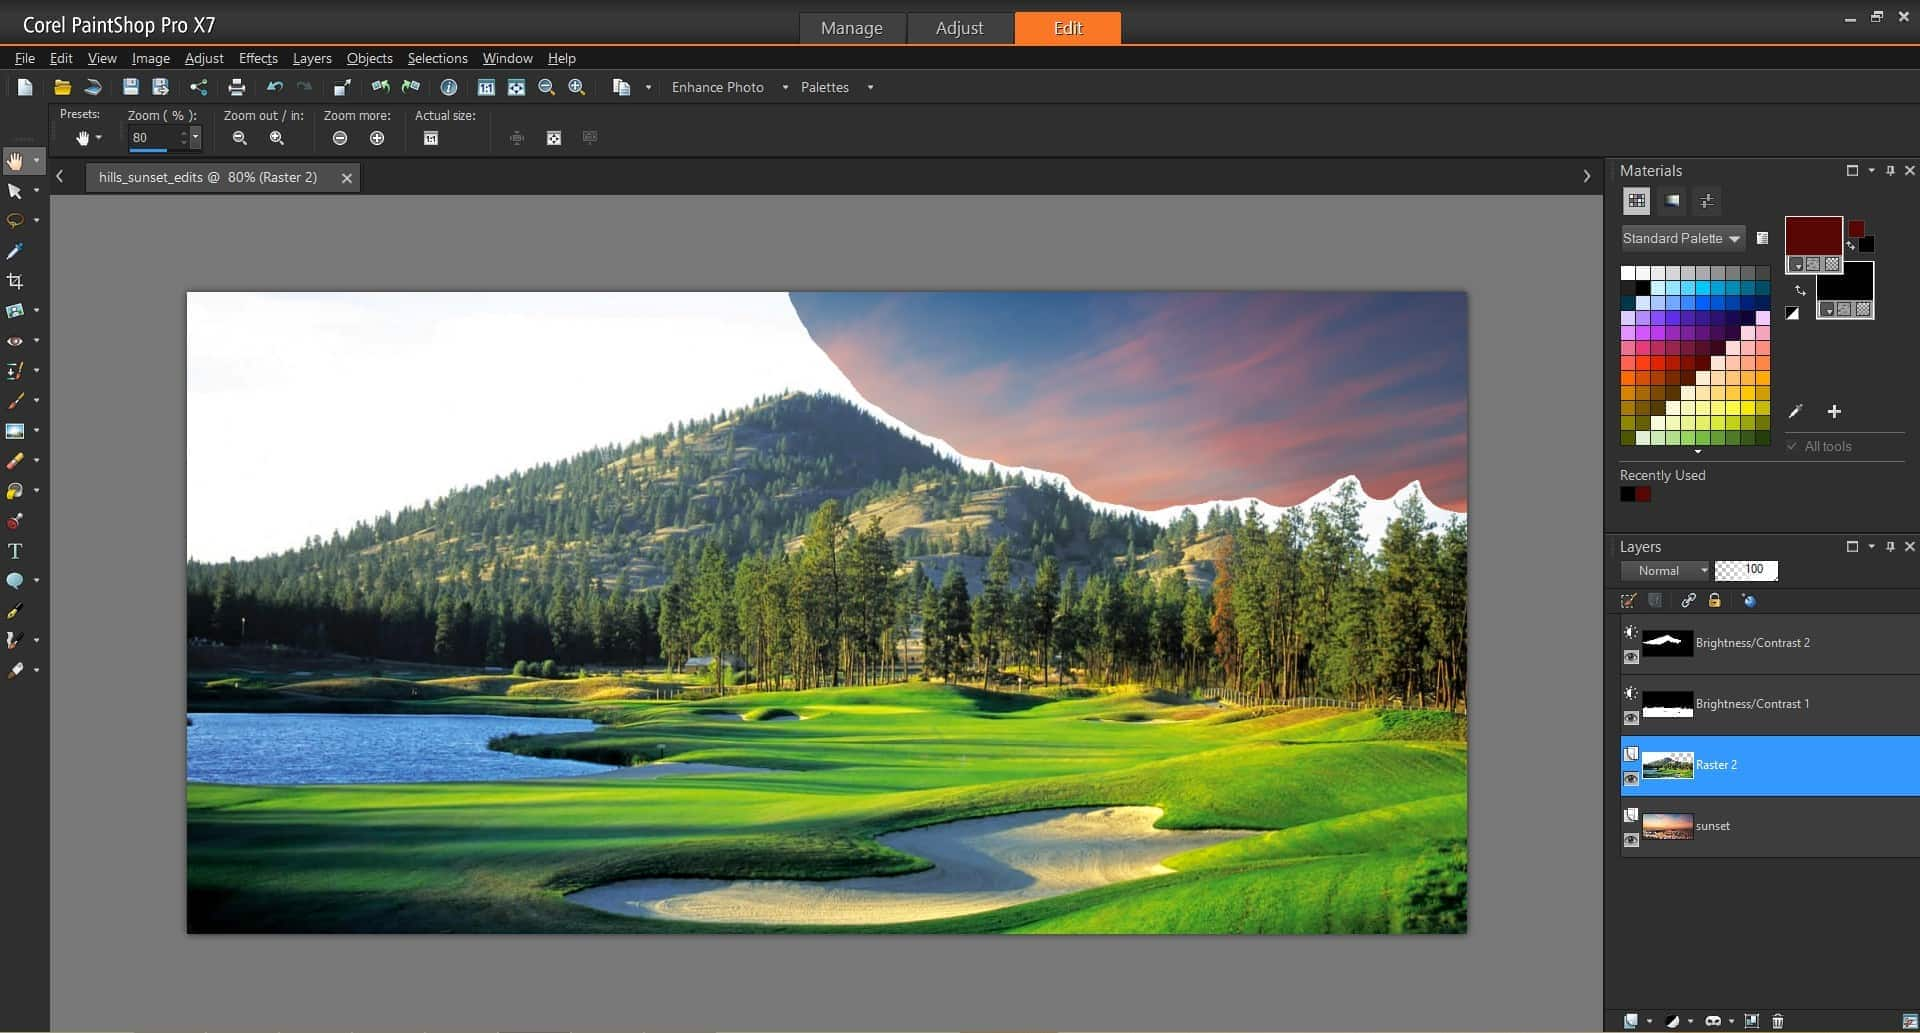
After exposure blending, one of the most important techniques you can do with layers is making local adjustments. That just means tweaking certain parts of the photo while leaving the rest of the photo as is. Using layers you can selectively apply saturation adjustments, brightness/contrast, sharpening, etc. This allows for an incredible amount of control over the final image. Just create a version of the photo with the adjustments, put it as the bottom layer, and reveal it with the brush just in the spots you choose. This layer technique can be used for all kinds of edits, from adjusting individual elements like the white balance to replacing them all together like I have below in this screenshot where I’m partway through a background replacement. I placed the sky as the background layer and then used the background eraser on the foreground layer to reveal the sky underneath. You’ll see I have created four separate layers—one for the foreground (the hills and grass), another for the sky, and two for the adjustment layers where I’ve altered the contrast and brightness of the hills and grass individually.
Make your photos fun!
You can have all kinds of fun with your photos using layers. Create all kinds of scrapbook pages, edit your photos and place them inside different frames. You can then use picture tubes to decorate your photos—placing each picture tube stroke on a new layer. You can learn more about scrapbooking from our friends at Scrapbook Campus. Or just for fun, you can remove objects or people from one photo and place them into another photo that has a completely different background, just like I did for my niece, who loves winter and playing in the snow!
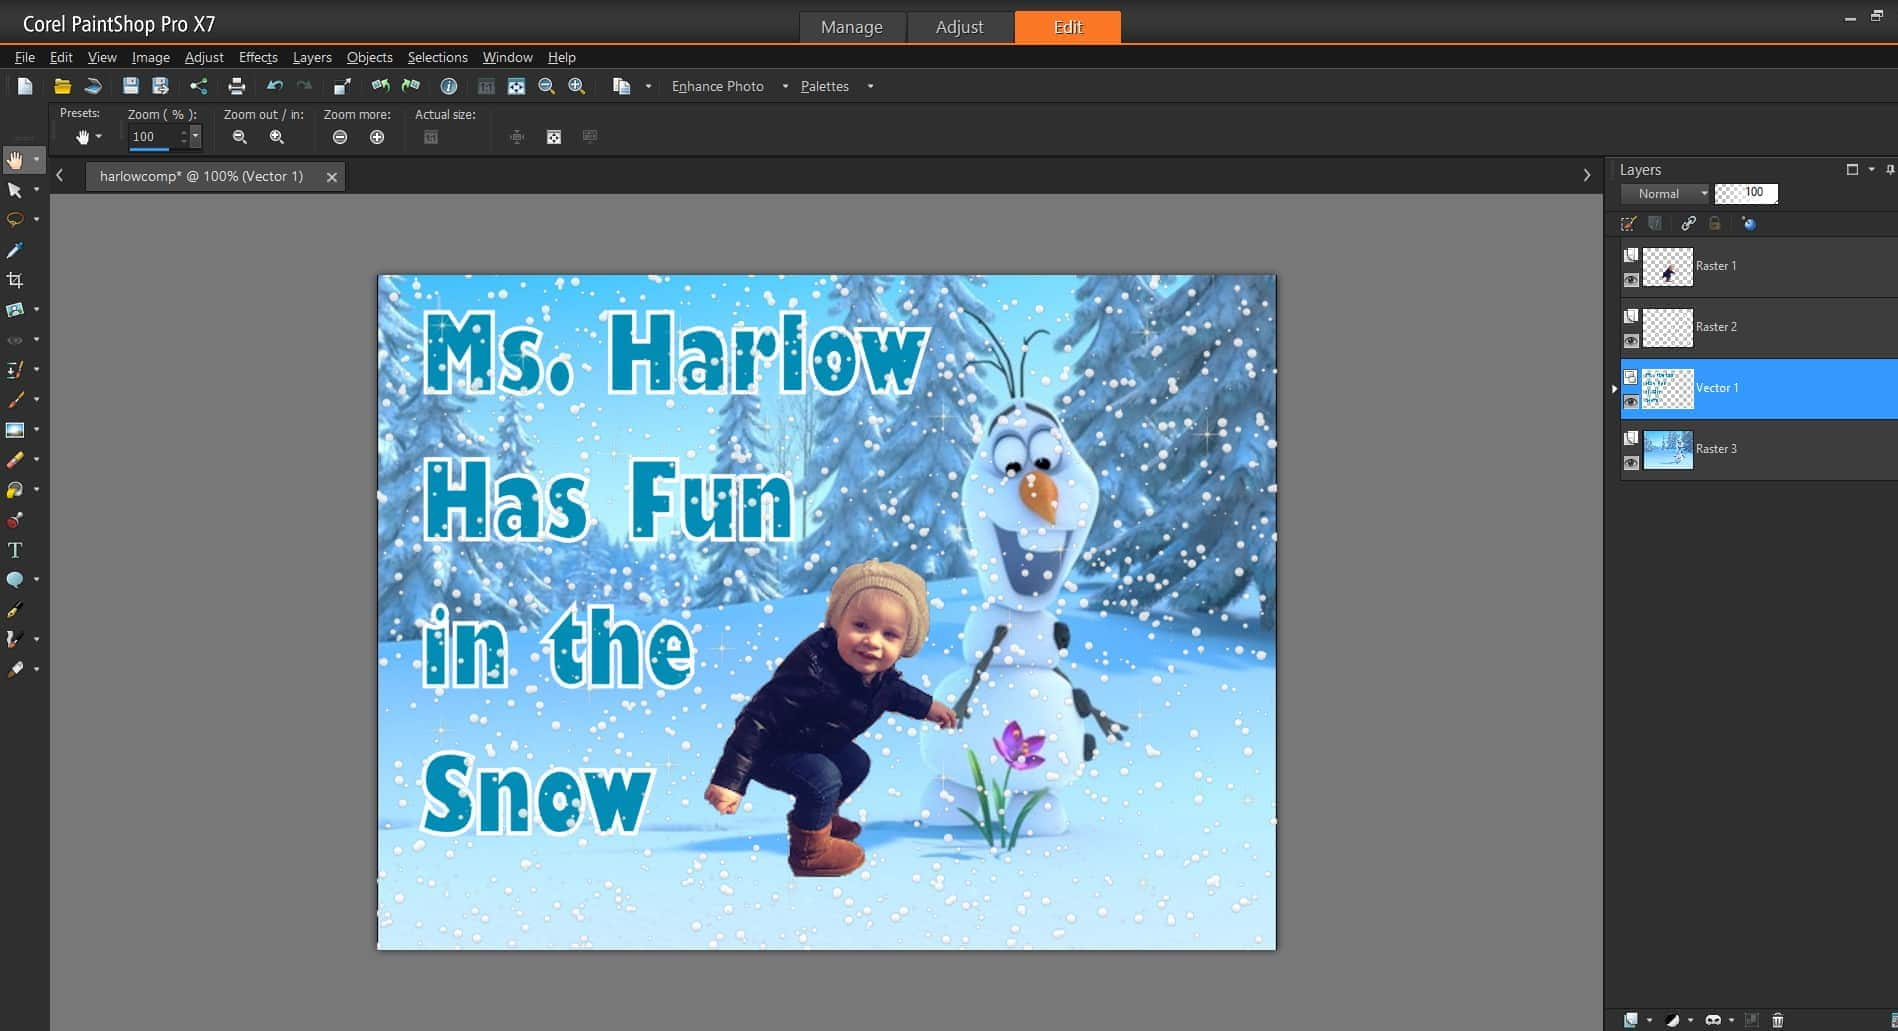
These are only a few of the ways that you can use layers. As a best practice, when you’re working with important photos, it’s always good to duplicate the background layer before getting started, just so you always have a fresh copy to go back to if you want to start over or change something you didn’t like. There are all kinds of other uses and applications when it comes to layers. If you haven’t already, I encourage you to download the free 30-day trial and edit layers for yourself. Check out our tutorial series Working with Layers to find all kinds of new and exciting ways to incorporate layers into your work. Have fun!



13 Comments