This video covers the following topics:
0:27 When trying to add text as a selection, my Pick tool moves the background instead of the floating text. How can I get the text to move?
1:48 I want to add my design to a t-shirt mockup, how do I make it look more realistic?
3:07 How do I get rid of the white fill when drawing lines with the Pen tool?
4:57 I want to select some text out of an image so I can copy it, how do I do this?
7:02 I’m having a hard time selecting a portion of my photo to use on another photo.
8:23 I was given a lensball and can’t figure out how to flip just the ball in my photos.
You can use the video time stamps if you only want to view a particular question and answer. Below is a written version of this session, with links to related tutorials that provide more details on some of the topics.
Resources
Download a printable PDF of the written tutorial (PDF, 2 MB)
Find the PaintShop Pro User Guide for your version
View our full collection of PaintShop Pro tutorials to learn more
When trying to add text as a selection, my Pick tool moves the background image instead of the floating text. How can I get the text to move?
In PaintShop Pro you can create different types of text: vector text, raster text, and text as a selection. When you create text as a selection, once you click the Apply checkmark to complete the text it becomes part of the background layer.
To move the text selection, it needs to be on its own layer, apart from the background layer. There are two ways you can do this:
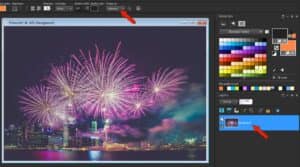
- Activate the Pick tool and click on image. The text selection will automatically be placed on a new Promoted Selection layer. The selection marquee disappears, meaning that the text has been deselected.
- Or, under the Selections menu choose Promote Selection to Layer. Then press Ctrl + D to deselect the text.
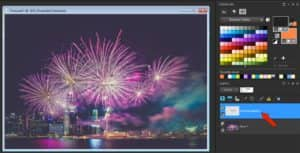
In your Layers palette, make sure the Promoted Selection layer is active and then you can use the Pick tool to move the text.

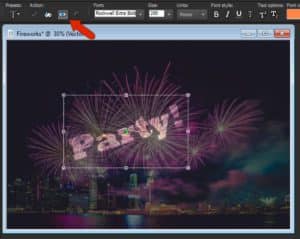
Keep in mind that when you create text as Selection it is not editable, whereas if you create text as Vector you can use the Text tool to edit the text properties (font, size, color, etc.) or the text itself. And with vector text, you can use the Text Cutter and Cutter Preview tools to create a selection from your text. When the Text tool is activated you will see these tools on the Tool Options palette along the top.
When you click on the Cutter Preview icon, a semi-transparent mode is activated that lets you preview the cutout. You can now adjust the position, size, or rotation of the proposed cutout using the control handles for the object.
To learn more about the Text Cutter, watch our full tutorial How to Cut Out Shapes and Text.
Is there a tutorial on how to create a shadow on different parts of an image? I created a photo mockup for a t-shirt on which I will add my digital design, and I’d like to make it look more realistic.
PaintShop Pro allows you to add a drop shadow effect to objects in your images. You can apply this effect by going to Effects > 3D Effects > Drop Shadow. However, this probably won’t give you the realistic look you are going for, as it will give your design a 3D appearance that looks like it is raised above the t-shirt.
Many photos of t-shirts have some loose wrinkles which naturally have shadows. To make your design look realistic, you want to blend it into the t-shirt photo, so that some of the wrinkles and their shadows, and perhaps some of the fabric texture, show through the design image. You can achieve this using Layer Blend Modes and Layer Opacity.
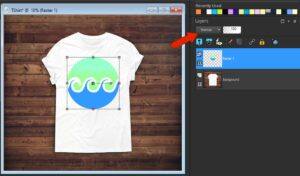
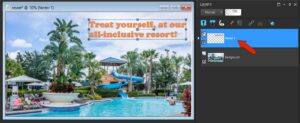
Layer Blend Modes and Layer Opacity are features of the Layers palette. If your Layers palette is not displayed, go to View >Palettes > Layers or press F8. In this example, we have copied and pasted a PNG logo with a transparent background onto a t-shirt photo and used the Pick tool to adjust its size and position.
The Layer Blend Mode feature is a dropdown list at the top of the Layers palette. The default blend mode is Normal, and it does not allow any of the wrinkles show through the green and blue areas of the logo.
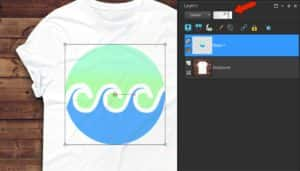
Make sure that you have selected the logo layer and then try some other blend modes. In this example, if we switch the blend mode to Darken or Multiply, some of the wrinkles will show through. We can enhance that even more by reducing the Layer Opacity using the slider right beside the blend mode dropdown.
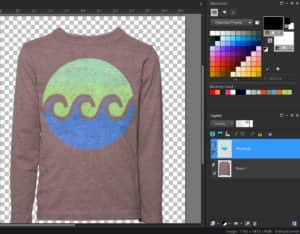
The best blend mode for your design will depend on the colors found in both layers. With the same logo on a darker, textured t-shirt, the Overlay blend mode works well, or Hard Light with reduced opacity.
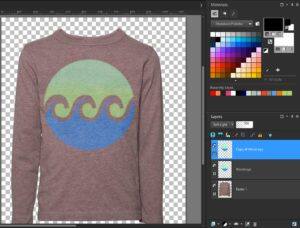
In this example, the Soft Light blend mode makes the logo look a bit faded, but that may be the effect you’re going for. If you like the blend mode but want the logo to be a bit darker, you can duplicate the layer once or twice to strengthen the logo. To duplicate a layer, right-click on it in the Layers palette and select Duplicate.
You’ll have to experiment with the various blend modes and adjustments to layer opacity to see what works best for your designs.
I want to do a black and white line tracing on a layer over a photo. When I start drawing lines, they appear to enclose areas of white overlaying the image. Why are there areas of white instead of just the black lines?
This question is related to fills. When tracing with the Pen tool, the foreground (top) swatch in the Materials palette sets the outline color, and the background (bottom) swatch sets the fill color. So in this example, as you trace, the shape fills with white.
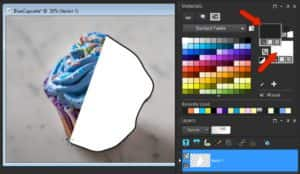
You can easily remove the fill by using the Pick tool to select the vector shape and clicking the Transparent icon for the background swatch. Or you can set the background swatch to transparent before you start tracing.
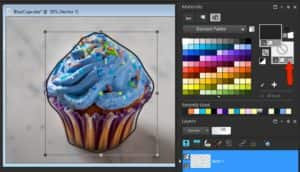
Fills work the same way when using the Shape tools. An ellipse traced over a cupcake will have the outline and fill colors set by the swatches in the Materials palette.
Set the background swatch to transparent if you want to draw a shape without a fill.
To adjust a shape to fit your tracing, activate the Pen tool, right-click and covert the ellipse to a path, and add a few more nodes by holding Ctrl and clicking on the path.
Our next 3 questions involve making selections. PaintShop Pro has some powerful tools that enable you to select objects and extract them from images in order to manipulate them, place them on a new background, or add them to another image. We’ll go through the specific scenarios from user questions, but we would also encourage you to watch our in-depth selection tutorials, which will be linked in the questions below. These tutorials will help you understand how to choose the right selection tool for what you’re trying to accomplish.
I have an image that contains text, and I want to select only the text and nothing else. I also want to copy the text to a text file. Is there a way to do this?
The only way that you can copy text from an image and paste it into a new file as text is if your text is vector text on a separate layer within the image. So if you have a single-layer file such as a JPG photo or PNG, you will not be able to simply copy it and paste elsewhere as text that you can edit or format.
You can tell if your text is vector text by looking in the Layers palette. To display the Layers palette, go to View > Palettes > Layers or press F8. If your file has vector text on its own layer, then it is easy to select and copy the text.
Activate the Text tool and use it to select the text by dragging over it then press Ctrl + C to copy. Now you can paste the text into a text file.
TIP: You can also use the following text selection methods: double-click a word to select it, triple-click a line to select it, and quadruple-click in the text or press Ctrl + A to select the entire text.
If you want to copy and paste the text into a new PaintShop Pro file, use the Pick tool to select the text layer, and drag the layer into blank space, which copies the text into its own image. Or you can use Ctrl + C to copy and then go to Edit > Paste as New Image. This text will still be vector text so you can use the Text tool to edit it, change the color, size, font, and other text properties.
But what if your text is not vector text on its own layer? There are 2 other possibilities: your text is on a separate layer, but it is raster text; or your text is part of a single-layer file, which means that is it integrated right into the photo or image file. In either case, you can still copy and paste the text into a new file, but it will be pasted as an image – not as text.
To copy and paste raster text that is on a separate layer, simply select it with the Pick tool and then use Ctrl + C to copy and Ctrl + V to paste into any new image file (as long as the file format supports images, which would not be the case with a text editor such as Notepad).
If you have a single-layer image like a JPG photo, you’ll have to use a selection tool to extract the text from the image. As with text on a raster layer, this text will not be editable and can’t be pasted as a text file. But you can paste the selected text as an image into another file.
There are five available tools in the Selection tool group. In this example, our text characters are all the same color, so the best tool to use is Magic Wand tool.
Activate the Magic Wand tool, and on the Tool Options palette set the Match Mode to RBG Value and click on one of the letters. All the letters that are the same color will be selected at once.
If your text has different colors, you will need to adjust the tool options: set the Mode to Add and Contiguous to unchecked. Then as you click on each letter it will be added to the selection.
To learn more, watch our full tutorial How to Use the Magic Wand Selection Tool.

TIP: if your text has a different color outline as in this example, an easy way to include the outline in your selection is to go to Selections > Modify > Expand. In the Expand Selection window, adjust the Number of pixels setting until your selection includes the outline as well.
Once you have all the text selected, use Ctrl + C to copy and Ctrl + P to paste, keeping in mind that the text will be pasted as an image, not as actual text.
I’m having a hard time trying to select a portion of my photo to use with another photo.
There is more than one way to select an object or part of your image in order to extract it and place it into another image. The tools and method you use will depend largely on the image you are working with, but also on your workflow preference. Basically, you have the choice to: 1) select the object so you can remove it from the image; or 2) remove the background of the image so that you are left with the object on a transparent background.
We’ll demonstrate both methods to isolate the child in this photo.

Method 1: Selecting the Object/Subject
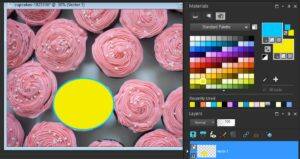
PaintShop Pro includes a group of selection tools to choose from. Which selection tool you use will depend on your image. In this example, the Smart Selection Brush is the best option because it lets you create a selection by brushing over a sample area. The selection expands automatically to the edges based on the information that is sampled by the brush. The Magic Wand tool that we used in the previous example will select based on the color, hue, brightness, or opacity of an object, so it is better suited for objects that have distinctly different pixels than those in other areas of an image (for example, a pink rose surrounded by green leaves).
Activate the Smart Selection Brush and on the Tool Options palette set the Mode to Add. To adjust the size of the brush, hold down the Alt key and drag up or down. Hold down your mouse button and use the brush to drag continuously around the inside of the object you want to select, then release your mouse.

If there are any parts of the object that are not included in the selection area, you can click on them or drag over them and they will be added. And, if your selection has picked up any areas that you don’t want included, you can switch to Remove mode on the Tool Options palette and then click on the unwanted areas to remove them.
To learn more about the Smart Selection Brush, watch our full tutorial Making a Fine Detail Selection. To learn more about editing and refining selection areas, watch our full tutorial Using the Refine Brush.
Once you are happy with your selection, press Ctrl + C to copy the selection and Ctrl +V to paste it as a new layer on another photo. You can use the Pick tool to resize and move the new layer.

Method 2: Removing the Background
This method uses the Background Eraser tool, which you can find in the Eraser tool group. To begin, activate the Background Eraser and adjust the size of the brush to your liking (by holding down Alt and dragging up or down). Carefully trace around the object, making sure that the brush tip in the center does not touch the object you want to keep.

Once you have erased the background, use the Pick tool to select the object then copy and paste as a new layer as before.
To learn more, watch our full tutorial Creating Transparent Backgrounds with the Background Eraser.
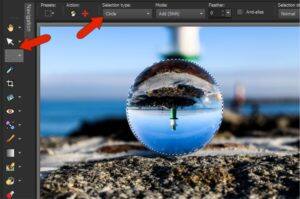
I was given a lensball and cannot figure out how to “flip” just the ball in my pictures.
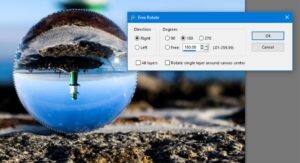
This is another example of knowing how to select just what you want. A lensball is almost always a perfect circle, so in this case we can use the standard Selection tool. On the Tool Options palette, change the Selection type to Circle. Starting at the center of the lensball, click and drag outwards to draw the selection circle.
If the selection circle is not perfectly centered, you can drag it while holding down the right mouse button.
If the selection circle is too large or small, go to Selections > Modify and choose Contract or Expand to adjust the size of the selection circle.
To make it possible to rotate just the selection, it needs to be on its own layer. To do this, choose Selections > Promote Selection to Layer. Then press Ctrl + D to remove the selection marquee.
To rotate the promoted selection exactly 180 degrees, go to Image > Free Rotate. In the Free Rotate window, make sure that the All Layers and Rotate single layer around canvas center options are unchecked. Choose 180 degrees and click OK.