This tutorial will teach you how to use the Shape and Text Cutter tools to crop your photos into shape or text objects with transparent backgrounds. The handy cutter tools make this process very simple – just draw your shape or type your text, use the Cutter Preview to adjust size and position, then use the Shape/Text Cutter to crop your photo into a new image with a transparent background. It only takes a few seconds and once you see how easy it is to create text and shape cutouts, you will probably find many uses for them in your photo editing projects.
Thanks for watching! We hope you found this tutorial helpful and we would love to hear your feedback in the Comments section at the bottom of the page. You will find a written version of this tutorial below, and a printable PDF copy to download on the Download Resources tab above.
Download your FREE 30-day trial and make every shot your best shot with PaintShop Pro 2023, your all-in-one photo editing and design software.
Download these free resources:
Written Tutorial and Sample Images (Zip, 5 MB)
PaintShop Pro resources
Keyboard shortcuts (PDF, 173 KB)
PaintShop Pro User Guide (PDF, 25.4 MB)
What’s New in PaintShop Pro
Working with Transparency
PaintShop Pro Tools
Featured products
 PaintShop Pro 2023 Ultimate
 AI HDR Studio 3.0
 PaintShop Pro 2023
 Vision FX
How to Cut Out Shapes and Text
This tutorial will help you understand the Shape and Text Cutter tools that allow you to crop your photos into shape or text objects with transparent backgrounds.
Using the Shape Cutter tool
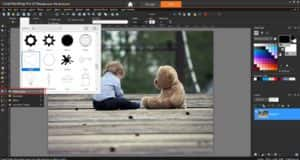
Open PaintShop Pro in the Edit tab and open the first image BabyBear.jpg. Activate the Preset Shape tool and select the Heart shape from the Shape List.
Drag your mouse across the screen to draw a heart shape to cover the child and stuffed bear. If your heart shape is not sized or placed exactly the way you want, you can activate the Pick tool and use it to resize or reposition the heart.
If you used the Pick tool, now reactivate the Preset Shape tool by selecting it in the left side toolbar. In the Property Bar at the top of the interface, click on the Cutter Preview icon.
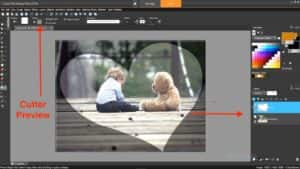
A semi-transparent mode is activated that lets you preview and edit the cutout. You can adjust the position, size, or rotation of the cutout using the adjustment handles.
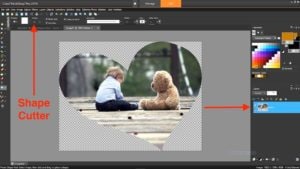
Now click on the Shape Cutter icon (also on the Property Bar) to create the heart-shaped cutout on the photo
In a few seconds, your image is complete.
Using the Text Cutter Tool
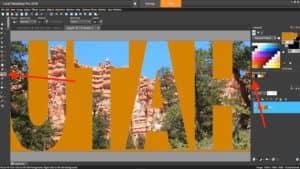
We can also create the same effect with text as a cutout. Open the sample image BryceCanyon.jpg, or any other photo you would like to use.
Activate the Text tool and type a word that’s big and blocky enough to fill much of your photo. Arial Black works well but you can try out different fonts and font sizes to get the look you want.
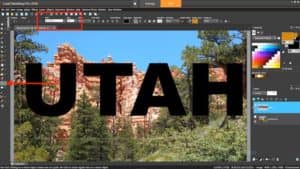
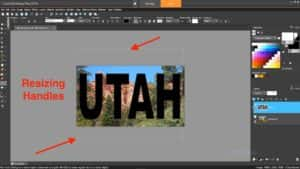
Using either the Text tool or the Pick tool, resize the text using the handles, including stretching vertically to fully fill the image. You may need to zoom out some to grab the edges for resizing.
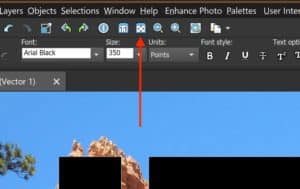
If you did zoom out to better see the resizing handles, click the Fit Image to Window icon to bring your photo back up to fill the screen.
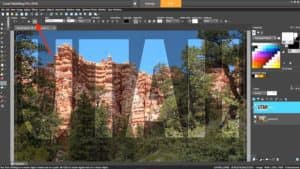
With the Text tool activated, you can see the same Cutter Preview and Text Cutter icons in the Property Bar. As we did with the shape, click on the Cutter Preview to view your cutout and make any adjustments. You can move the text around while still seeing the entire photo underneath.
Once you’re satisfied, click on the Text Cutter icon and your new image will be created.
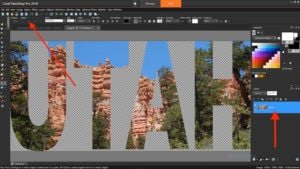
Now that you have created a shape and text cutout with transparent background, make sure to save the cutouts as a .PNG file to preserve the transparency. You can use these cutouts on a website or use them in other photo editing projects – for example, combine several shape and text cutouts into a collage image.
You can also use the Flood Fill tool to fill in the transparent background of your cutout shapes and text with color, creating a new image.
Download your FREE 30-day trial and make every shot your best shot with PaintShop Pro 2023, your all-in-one photo editing and design software.


Reader Interactions