With the Magic Wand selection tool, you can select an object or area in your images based on the color or brightness – for example, a pink rose surrounded by green leaves, or a dark area in an otherwise bright image. In this tutorial we’ll show you how to use the Magic Wand and how to adjust the various settings to achieve a precise selection. You’ll also learn how to make small touch-ups to perfect your selection.
Thanks for watching! We hope you found this tutorial helpful and we would love to hear your feedback in the Comments section at the bottom of the page. You will find a written version of this tutorial below, and a printable PDF copy to download on the Download Resources tab above.
Download your FREE 30-day trial and make every shot your best shot with PaintShop Pro, your all-in-one photo editing and design software.
Download these free resources:
Written tutorial and Sample Images (ZIP, 7 MB)
PaintShop Pro resources
Keyboard shortcuts (PDF, 173 KB)
PaintShop Pro User Guides
Partner and User websites
PaintShop Pro User Forum
Scrapbook Campus (Tips and tricks, workshops, master classes, and more)
Creation Cassel (Scripts, picture tubes, and other PaintShop Pro tools, plus weekly freebies)
PaintShop Pro Maniacs (Facebook group)
PaintShop Pro (Facebook group)
What’s New in PaintShop Pro
PaintShop Pro Tools
Working with Selections
Featured products
 PaintShop Pro 2023 Ultimate
 AI HDR Studio 3.0
 PaintShop Pro 2023
 Vision FX 2.0
How to Use the Magic Wand Selection Tool
With the Magic Wand selection tool, you can select an object or area in your images based on the color or brightness – for example, a pink rose surrounded by green leaves, or a dark area in an otherwise bright image. In this tutorial we’ll show you how to use the Magic Wand and how to adjust the various settings to achieve a precise selection. You’ll also learn how to make small touch-ups to perfect your selection.
Click on any of the images below to view full-size.
Setting up your Workspace
- Open PaintShop Pro in the Edit workspace.
- Click on the Window menu and ensure Tabbed Documents has a checkmark beside it.
- Open the 2 sample images provided: Two Flowers and Brunette Hair
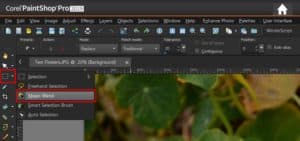
We will begin with the Two Flowers image. Go to the Selection tools group on the left-hand Tools toolbar and select the Magic Wand tool.
Understanding the Match Modes
The Magic Wand allows you to make a comprehensive selection with just one click, based on Match mode options. From the Match mode dropdown, you can choose to select based on color, hue, brightness or opacity of an object or area. Let’s try out the different Match modes.

Select None from the Match mode dropdown then click on the light-yellow area of the flower with the Magic Wand. You will see that the entire image is selected. This is because the None mode contains no restrictions; therefore, it selects the entire image. This makes it easier than trying to manually draw a complete marquee around your image.
NOTE: Selection areas are identified by the moving dotted line border called the selection marquee but also commonly referred to as the “marching ants”. The entire image should be framed by the “marching ants” border.
Do one of the following to deselect your selection and remove the selection marquee:
- Go to Selections > Select None, or
- Press Ctrl + D on your keyboard.
Next, select the RGB Value match mode. This selects pixels that match the red, green and blue values of the first pixel you click. The range of color values it selects will depend on the Tolerance value you enter in the Tolerance setting just to the right of the Match mode drop-down. The higher the tolerance setting, the more pixels are selected. Let’s try this out:
- Set the Tolerance value to 20 and click on the light-yellow portion of the flower. Notice a small portion of the flower has been selected.
- Deselect (Ctrl + D), set the Tolerance value to 70 and click again on the same light-yellow area of the flower. You will see that a much larger portion of the flower has been selected, along with a bit of the background.

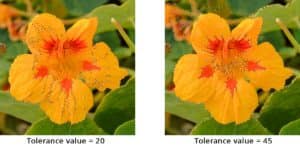
Deselect and choose Color from the Match mode drop down. Seemingly similar to RGB Value mode, Color mode chooses pixels that match the shading variations of the pixel you click.
- Set the Tolerance value to 20 and click on the light-yellow portion of the flower. Notice that some portions of the flower have been selected.
- Deselect (Ctrl + D), set the Tolerance value to 45 and click again on the same light-yellow area of the flower.
You will see that almost all the flower has been selected, along with part of the background. A higher tolerance selects additional shaded variations of yellow pixels, this time including those outside the flower.
Deselect and choose Brightness from the Match mode dropdown. When using the Brightness mode, the Magic Wand selects pixels that match the perceptual lightness value of the pixel you first click.
- Set the Tolerance value to 20 and click on the light-yellow portion of the flower. Notice that some portions of the flower have been selected.
- Deselect (Ctrl + D), set the Tolerance value to 70 and click again on the same light-yellow area of the flower. You will see that almost all of the flower has been selected, along with areas of the background.
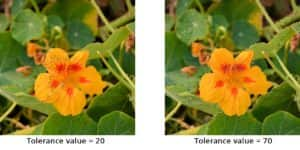
Brightness mode is especially noticeable if you click the red part of the flower. It picks not only red values, but other colors that meet the Brightness value of that red, which are darker than the yellow.

What it won’t do, unless Contiguous at the top is deselected, is jump to and select separate areas with similar values. The entire selection here is connected. If you want additional areas, hold down the Shift key to add areas or the Ctrl key to subtract an area. Otherwise, any new click will replace the previous one. We’ll look at the effects of Contiguous a bit later.
Deselect and choose Perceptual from the Match mode dropdown. The Perceptual mode selects pixels that match the perceptual brightness AND shading variation of the pixel you click. Go through the same steps as above to make a selection with a Tolerance value of 20, and then a selection with a Tolerance value of 70.
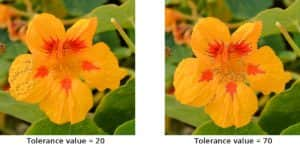
Deselect and choose Traditional from the Match mode dropdown. Similar to the RGB Value mode, this selects pixels that match red, green and blue values, with a bias toward lightness variations. This mode is therefore more discriminating than the RGB Value match mode. (This is probably the most common mode, hence the name).
Go through the same steps as above to make a selection with a Tolerance value of 20, and then a selection with a Tolerance value of 70. With the higher Tolerance value, you will see that most of the flower has been selected, except for the red areas.

The All Opaque mode selects all pixels that are not completely invisible (that is, having an opacity value of 1 or greater). Choosing this option disables the Tolerance setting. On this image, it selects every pixel as there are no transparent pixels.
The Opacity mode selects pixels that match the opacity value of the pixel you click. Again, you will see that the entire image will be selected when using Opacity mode, since there are no transparent or semi-transparent areas in this particular image.
Other Magic Wand Settings
Let’s review some of the other settings you will find in the Property bar for the Magic Wand tool.
Tolerance
As you have seen with the previous examples, the Tolerance value determines how closely the selected pixels match the pixel you first clicked on the image. At a low value, only very similar pixels are chosen; at a high value, a wider range of pixels are selected.
Feather
The Feather setting softens the edges of a selection by specifying a fade width, anywhere from 0 to 200 pixels. Let’s try it out. Make sure you have deselected any previous selection.
- Set the Tolerance value to 70 and the Feather value to 20; Contiguous is checked.
- With the Magic Wand tool, click on the same yellow part of the flower
- Holding down the Shift key, click on any missed areas of the flower to add them to the selection, like the center red parts.
- If you inadvertently select areas outside the flower, hold down the Ctrl key and click on these parts to subtract them from the selection. You may not get an exact selection, but you’ll get close enough for the purpose of this exercise.
Notice how the selection marquee has expanded with the higher Feather value.

Use all layers
This setting is a check box to the right of the Tolerance setting. For this image, the option is greyed out since our image only has one layer. If you were working with an image that had multiple layers, the Magic Wand would select matching pixels across all layers when Use all layers is enabled.
Contiguous
When you enable the Contiguous setting, the Magic Wand selects only pixels that connect to the pixel you click. When it’s disabled, or unchecked, you can add to your selection other areas that have the same values but are not connected to the area you first clicked.
Try making a few selections with Contiguous on and off to see the difference.

Anti-alias
When you enable the Anti-alias option, it will produce a smooth-edged selection by partially filling in pixels along the edge, making them semitransparent. You can use this option inside or outside the selection marquee.
NOTE: So, what’s the difference between Feather and Anti-alias? It can be difficult to see until you zoom in. Anti-aliasing makes an edge look smoother by making the pixels fade out to transparency from an edge, while feathering blurs the pixels.
Adjusting a Selection
It can be difficult at first to get a perfect selection with the Magic Wand. As mentioned before, you can add to the selection area by holding down the Shift key and clicking on other areas that you want the selection marquee to encompass. And you can remove areas from the selection marquee by holding down the Ctrl key and clicking on the unwanted area. But this can sometimes be a tedious and time-consuming process. Here is another way you can fine-tune your selection.
- Make sure you have the Magic Wand tool activated and have deselected the previous selection you created.
- Set the Match mode to Traditional; Tolerance to 70; Feather to 0; Contiguous checked.
- Click on the same light-yellow area of the flower to make your preliminary selection.
- Hold down the Shift key and click on missed areas to add them to the selection, until you have most of the flower selected.
There will still be some small holes, mainly in the center. But there is an easy way to fix this.
Go to Selections > Modify > Remove Specks and Holes. You can expand the dialog box by grabbing a corner or side and dragging out. You can use the Zoom setting to zoom out and see more of the flower if necessary.
- From the three radio button choices, choose Remove Specks and Holes
- In the Square area smaller than setting, set it to 100 x 100 pixels
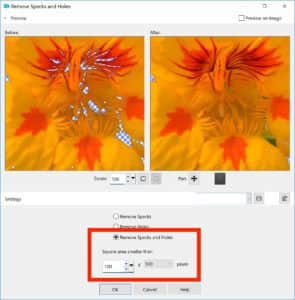
The After window in the Preview area above will update, and you will see that small gaps in the center of the selection have now been filled in. Click OK.
How to Select Hair
Making a selection that includes hair can be challenging, but you will find that the Magic Wand is a great tool to use for this. Close the Two Flowers image and we will use the Brunette Hair image to demonstrate. Before we use the Magic Wand, we will make a preliminary selection using the Auto Selection tool. The Auto Selection tool can be found in the Selection tools group, represented by the dotted line rectangle with an arrow inside it.
NOTE: if you are working in the Essentials workspace in PaintShop Pro your Tools toolbar may not include the Auto Selection tool. To fix this, click on the plus sign at the bottom, choose the Auto Selection tool from the list, and it will be added to the toolbar.
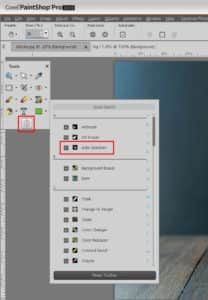
Draw a selection marquee closely around the entire woman and her hair. Again, if there are parts you need to add or subtract, activate the Magic Wand to do so, using the Shift key to add or the Ctrl key to remove.

Once you have completed your selection, go to Edit > Copy to copy the selected area, then go to Edit > Paste as New Image. If there are any areas you still wish to delete, you can use the Eraser tool to do this.
If you are using PaintShop Pro 2020 or higher, you can also use the Refine brush to modify and perfect your selections. To learn more, watch the tutorial Using the Refine Brush.
Download your FREE 30-day trial and make every shot your best shot with PaintShop Pro, your all-in-one photo editing and design software.


Comments (2)
Reader Interactions
Comments
Your Magic Wand Selection Tool very nice
Thank you for sharing – it’s so helpful to know your workflow along with your gear. Beautiful work.