
How to use Vision FX and tips for better AI art
The Vision FX plugin enables you to transform photos and images into anything you can imagine, from cartoon characters to futuristic fantasy, classic or modern art, science fiction and anime, and much more, backed by the power of generative AI. Just provide a text prompt describing your idea, adjust a few simple settings, and the plugin generates several options to bring your ideas to life. Once your photo is transformed, and you choose your favorite result, bring it back into your Corel program for final polishing or editing.
Download the written tutorial (PDF, 1.6 MB)
Tutorial #1: How to use Vision FX
Tutorial #2: Tips for better AI art
Installation instructions
Installing and using Vision FX with PaintShop Pro, PHOTO-PAINT, and CorelDRAW
Using Vision FX with Painter
Installing and using Vision FX with Affinity photo
System requirements
Installing and using Vision FX with PaintShop Pro, CorelDRAW, and PHOTO-PAINT
If purchased from the in-product Store:
- A download link will be sent to you in your order confirmation email. Check your Junk or Spam folder if you cannot locate the email.
- Download the file and open it to start the installation. If the installer does not start automatically, inside the window that opens locate and double-click on the file named Setup.exe then follow the on-screen instructions.
- Windows will recognize the Vision FX download as a disk or DVD drive titled DVD Drive VISION_FX.
- Once the installation process is completed, you will need to restart your main design application to see and launch the Vision FX plugin.
- You can now right-click DVD Drive VISION_FX and click Eject.
- To launch Vision FX, open the image you would like to start with in your software application (PaintShop Pro, Painter, CorelDRAW or Corel PHOTO-PAINT). Under the Effects menu (or Bitmaps menu for CorelDRAW), select Plugins and then Vision FX.
If purchased from paintshoppro.com:
- After purchase, you will be redirected to an order completion page. Click the DOWNLOAD button. This information will also be sent to your email, check your Junk or Spam folder if you cannot locate the email.
- Once the download is complete, click on the downloaded file to begin installation. If the installer does not start automatically, inside the window that opens; double-click on Setup.exe and follow the on-screen instructions.
- Windows will recognize the Vision FX download as a disk or DVD drive titled DVD Drive VISION_FX.
- Once the installation is complete, you will need to close and reopen your software application to see and launch the Vision FX plugin.
- You can now right-click DVD Drive VISION_FX and click Eject.
- To launch Vision FX, open the image you would like to start with in your software application (PaintShop Pro, Painter, CorelDRAW or Corel PHOTO-PAINT). Under the Effects menu (or Bitmaps menu for CorelDRAW), select Plugins and then Vision FX.
Usage instructions:
- To launch Vision FX, open the image you would like to start with in your software application (PaintShop Pro, CorelDRAW or Corel PHOTO-PAINT). Under the Effects menu (or Bitmaps menu for CorelDRAW), select Plugins and then Vision FX.
- Enter Text Prompts describing your desired output and adjust sliders for fine-tuning.
- Click Run to initialize the image generation process. During this time, your main design application will not be accessible. A progress bar should appear on the first of the five thumbnails below your starting image to indicate the Vision FX is working.
- If you need to hit Stop at any point during the process, the progress bar will be replaced by a message indicating that the model is stopping the generation. Once that message disappears, you can resume by hitting Run again to complete the remaining images.
- Once the plugin generates all five images you can click Save to bring your selected result back into your main design application, or close Vision FX without saving.
Using Vision FX with Corel Painter
- To launch Vision FX from Painter, open the image you would like to start with. Since the plugin will only work on the active layer, if your image has more than one layer, be sure to select the layer you want to use, or drop all layers to flatten your image. Then go to the Effects menu and select Vision FX.
- If you don’t see the Vision FX plugin listed under the Effects menu, you may have to manually direct Painter to the plugin. To do this:
- Navigate to C:\Program Files\Corel\Painter 2023\Support Files
- Create a new folder called Plugins
- Navigate to C:\Program Files\Corel\Plugins
- Copy Vision FX 1.0_x64.8bf from this folder and paste it to C:\Program Files\Corel\Painter 2023\Support Files\Plugins
- Relaunch Painter and Vision FX will show at the bottom of the Effects menu
Installing and using Vision FX with Affinity Photo
How to manually add Vision FX to Affinity Photo
- From the Edit menu, select Settings.
- Select the Photoshop Plugins tab.
- Check “Allow unknown plugins to be used” beneath the Detected Plugins list.
- Under the Plugin Search Folders box, click Add, then navigate to C:\Program Files\Vision FX 1.0\Plugin, which is the parent folder that contains the Vision FX 1.0_x64.8bf plugin file.
NOTE: you may need to restart Affinity Photo for the plugin to take effect.
How to launch Vision FX in Affinity Photo
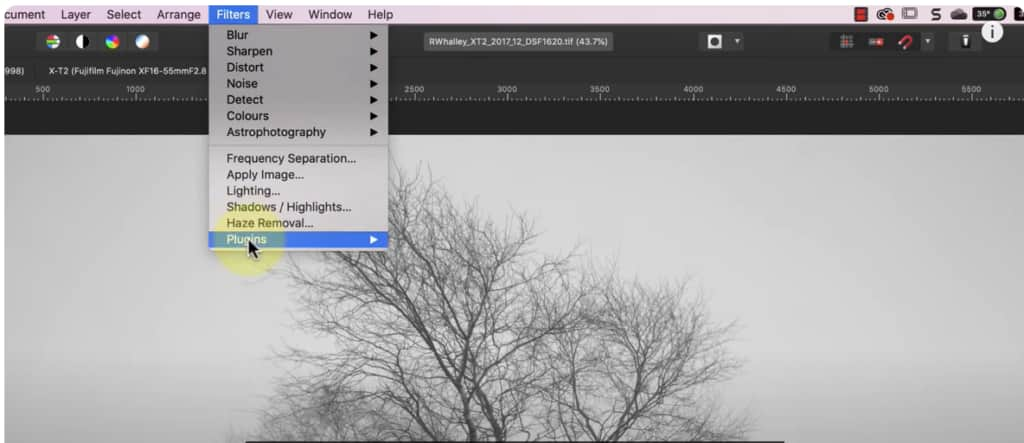
To launch Vision FX, open the image you would like to start with. Under the Filters menu, choose Plugins > Vision FX.
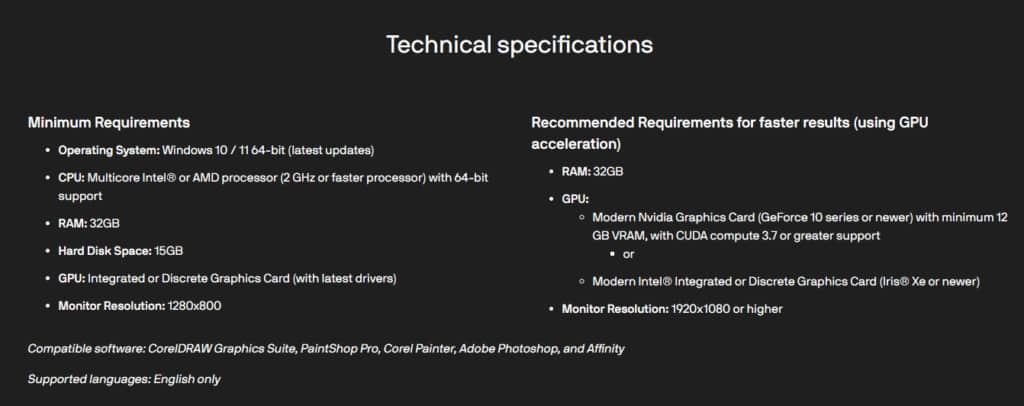
Minimum System Requirements:
- Operating System: Windows 11, 10 64-bit (latest updates)
- CPU: Multicore Intel® or AMD processor (2 GHz or faster processor) with 64-bit support
- RAM: 32GB
- GPU: Integrated or Discrete Graphics Card (with latest drivers)
- Hard Disk Space: 15GB
- Compatible Software: Corel PaintShop Pro, Corel Painter, CorelDRAW, Corel PHOTO-PAINT, Adobe Photoshop, and Affinity
Important Notes:
- Please ensure that any computer trying to run Vision FX meets the minimum system requirements above. This plugin is hardware intensive and computers that do not meet the system requirements may experience numerous issues or see substantial decreases in performance.
FAQs
If you have a technical support question that is not covered below, please contact support@distinctplugins.io.
What Corel software does the Vision FX plugin work with?
Vision FX works with the following Corel software:
- PaintShop Pro 2021-2023
- CorelDRAW Graphics Suite subscription
- CorelDRAW Graphics Suite 2021-2024 (one-time purchase)
- Corel Painter 2021 and higher
Vision FX also works with Adobe Photoshop and Affinity Photo.
I’m having problems installing or launching the program, what do I do?
First, check that your computer meets the system requirements:
Complete installation instructions are available on the Installation instructions tab at the top of this page.
TIP: When launching the plugin, make sure to give it enough time to load everything into memory. This can take 15 to 45 seconds. You can open the Windows task manager and watch the memory usage of Vision FX. It should increase as the plugin is loading and stop around 5.5GB to 6.5GB. Then you will know that the plugin is loaded and ready to use.
How do I launch Vision FX?
To launch Vision FX from PaintShop Pro, PHOTO-PAINT or Painter, go to Effects > Plugins > Vision FX.
To launch from CorelDRAW, you must have a raster image open then go to Bitmaps > Plugins > Vision FX.
To launch from Affinity photo, go to Filters > Plugins > Vision FX.
What kind of images can I use?
Vision FX can be used with photos, digital artwork, illustrations, graphic designs. However, you must make sure that your image is a raster format such as JPG or PNG. If you are working with a multi-layer file such as a .pspimage file in PaintShop Pro, make sure the raster image layer is the active layer when launching the plugin.
What is the pixel size of the results produced by Vision FX?
Vision FX, being a plugin, utilizes the size of the image provided by the host application (e.g. PaintShop Pro). The AI algorithm generates results at a default resolution of 512×512 pixels. However, during the rendering process, the plugin takes into account the size of the original input image from the host application. This ensures that the final output maintains the dimensions and aspect ratio of the original image.
How do I write a prompt?
Check out our list of examples on the Sample prompts tab above. You can use these as a starting point and then make modifications to the prompt to generate different results.
TIP: record your prompts and seed numbers for any results that you would like to use again on other images. Using a snipping tool or screen capture is an easy way to take a quick snapshot of the prompts, seed numbers, and slider settings.
If you want to start from scratch and write your own prompts, check out this article from zapier.com on how to write effective AI prompts.
How do I remove the NSFW filter in Vision FX?
The NSFW (Not Safe For Work) labelling in Vision FX is not a form of censorship but a feature designed to alert users about potentially sensitive content. Please note that Vision FX utilizes a Stable Diffusion 1.5 model. The AI algorithm responsible for generating images operates independently – it’s not directly controlled by Distinct AI, the creators of AI Vision FX. Therefore, they do not have the ability to individually modify or remove the NSFW results.
Can I sell my AI-generated art after I create it in Vision FX?
Yes, you are allowed to sell the artwork you create using Vision FX. There are no restrictions on commercializing the artwork, including reprinting, selling, and merchandising. This applies to both the images created during the research preview and the final artwork.
However, please ensure that you comply with the terms of use provided by Vision FX. While selling Vision FX-generated artwork is permitted, it’s important to consider the ethical implications. Remember to acknowledge and give credit to the AI tool for its contribution. Genuine artists put in significant effort to create their artwork, so it’s essential to respect their contributions while utilizing AI tools. For a comprehensive outline of the Terms and Conditions, please read through the EULA found here https://www.distinctplugins.io/docs/eula
How does Vision FX create AI-powered photos?
Vision FX and other AI-powered software create AI-powered photos by utilizing advanced machine learning algorithms. These algorithms analyze the input photo and apply artistic techniques and enhancements to generate a new version of the photo with the desired style or effect. The AI algorithms learn from the input data to create visually stunning works of art.
Can someone tell if my photo was created by AI in Vision FX?
Once the results are refined, it is generally not possible for someone to determine if a photo was created using AI in Vision FX or any other AI-based software. The AI algorithms used in Vision FX are designed to simulate artistic techniques and enhance the creative process, making it difficult to differentiate AI-generated content from traditionally created content. However, it’s always good practice to disclose the use of AI tools if it is relevant to the context or if requested by others.
Resources
Vision FX comparison chart for slider values (PDF, 1 MB)
Installation instructions (PDF, 61 KB)
How to use Vision FX 2.0 – written tutorial (PDF, 1.4 MB)
Tips for better AI art – written tutorial (PDF, 2.2 MB)
PaintShop Pro resources
Keyboard shortcuts (PDF, 173 KB)
PaintShop Pro User Guides
Partner and User websites
PaintShop Pro User Forum
Scrapbook Campus (Tips and tricks, workshops, master classes, and more)
Creation Cassel (Scripts, picture tubes, and other PaintShop Pro tools, plus weekly freebies)
PaintShop Pro Maniacs (Facebook group)
PaintShop Pro (Facebook group)
Sample prompts
If you’ve developed your own prompts that you’d like to share with others, add them to the Comments section below.
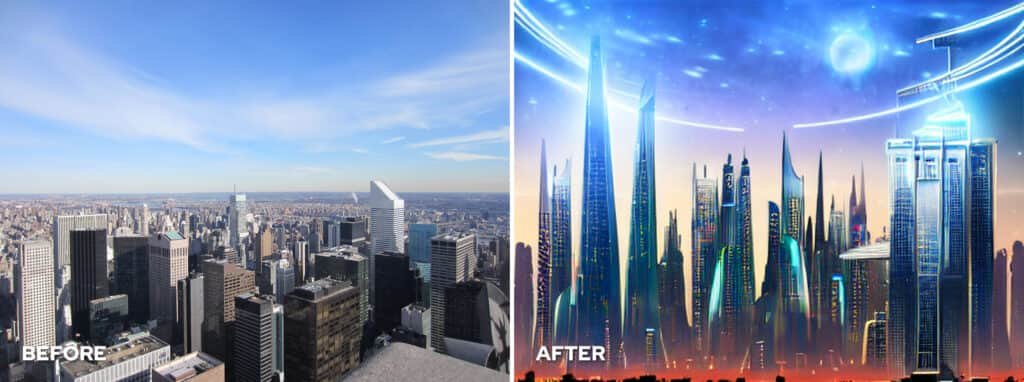
Here are some examples of prompts that you can use to get started. Click on any of the images below to view full size.
Prompt: Futuristic city, sci-fi, metropolis, skyscrapers, high tech, high detail, photo-realistic, high quality, detailed photo, studio quality, intricate, realistic, night sky, nighttime, dark sky
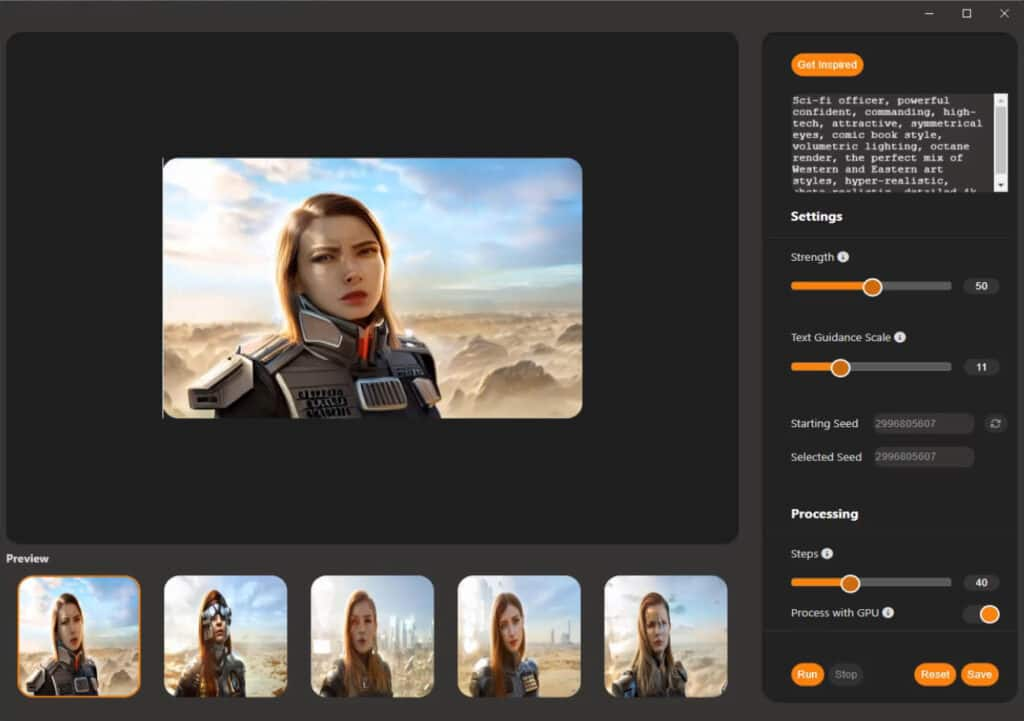
Prompt: Sci-fi officer, powerful confident, commanding, high-tech, attractive, symmetrical eyes, comic book style, volumetric lighting, octane render, the perfect mix of Western and Eastern art styles, hyper-realistic, photo-realistic, detailed 4k

Prompt: African American Anime character, action movie, highly detailed exquisite fan art, big eyes, happy, energetic, pretty, color manga visual style, fun, friendly, mix of western and eastern art styles, hyper-realistic, detailed 4k


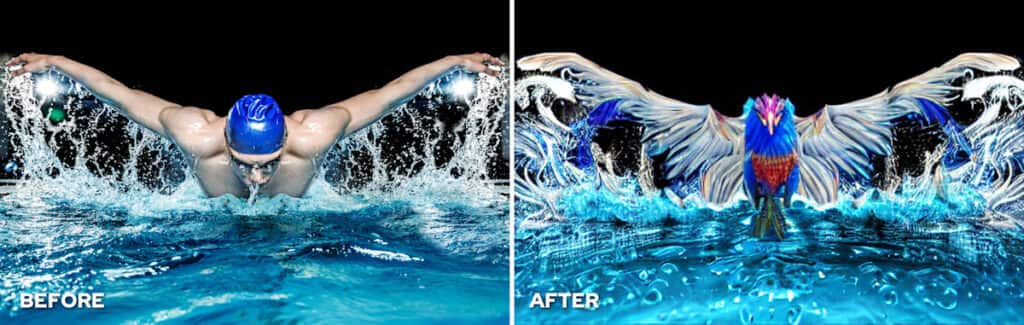
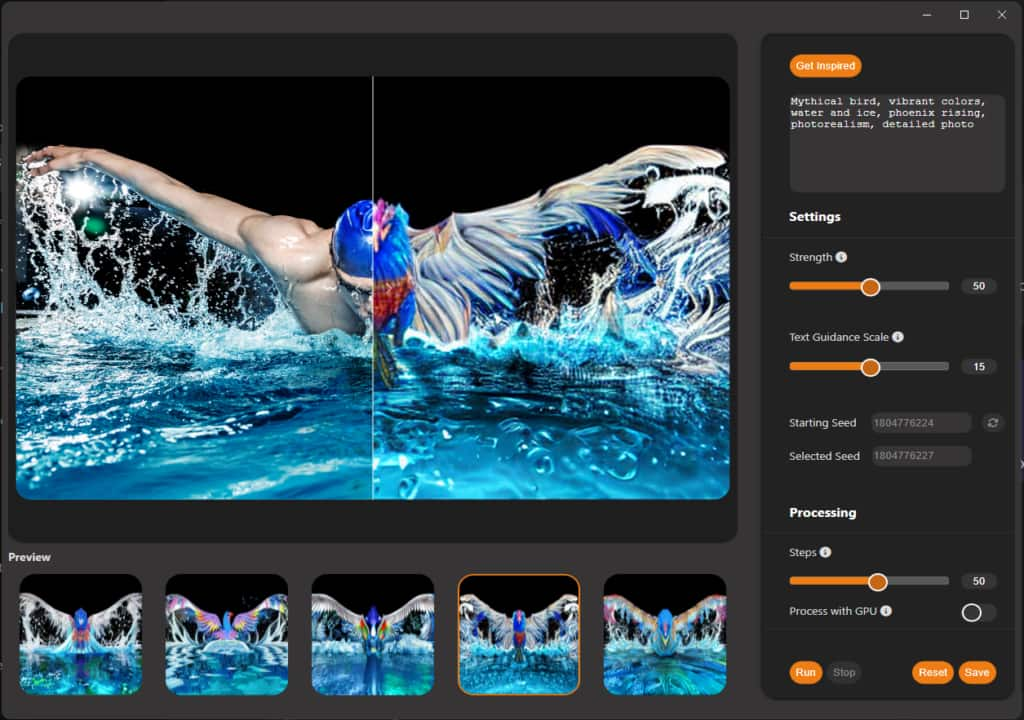
Prompt: Mythical bird, vibrant colors, water and ice, phoenix rising, photorealism, detailed photo
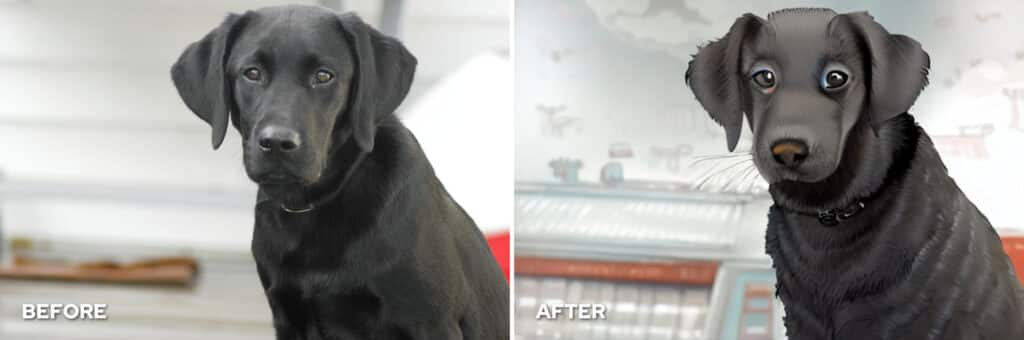
Prompt: Cartoon, animated, cute dog, high detail, colorful, studio quality, character design, illustration, digital art

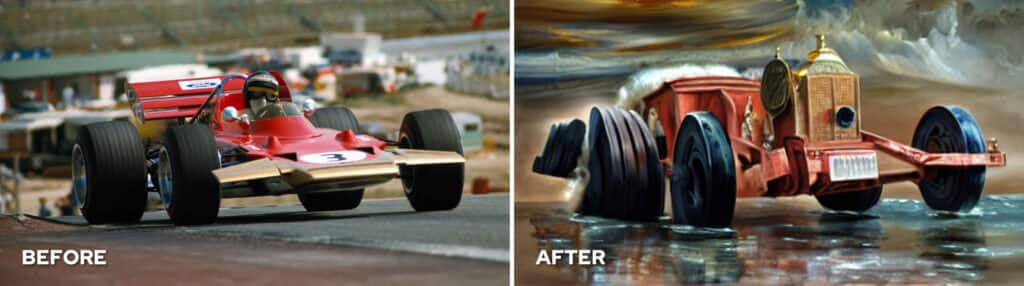
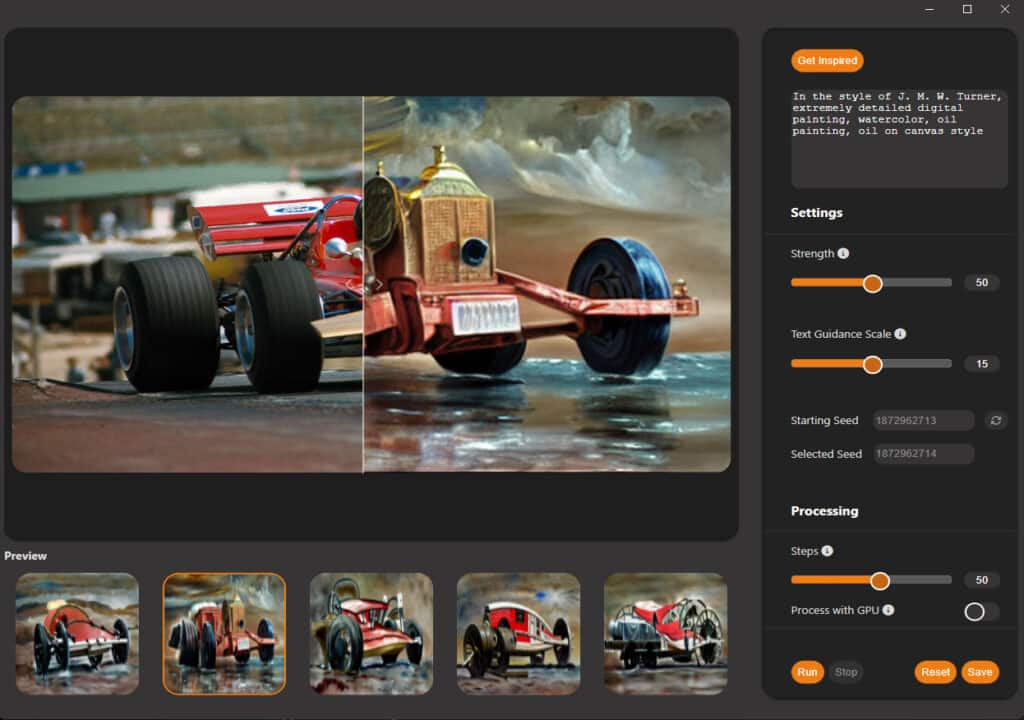
Prompt: In the style of J.M.W. Turner, extremely detailed digital painting, watercolor, oil painting, oil on canvas style.
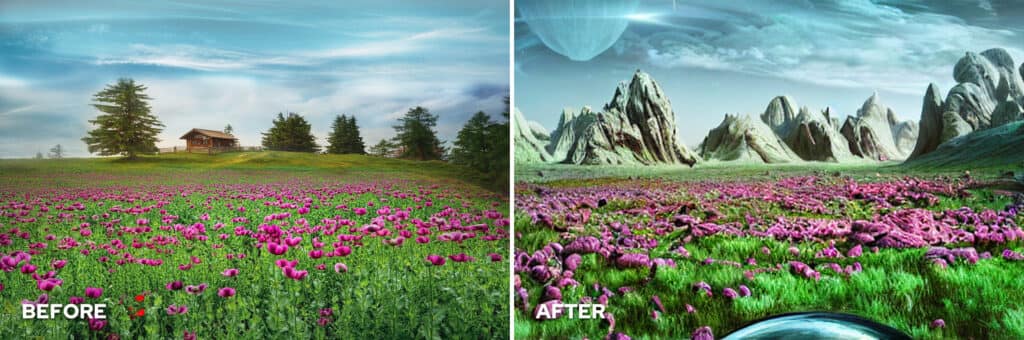
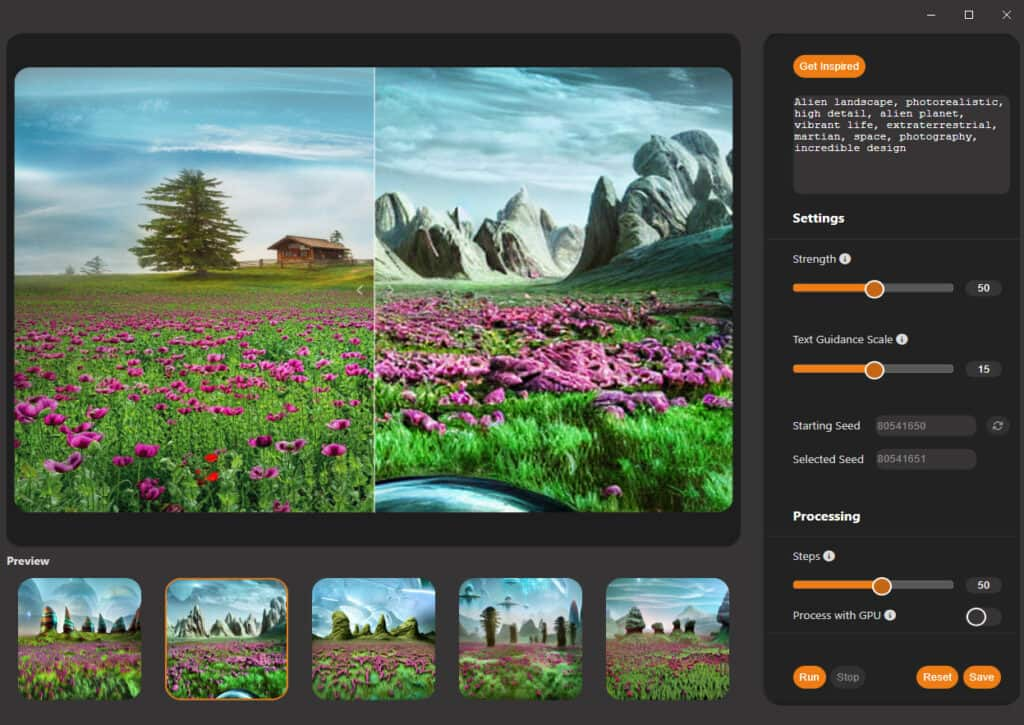
Prompt: Alien landscape, photorealistic, high detail, alien planet, vibrant life, extraterrestrial, martian, space, photography, incredible design
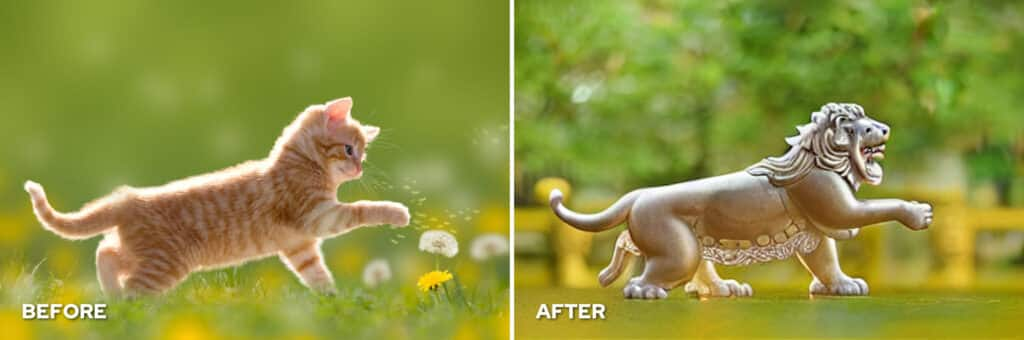
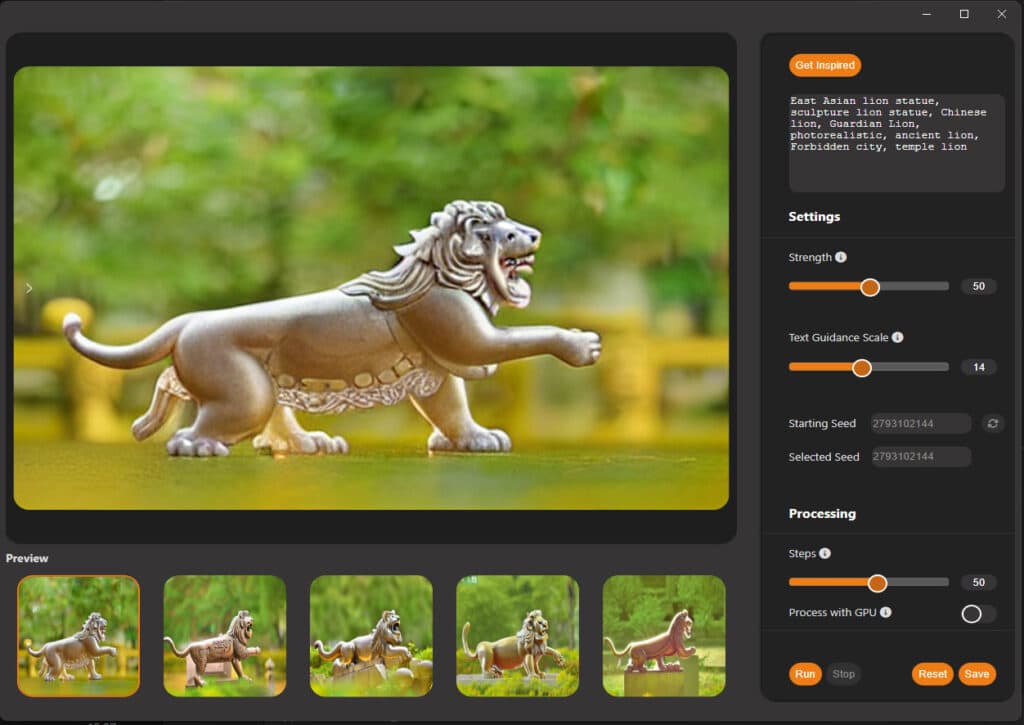
Prompt: East Asian lion statue, sculpture lion statue, Chinese lion, Guardian Lion, photorealistic, ancient lion, Forbidden city, temple lion
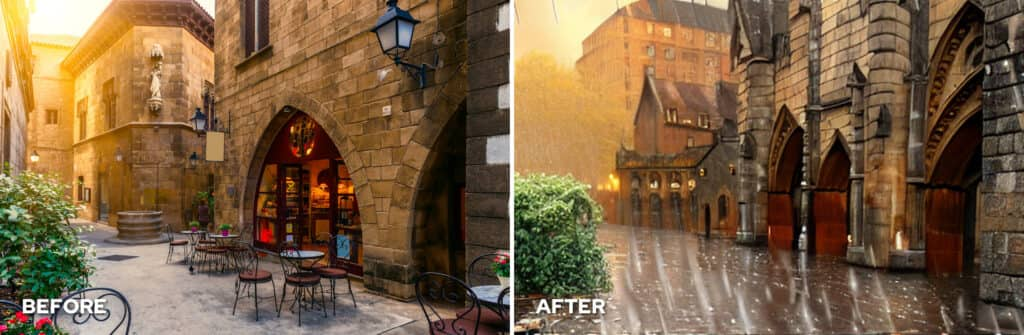
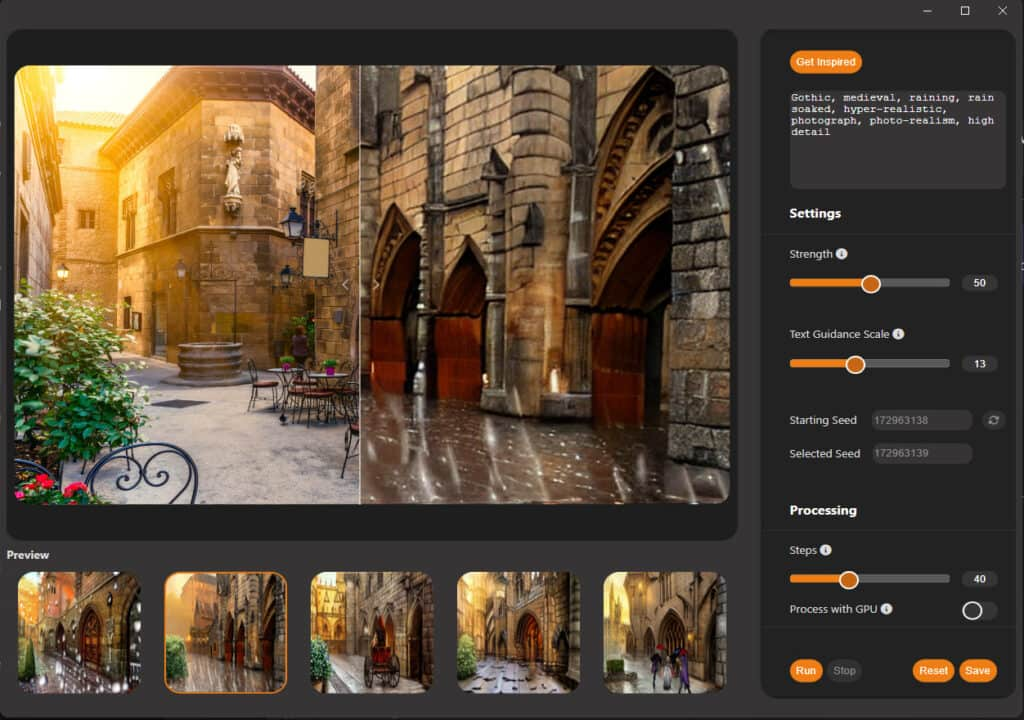
Prompt: Gothic, medieval, raining, rain soaked, hyper-realistic, photograph, photo-realism, high detail
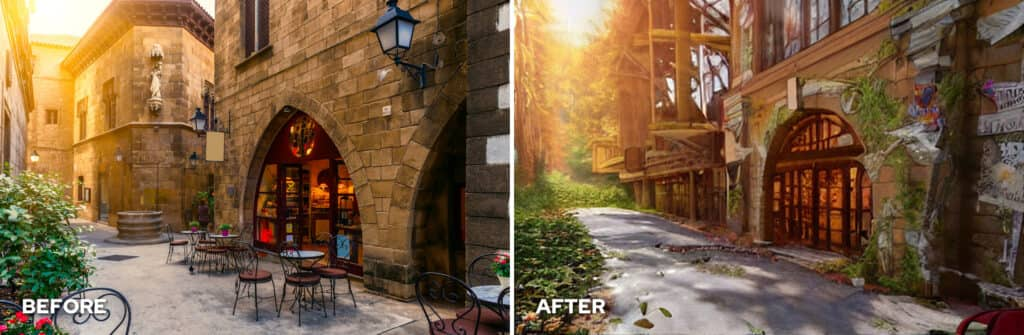
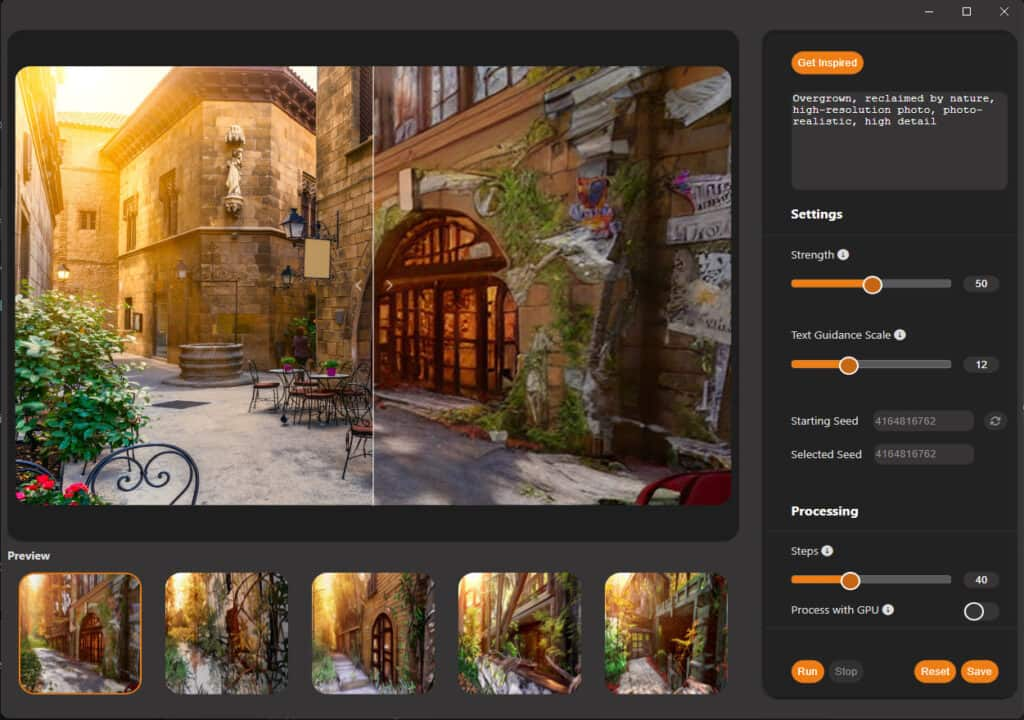
Prompt: Overgrown, reclaimed by nature, high-resolution photo, photo-realistic, high detail
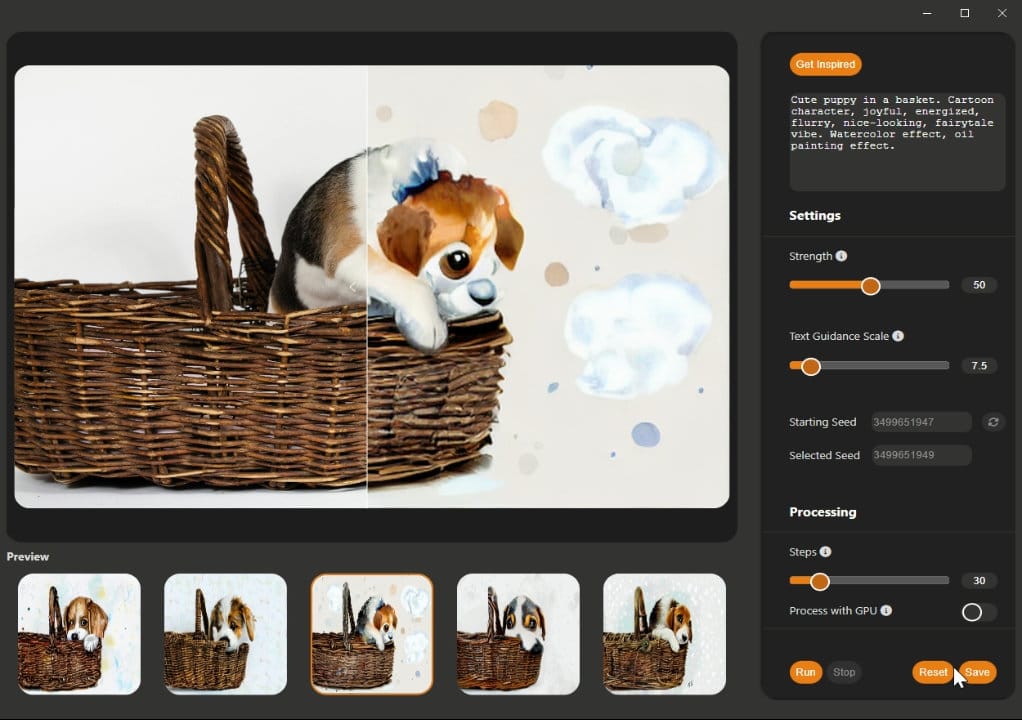
Prompt: Cute puppy in a basket, cartoon character, joyful, energized, furry, nice-looking, fairytale vibe, watercolor effect, oil painting effect

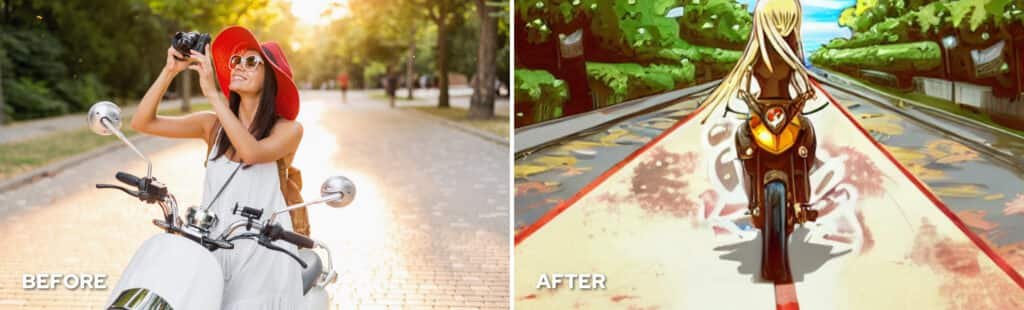
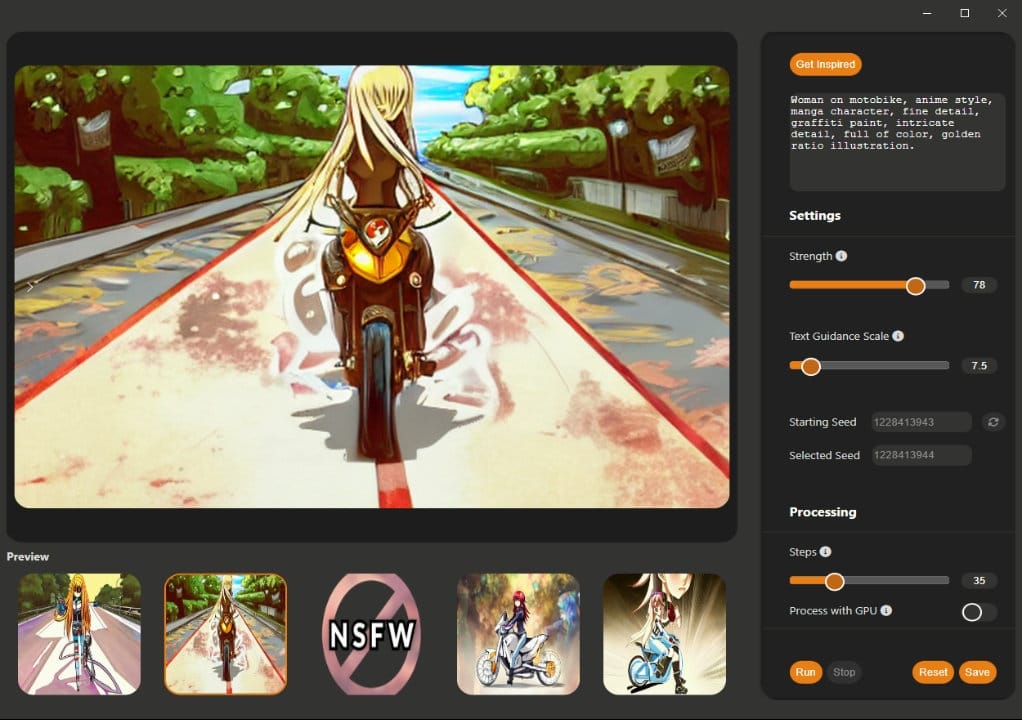
Prompt: Woman on motorbike, anime style, manga character, fine detail, graffiti paint, intricate detail, full of color, golden ratio illustration
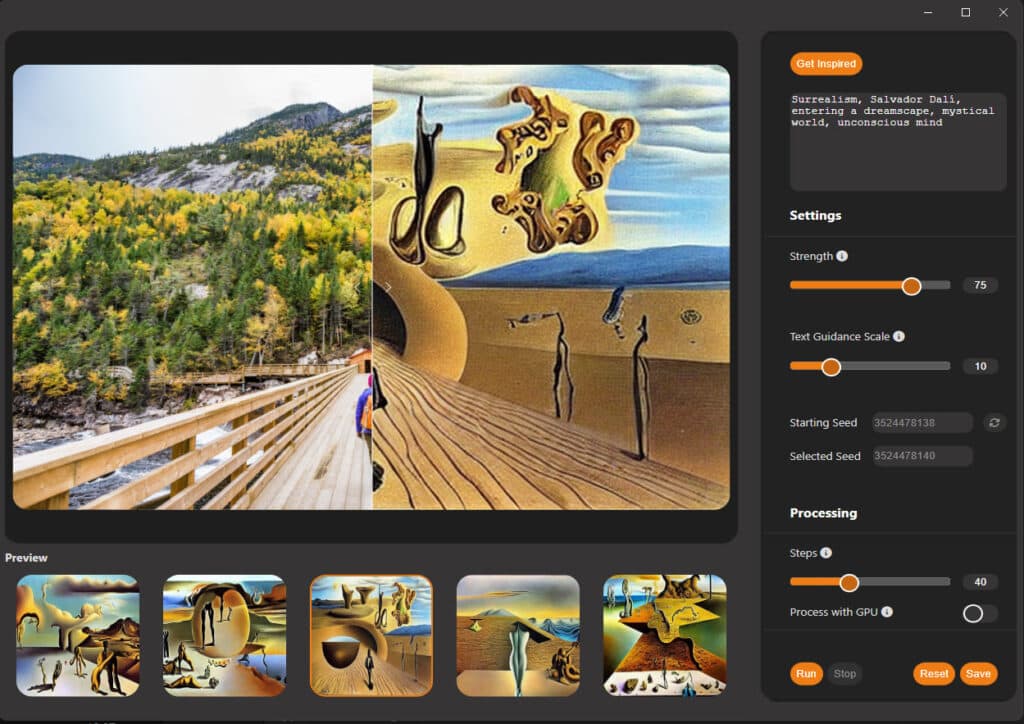
Prompt: Surrealism, Salvador Dali, entering a dreamscape, mystical world, unconscious mind

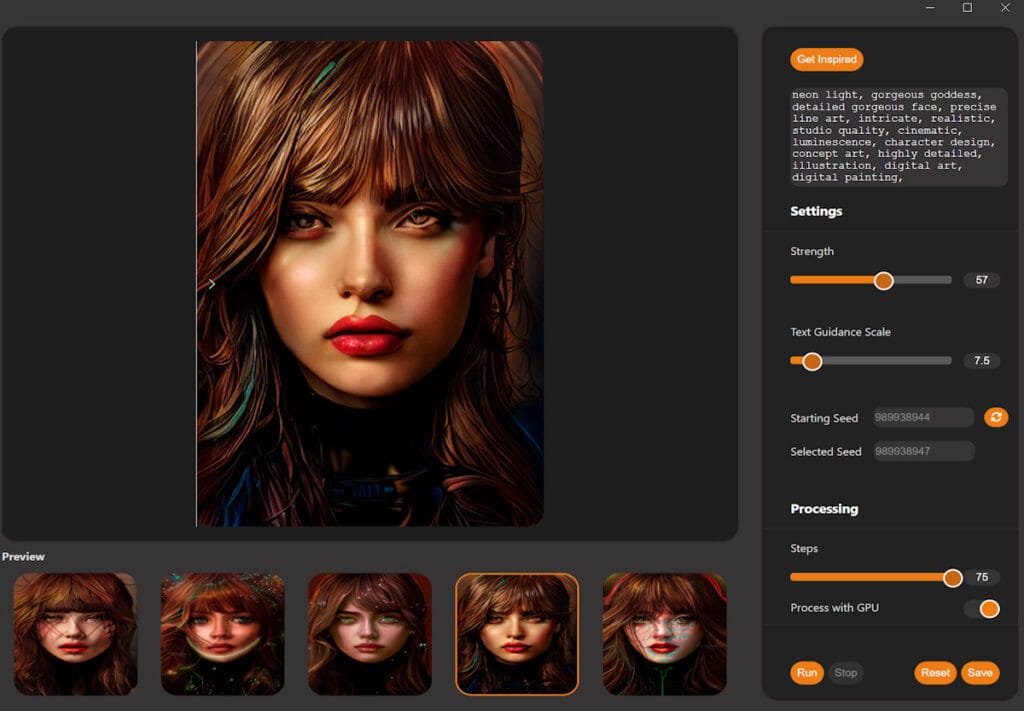
Prompt: Neon light, gorgeous goddess, detailed gorgeous face, precise line art, intricate, realistic, studio quality, cinematic, luminescence, character design, concept art, highly detailed, illustration, digital art, digital painting
Tutorial #1: How to use Vision FX
In this tutorial, we’ll demonstrate how to use the Vision FX 2.0 plugin. This plugin can be used with PaintShop Pro, CorelDRAW, Corel PHOTO-PAINT and Corel Painter, as well as other applications including Adobe Photoshop and Affinity. In this tutorial we’ll be using PaintShop Pro.
Vision FX enables you to transform photos and images into anything you can imagine, from cartoon characters to futuristic fantasy, classic or modern art, science fiction and anime, and much more, backed by the power of generative AI. Just provide a text prompt describing your idea, adjust a few simple settings, and the plugin generates several options to bring your ideas to life. Once your photo or image is transformed, and you choose your favorite result, bring it back into your host software program for final polishing or editing.
Optimize Vision FX performance
Vision FX uses an image-to-image AI algorithm, meaning that you need to start with a raster image, like this one I have imported into CorelDRAW. The Vision FX plugin can also be used with Corel PaintShop Pro, Corel PHOTO-PAINT and Corel Painter, as well as Adobe Photoshop and Affinity. Note that Vision FX doesn’t work with vector graphics, only raster images such as JPEGs and PNGs.
To preserve my original image, I’ll select it and press Ctrl +C and Ctrl + V, or Cmd + C and V on the Mac. Now I have two JPEGs in my Objects docker, or Objects inspector on the Mac.
I’ll keep the copied layer selected, and choose Bitmaps / Plugins / Vision FX 2.0 / Vision FX 2.0.
Before you start using Vision FX, it’s crucial to configure the program settings for optimal performance. Be sure to read over the Performance Tips that appear when you first open the program.
You can disable this pop-up if you don’t want to see it every time you launch Vision FX. If you disable it, you can access the Performance Tips from the Help menu. We’ll cover these tips as we go through the menus along the top, which are new in Vision FX 2.0.
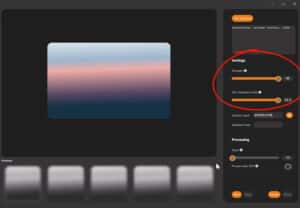
There are two options in the Settings menu.
For AI Engine, the default is to run on your computer’s CPU. But if your machine has an Intel or Nvidia graphics card, select the relevant GPU option to maximize performance. I’ll show how to view your graphics settings in just a bit.
The Image Quality setting refers to the inference resolution. Choosing a higher resolution can help produce cleaner or more detailed images, but requires more processing time and power. Working with a lower resolution will speed up the processing time and still produce great results, just not as detailed or refined.
The Image Quality setting can be changed as needed. For example, you can use 512 when you’re trying out different prompts and concepts, then increase to 1024 when you’re ready to generate a final image at a higher quality. In addition, low resolution images can be enhanced with the Enhance Image Quality feature, which I’ll show farther on.
Let’s now open the Help menu. FAQ links to the Vision FX website with some frequently asked questions. Performance tips opens the tips popup we saw earlier, and System Info opens a handy window with your computer specs. This is where I can see my graphics card, so I know to use Nvidia GPU in Model Settings. Check for Updates is how you can check periodically for enhancements and new models, and About displays version details for the software and AI engine.
Create an AI-generated image
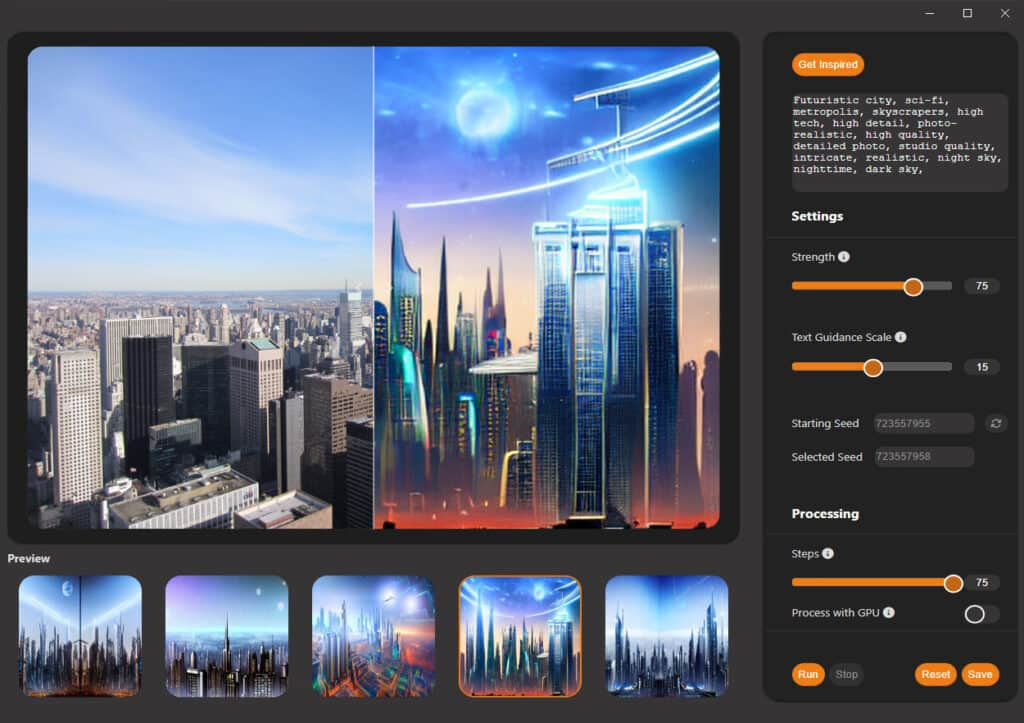
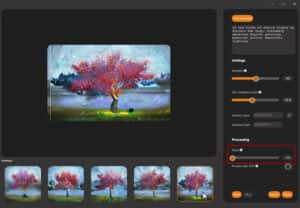
The Vision FX UI is pretty straightforward, but some fine-tuning may be needed to get the results you want. A sample prompt is provided at the top right, with comma-separated terms specifying a detailed digital painting in the style of Van Gogh, with mystical colors and beautiful lighting. There is also a field for negative prompts, which we’ll explore a bit farther on.
If you’re not sure how to get started with your own prompts you can click the Get Inspired button. This will take you to a gallery where you can view artwork created with Vision FX, plus the prompts for each image, which you can copy and use.
The Strength slider controls how much the AI results will deviate from the original. As strength increases, less of the original image will appear in the results. I’ll move this down a bit, in order to compare strength results.
Text Guidance controls how strictly the text prompt will be adhered to, which I’ll leave as is.
Seed is a random number used to generate the first AI result, and the other four results will use consecutive seed values starting from this number. Seed values can be regenerated to get a different set of results.
The Steps slider controls quality and speed. A high number of steps will produce slightly better results but will take longer.
When first generating options, leaving Enhance Image Quality disabled helps reduce processing time.
Clicking Generate invokes the AI engine to start producing the five options. This is a resource- heavy operation, so it might take some time to complete all five.
As options are generated, the slider on the image can be used to compare the AI version to the original, and I can click each option to see which I like best.
With these relatively low strength and text guidance values, the trees and overall colors and tone in each option stay pretty true to the original, while the AI engine has added the Van Gogh style specified in the prompt.
If I don’t love any of the results, I can reset the values, which also resets the seed number, and this time I’ll keep the default strength value. Clicking Generate again will produce five new options based on the default settings.
I can only choose only one of these to save, but if I wanted to get the same set of five results again, I would first note these exact settings, including the seed value, to run again later.
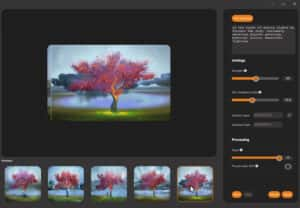
Let’s say I like result #4, and want to see an enhanced version. With that option selected, I’ll turn on Enhance Image Quality and generate again. This recreates this option and any options that come after, though I could click Stop after I get the one I want. The enhanced results are a bit crisper and smoother than their originals.
To bring this result back into CorelDRAW, I’ll select it and click Save. This closes the plugin and brings me back to CorelDRAW, where the duplicated bitmap has been replaced with the AI result I chose.
To see how the results would look with different values, I’ll make another copy of the original image, then activate the plugin again. To get these results, I disabled Enhanced Image Quality to save time, and tried higher strength and text guidance values. While the results are still based somewhat on the original forest image, each option looks less like the original and more like a Van Gogh painting. I’ll save one of the results and return to CorelDRAW again.
Trying again on a third copied image, I get these results, using maximum strength and higher text guidance. These images have less connection to the forest, and are more like Starry Night. High strength is also a great way to generate an AI image from scratch, as we’ll see again a bit farther on.
To generate a couple fresh results at a higher resolution, I’ll change this in the settings, increase steps, select the fourth result, and generate again. These two new results took a bit longer, but have tighter strokes and finer detail.
After saving the result I want, here are the three Vision FX-produced images in CorelDRAW, spaced apart in order to compare with the original.
Negative prompts
Now let’s look at negative prompts, which can be used to reinforce what you’re trying to achieve with your prompt terms, while also defining any objects, elements, styles, or moods that you don’t want to see in your results.
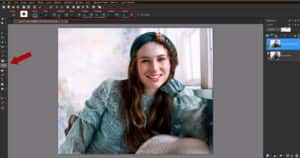
I have this beach sunset image open in PaintShop Pro. To preserve the original Background layer, I’ll right click and choose Duplicate.
The plugin can be found in Effects / Plugins / Vision FX 2 – Vision FX 2.
To generate some watercolor results, I entered a prompt about a watercolor sunset painting with low detail and pastel colors. The best practice is to be ultra-specific with your prompts, and start with a few terms that summarize the end result you’re looking for. Subsequent terms should mainly contain adjectives that describe or enhance the style description.
Bumping up the strength and text guidance produced these results.
I can make some minor changes by adding negative prompts, specifying elements that should not be included. To try and brighten things, I’ll choose the third option to regenerate the last few results. For negative prompts, I’ll add:
I’ll generate again, keeping the other settings as they are, to produce brighter and more uniformly-toned results.
With this option selected I’ll save, which brings me back to Paintshop Pro. The duplicated layer is replaced with the AI image, which I can hide to see that the original photo is still there.
Create a character portrait
To create a portrait, I could start with a photo as we’ve seen, but to generate ideas from scratch, I can start with an empty canvas.
I’m using PaintShop Pro again, and my starting image is a simple gradient fill. And I can now access Vision FX directly from the Effects menu.
I want to get something similar to this example from the Vision FX gallery, so I’ll copy its prompt, and paste it into Vision FX.
I’ll also make a few changes to the prompt, including adding photorealistic and changing the background style.
Strength is high, but low enough to incorporate the gradient in the results.
You can even bring your pets into the fun. Here’s my dog at home, as a cute Pixar 3d animated character with atmospheric lighting.
- Select the original background layer in the Layers palette.
- Right-click on the layer and select Duplicate.
- Select the duplicate layer to make it the active layer, then launch the Vision FX plugin.
- Make adjustments to your prompts and/or settings and generate a new batch of AI images.
- Select one of the AI images and click Save to return to PaintShop Pro.
- Use the Visibility (eye) icon beside the layer in the Layers palette to toggle layer visibility on and off to compare the different duplicate layers.
In our example, we have three duplicate layers of the original forest photo. For each duplicate, we used different Strength and Text Guidance settings to generate the AI images. As we increased these settings, the results looked less like the original forest image and more like a Van Gogh painting.
Creating and modifying text prompts
Experimenting with different prompts can be a lot of fun when working with AI image generating programs, but it takes some time to learn how to write a prompt that will result in the image that is in your imagination. But even the unexpected results can be delightful! Here are some tips for building a prompt.
- Start with a clear statement describing the main subject of your image, for example “futuristic sci-fi city.” The order of prompt terms can make a difference in the results, so put the most important terms at the beginning of the prompt.
- Include additional terms to describe other elements you’d like included, such as “alien invasion, skyscrapers under attack, spaceships.”
- Describe the mood you’re envisioning, such as “ominous, dark, dramatic, and dystopian.”
- Include the artistic style (e.g., photo-realistic, cartoon, comic book, oil painting, etc.) and if relevant, you can also include a particular artist or photographer.
- You can even include terms to describe the lighting (e.g., “golden hour”), the color scheme, and the level of detail.
The best practice is to be ultra-specific with your prompts and start with a few terms that summarize the end result you’re looking for. Subsequent terms should mainly contain adjectives that describe or enhance the style description.
It’s important to remember that building prompts to generate AI art is an iterative process. Don’t hesitate to refine your prompt if the initial results don’t match your expectations. Experiment with different phrasings or add more details to guide the AI better.
Creating characters
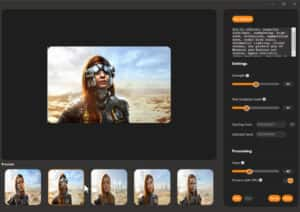
Now let’s look at what we can do with a portrait. In this example, we’re starting with a photo of a woman on a beach that we want to transform into a character.

We’re using a set of prompts for a sci-fi, high tech comic book style and also including popular rendering terms such as photorealistic, volumetric lighting, octane render, mix of western and eastern art styles, detailed 4k.
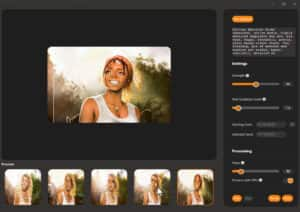
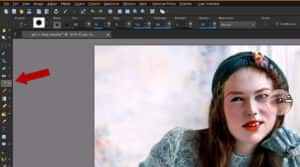
For another example, we transformed a photo of a young woman outdoors…

… into a manga style portrait image.
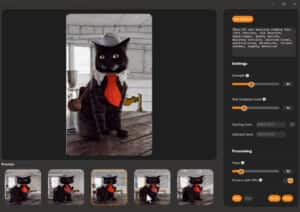
You can even bring your pets into the fun. Here’s a photo of my cat in a tie…
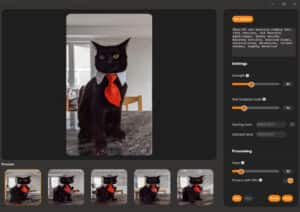
… turned into a sheriff in a dusty old-time saloon.
Tutorial #2: 10 Tips for better AI art
With the Vision FX plugin you can create AI art from a photo, an image, or even a blank canvas. But creating AI generative art is not a one-click process or a quick and immediate effect, such as a PaintShop Pro script or Photoshop action. Instead, think of Vision FX as a powerful tool in your artistic toolkit. It takes a bit of practice, but the plugin can help bring your ideas and imagination to life.
In this video, we share 10 tips to help you get the most out of Vision FX.
Tip #1: Be descriptive
While there isn’t a specific number of keywords that work best for any image, using several strong and descriptive keywords in your prompts helps Vision FX produce more intricate and detailed results.
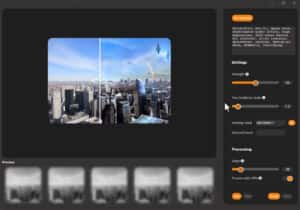
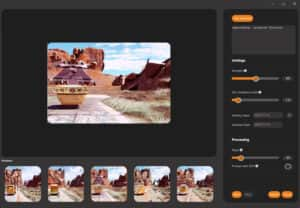
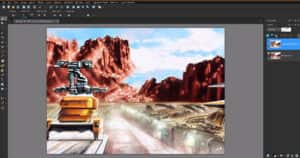
In this example, we’re starting with a photo of a camper van. Using just two keywords – “spaceship” and “science fiction” – and keeping the other settings at their defaults, gives us a decent starting point.
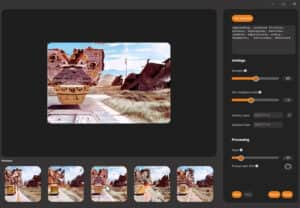
Starting off with a short list of keywords is a good way to quickly generate some rough ideas that you can then build on. In this example, we’ll increase the Text Guidance scale, and expand on the prompt terms. It’s important to be specific and detailed – the more details you include, the more likely you are to get the results you envisioned.
When the prompt is expanded to include some additional terms such as “aliens, dystopian, battles, lasers, explosions, scary, dramatic, intricate, and detailed,” the resulting images have more of these details and elements in the spaceship and the landscape.
Tip #2: Reduce the number of generated images for faster processing
When you’re experimenting with different settings and/or prompt terms, it can be time-consuming to generate a whole full set of five AI images each time. To try out a new idea while saving some time, you can generate a partial set of new AI images instead. To do this, select the fourth image, adjust the prompts or settings, and click Run to regenerate only images 4 and 5.
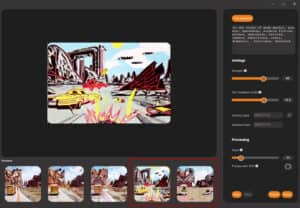
In this example, the prompt was updated to include “in the style of Andy Warhol” and the Strength and Text Guidance settings were increased. We selected the fourth image from our previous results and clicked Run to generate 2 new images. This allows us to see what kind of results the modified prompt and settings will produce, but the processing time is much faster since we are only generating 2 new images.
Once you’re happy with the results produced from the modified prompt and settings, you can use them to produce a full set of 5 results:
- Select one of the new images.
- Copy the prompt and make note of the settings.
- Select the first result and apply the new prompt and settings.
- Click Run to generate 5 new images.
Tip #3: Lower the Steps setting for faster processing
Another way to speed up the processing time when you are experimenting with different prompts and settings is to keep the Steps setting at the minimum. The Steps setting controls how the image is processed or diffused, which affects the quality of the result and the amount of processing time required.
In this example, these images were generated with the default van Gogh prompts and settings. Using the minimum Steps value of 20 produces relatively quick results, but not of the highest quality. These initial low-step images have loose detail and some artifacts.
Although these images are of lower quality, they are good enough to see what kind of results the prompt and settings generate. If you’re happy with the style of results, you can then increase the Steps setting and generate a new set of images. When the Steps setting was increased to the maximum (75), the resulting images took longer to process but have smoother lines, higher detail, and no artifacts.
Tip #4: Use a screen capture or snipping tool to save settings
If you like a particular set of results, you’ll only get the same results again if all settings are exactly the same. This means you’ll need to use the exact same prompt terms in the same order, the same Strength and Text Guidance values, and the same Starting Seed number. The quickest way to save these settings is to use the Windows snipping tool, or another screen capture tool, to take a snapshot of the Vision FX window. Save the captured image for future reference when running the plugin again.
Tip #5: Use upsampling to create larger images
Smaller images get processed faster by Vision FX. 512 pixels is the optimal starter size and is also the default size produced by Vision FX. But if you want your final image to be larger, try upsampling your AI results in your host software.
In this example, we selected one of the spaceship results and clicked the Save button to bring the AI image back into our host software, which is PaintShop Pro.
To upsample in PaintShop Pro, go to Image > Resize. In the Resize window, choose a resize method and enter the new size (we’re using Resize by Percentage and increasing by a percentage of 400). The Resize window also has Advanced and AI-Powered Settings, which you can enable if you want to choose the resampling method and settings (we’re using AI-Powered, in Illustration mode).
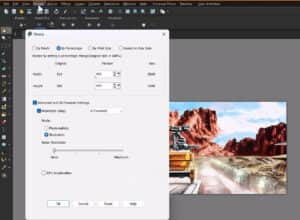
After clicking OK, the image is now 4 times larger with resolution similar to the original.
If you are using the Vision FX plugin in CorelDRAW, go to Bitmaps > Resample to upsample your AI image. If you’re using Corel PHOTO-PAINT, go to Image > Resample.
To learn more, watch the full tutorials on upsampling in PaintShop Pro or upsampling in CorelDRAW.
Tip #6: Create a landscape image from scratch
To generate an interesting landscape image, you don’t have to start with a landscape photo. You can start with a completely blank image, or colored background. In this example we’re starting with a PaintShop Pro image that has been filled with the Dusty Skies gradient.

In Vision FX, we’ll start with the prompt terms “mountains, Autumn leaves, lake” and see what kind of results we get.
The Strength and Text Guidance sliders need to be at the maximum value since there’s nothing else in the image to go on, and we’ll set the Steps value low for quicker generation.
After clicking Run, we can see that in all generated images, the gradient is nicely incorporated in the background.
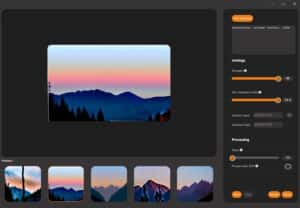
These first images are a good start, but we want the results to include a lake. The order of prompt terms can make a difference, so we’ll rearrange the prompt terms so that “lake” is the first term. After regenerating a set of images, we have a few lakes, but the results are still pretty basic.
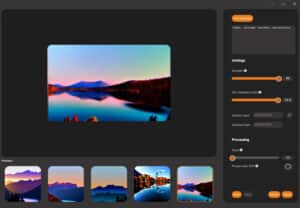
When relying on text guidance alone, it’s very important to have a healthy number of prompt words and phrases.
As we’ve seen, just a couple of prompts means you have less control, which can be great for starter ideas. When you’re ready to build on your prompts, more is better, so long as they make sense together. Think of the image you are trying to evoke, and the ways you would describe it. Remember, this AI model is built from descriptions of existing images and will use those descriptions to attempt to reproduce what you’re requesting.
Now we’ve added a few more terms like “colorful boats in the lake, Impressionist style, and relaxing and peaceful atmosphere” and bumped up the Steps for higher quality.
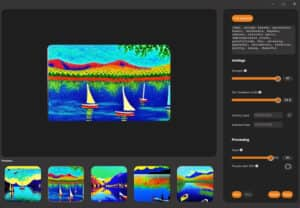
Each landscape now is now much more detailed and tailored to our prompts. Even so, not every option shows all of the elements we want, which means that some trial and error is usually needed for adding, changing, and re-ordering prompts.
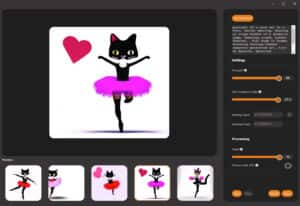
Tip #7: Create a character from scratch
As with an AI-generated landscape, you can also use Vision FX to generate a new character. In this example, we’re starting with a completely blank image, and entering prompts to generate a ballet-dancing cat.
As before, we’re using maximum Strength and Text Guidance. This is a great way to generate from-scratch ideas for characters, book covers, posters, etc.
Tip #8: Refine your AI art in your host software
You can combine the tools of your host software with the power of Vision FX to craft exactly the image you want. In this example, we’ve used Vision FX to generate a few ancient Chinese parchment versions of a photo of a cardinal.
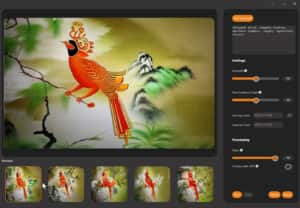
We’ll click Save to bring one of the images back into PaintShop Pro, which replaces the original photo in the layer we duplicated for this purpose.
TIP: before bringing your image into Vision FX, it’s a good idea to preserve your original image by creating a duplicate layer to use in Vision FX.
Next, we’ll duplicate the AI layer to preserve the original Vision FX image, then open the Instant Effects palette, and apply the Aged Texture effect from the AI-powered category.

With this layer active, that has both AI and PaintShop Pro effects, we can go back to Vision FX and apply some new prompts to add a watercolor on parchment effect.
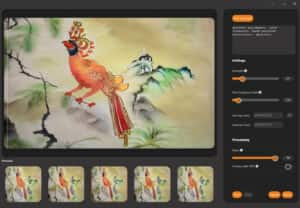
This is just a simple example of how you can use Vision FX in conjunction with your host software. Any of the host software programs that are compatible with Vision FX have a vast array of tools, adjustments, and effects that you can use as part of your photo editing, graphic design, or digital art workflow.
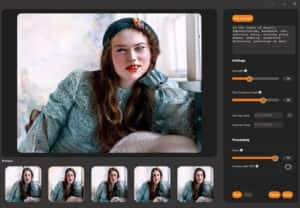
Tip #9: Fix AI portraits with your host software
One area that AI in general doesn’t always get right is facial features and anatomy. But you can use tools in your host software to fix problem areas.
In this example we’ve generated some Renoir-style results from a portrait photo, and in each one, the face is a bit off. We’ll choose one to work with, and click Save to bring it back into PaintShop Pro.
Because we used a duplicate layer of the original photo to work with in Vision FX, we still have the original photo on the layer below. There are a few ways we can touch up the face.
Touch-up method #1: The Eraser tool
One way to touch up the portrait is with the Eraser tool. Select the tool on the toolbar and then on the Tool Options palette you can adjust the size and other brush settings. For our image, we’ll use a small brush size with a low hardness and reduced opacity. The low hardness and opacity will give our brush strokes soft edges and only partial transparency, which will help blend the two layers. Sweeping over problem areas on the AI image allows the original photo on the layer below to show through. You can use the visibility (eye) icon to toggle the layer on and off to compare the photo with the AI image.
To learn more about the Eraser tool, watch the full tutorial.
Touch-up method #2: Layer blend modes
Adjusting layer blend modes can also produce nice effects, such as Screen in our example. To try out different blend modes, just select one from the dropdown list at the top of the Layers palette.
Touch-up method #3: The Clone Brush tool
Another PaintShop Pro tool that can help with facial features is the Clone Brush tool. In the Layers palette, we can turn off the visibility of the AI layer and select the original layer, then right-click on the right eye to clone it. Back in the Layers palette, we’ll turn on the visibility of the AI layer and select it, then click to replace the eye.
To learn more about the Clone Brush tool, watch the full tutorial.
Tip #10: Convert AI images to vector images
With vector-based software such as CorelDRAW, you can easily convert a Vision FX generated image into a vector file. The advantage of converting a bitmap (also called “raster”) image such as a JPG or PNG to a vector image is that vectors are fully editable and can be scaled up to large sizes without a loss of quality.
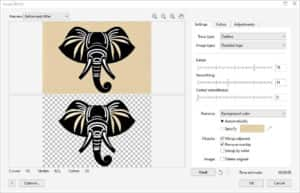
In this example, we used Vision FX to generate an elephant logo from a blank image, using prompt terms including “logo, corporate, elephant, flat image, clean lines, symmetrical, and black and white.”

After saving the image as a JPG, we imported it into CorelDRAW. To convert it to a vector image we’ll use the PowerTRACE feature. There are a few ways to open PowerTRACE:
- Right-click on a bitmap to open the context menu and choose a trace option.
- Select the image and choose a trace option from the Trace Bitmap dropdown menu on the property bar.
- Under the Bitmaps menu, select a trace option.
For this image, we are using the Outline Trace > Detailed Logo option. In the PowerTRACE window, you can adjust the settings for detail, smoothing etc., then click OK to start the trace.
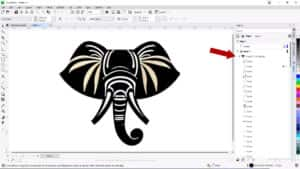
After the trace is completed the new vector image will be placed on top of the original bitmap image in the drawing window. In the Objects docker, we can see the group of curves that make up the vector. Because this vector design is fully editable, we can reshape the curves, change the colors, resize, add text or effects, etc. and use this design for T-shirts, posters, marketing materials, and all sorts of graphic design projects.
To learn more about the PowerTRACE feature, watch the full tutorial.
We hope these tips help you as you explore the possibilities of what you can create with AI generative art.
Download your FREE 30-day trial and make every shot your best shot with PaintShop Pro, your all-in-one photo editing and design software.

Comments (29)
Reader Interactions
Comments
Hello
I have Painter 2023 how do i get Vision Fx to work with it Having bought it recently downloading it ,i Window 12 ,& 64 bit machine
Hi Gary,
The Vision FX plugin should be listed under the Effects menu in Painter 2023.
Best regards,
The Discovery Center team
I downloaded VisionFX to work with my CorelDraw app and there’s no tutorial about to begin in CorelDraw. Do I open Photopaint?
Hi Scott,
In CorelDRAW you can access the Vision FX plugin under the Bitmaps > Plugins menu, and in PHOTO-PAINT it will be listed under the Effects menu.
Best regards,
The Discovery Center team
I downloaded VisionFX to work with my CorelDraw app and there’s no tutorial about to begin in CorelDraw. Do I open Photopaint?
Hi Muhammad,
You can use either CorelDRAW or PHOTO-PAINT but you will need to use a raster image (JPG, PNG), not a vector image. To launch Vision FX, open the raster image you would like to start with in CorelDRAW or Corel PHOTO-PAINT. If using CorelDRAW, select the image and go to the Bitmaps menu and select Plugins > Vision FX. If using PHOTO-PAINT, select the image and go to the Effects menu and select Plugins and then Vision FX.
Hope this helps!
The Discovery Center team
I read that online, but all I got as a download proved to be an .iso file that I can’t do anything useful with. If I double click on it, it just informs me that I have already downloaded the file and demonstrates the name of the file, just as it sits in my downloads folder, as if I didn’t already know that. If I right click on it, it just offers me the obvious options with an .iso file of saving it to disc or to an optical disc, but nothing about installing it in a way that it should obviously function in conjunction with my Corel apps, and it plainly does not appear in the Plugins there. I can’t imagine why an app that is supposed to function as a plugin would not have come as some sort of an executable file, rather than an .iso file. I am working with Corel support, but I got transferred up to an “upper level” agent, and when I told him I was having trouble with determining how to use Vision FX, he responded immediately by telling me that it was not a Corel product! I actually had to send him a screen shot of my Corel invoice from Cleverbridge before he recognized that it would, in fact, be his job to help me get it running, and he had to convert it from a chat interaction to an email support ticket that will allow him time to figure out what it’s all about, before he will be able to help me. I get the sense that they pushed this for sale before they ironed out all the wrinkles.
Hi, Bob; Hope you’re not trying to run it on the machine you got from me. I’m about to try it on my laptop.
Hi Rob, if you haven’t found a solution for this yet, I stumbled on a Youtube video “How to Generate AI Art with Vision FX Plugin for Corel Painter, Photoshop + more” (https://www.youtube.com/watch?v=TdZjKVXNX2s) that mentions that the .iso file is compressed like a .zip file and needs to be extracted with an unzip program. I haven’t tried Vision FX yet because I don’t think my computer is powerful enough to handle it but hopefully the video will help you. In any case, the Corel support person should have known about extracting an .iso file. Good luck!
Are you going to work on making it not so processor heavy? I have a pretty decent computer and it takes FOREVER. It seems to stall on my laptop (and it’s not exactly weak either)
Can you share the starting seed numbers for above prompts?
Thanks
I have been waiting for the ability to do AI offline for a long time. So I bought this and it’s welcome. I even updated my graphics card as Aaron Rutton suggested to manage it ( definitely a lot faster- though not a cheap investment)
I just hope Vision FX is eventually released in updates or new versions or something.
I have been using Stable Diffusion daily since last October using deepdreamgenerator.
I am happy that Vision FX is coming up with some interesting results. However I’m currently finding its output lacking compared to what I’m used to.
I have used the Stable 1.5 version and also Stable 2.0. Stable 1 .5 has been good. However the deepdream people added Negative Prompts and Face Enhance, which have been a game changer in helping remove the inevitable multiple limbs, colour you don’t like , multiple image’s etc and distorted faces..
Vision FX really needs this. I continue to get horrible mangled faces in figures etc in Vision FX in a way I never had with Stable on deepdream. They also have an ‘artistic’ add-in as an option and that has been really good.
So this is sort of a review and a plea for the future. You have the basis of something really good here but needs evolving. For myself, at least I now have a faster machine and will keep exploring it.
I agree with the faces. I have a 4070 Nvidia card and the faces are always a disaster. I’ve even tried the (realistic photo of (celebrity look alike) acrylic paint, palette knife strokes / prompt) and set my strength to 20 and then 15. I’ve tried a bunch of different command prompts and setting as well. I get better results with the AI powered instant effects in Paint Shop Pro. I’ve hit on a few nice graphics but if you’re looking for a facial AI compatible software. This isn’t it. They really need an upgrade.
. Please note that Vision FX utilizes a Stable Diffusion 1.5 model. They seem to be quite a bit behind the standard Stable Diffusion version. Stable Diffusion 2.1 is a marked improvement over Stable Diffusion 2, being able to actually depict Robert Downey Jr. Additionally, the skin texture for SD 2.1 is even better than SD 1.5.
Vision FX needs vast improvements. Negative prompts,Preview number selection,faster processing time,documentation as examples.
Hopefully updates will be happening in the near future.
Why is it that you get these NSFW prompts when trying to do a facial image or illustration or similar. Is there a key to turning them off. * Not Safe for Work) Most AI sites have this option. Vision FX or Corel doesn’t offer it as far as I can tell.
You’d have to turn off the media player, but it’s not recommended because it would affect your other programs. I guess the only solution would be to have the software company exclude the NSFW sites and graphics in their search paths or to ask Microsoft to create another path to turn the NSFW on or off.
Prompt Generator
https://sd-prompt-generator.netlify.app/
Prompt Generator – Good when you can get it to work – It’s simple and creates the negative prompt as well.
https://www.feedough.com/stable-diffusion-prompt-generator/
https://www.vecteezy.com/
This one was kind of fun-
Prompt:
Prompt: Comic book illustration of a young lady with blond hair, standing in the subway, staring energetically, sci-fi background. Vibrant colors, dynamic lighting, detailed shading, action-packed. Created by a top comic book artist, inspired by Alex Ross and Jim Lee. High resolution, 4k.
As well as the Biomechanical Stuff.
Prompt:
Biomechanical, Cyberpunk, Sci Fi, Apocalyptic style. Blend of energetic organic and mechanical elements, futuristic, cybernetic, robotic, detailed, intricate blending and shading. High definition, ultra-HD, realistic, ultra vibrant colors, high detail, perfect composition, 4k art photography, HDR.
What’s the deal with picking only one (1) of the five “preview” renderings? I have Windows 10 Pro and have been able to copy multiple objects for a while. And I could select multiple objects even BEFORE windows 10!
So, the documentation/videos gently inform us that we need to re-run VFx repeatedly with the same parameters if we should want more than ONE of the resulting “previews”? Balderdash and humbug!
I don’t know about the rest of the world but I’m going to try to get a refund.
Here’s a pretty good prompt to try. Female model — 60 Strength — 16 Text Guidance Seed – 2171073642
Prompt: Masterpiece comic book style cover featuring a stunning female model, with brown hair in a blouse, capturing her energy as she confidently looks at the city. High attention to detail in the sensual pose, large vibrant big colored eyes, perfect face and symmetrical lips, dynamic composition, and vibrant colors. Artistic influence by Jim Lee, Adam Hughes, and Stanley ‘Artgerm’ Lau. Resolution of 4K for crisp details.
Negative prompt: Poorly drawn anatomy, lack of energy in the pose, unappealing color palette, low-resolution rendering.
The resolution limit seems to be 512 pixels, which is only half of what Adobe Photoshop provides. Of course, I can always upscale it in something AI Gigapixel, but the point is I’m trying to skip that step.
It would be really nice if FX didn’t close after saving just one image. Sometimes there are more than one that I’d like to save.
Been with Corel since ver 3.. first time I’ve been disappointed with one of their products.. Vision FX is a joke. Hardly any style filters (4) and it grinds my graphics computer to a near standstill when generating previews.. good thing its 30 days money back guarantee.. back to the drawing board on this one Corel.. Mabe have a look at BeFunky to see what you should be competing with.
Just bought this software, The website states great for photographers to enhance photographs. That is a lie it did not work for me. Every attempt I made to enhance improve the photograph it simply changed the photograph. I started out with a Knight in armor and absolutely every single time it changed the armor into a shirt, it changed the man’s face, gave him a beard I didn’t ask for any of this creative input it just did it by itself regardless of what I asked for or told it not to do. This is not for photographers this is for lazy graphic artists or people with no artistic talent that don’t want to produce their own graphic arts. I Just bought it 10 hours ago gonna see if they’ll honor their money back warranty. Hope this helps somebody else. I bought it because my Corel graphic suite popped up a advertisement for this product. I’ve been Using Corel graphic suite for over 30 years and have been extremely happy with it. First time I bought one of their plugins ….. not happy!
Just brought PSP 2023 and Vision 2.0. When trying to open Vision FX 2.0 I get an executing plug-in bar but nothing loads or opens up into the FX SOFTWARE. How do I fix that.
Hi Jay,
Can you confirm that your computer system meets the minimum requirements for Vision FX 2.0? If so, we would suggest that you contact the makers of Vision FX directly for the quickest response, at support@distinctplugins.io.
Best regards,
The Discovery Center team
Have been playing around with version 2.0 for a bit now and I like it but I can not figure out how to keep the face of the subject from the original image. Example: My 15 year old grandson gets turned into a young man in his mid to late 20’s, and looks nothing like him. Any ideas on how I can retain the features of the subject? Thanks.
I’m running Pro 2023 Ultimate. When I try to start the program, I get a purchase option to purchase FX 2.0, which I do not want to purchase now. Unfortunately, I can’t get past the FX 2,0 screen to access my program. What needs to be done to correct this issue?
Hi Robert, there should be a Close button in the bottom right corner of the Vision FX purchase screen. Also, you can check the option “Do not display this message again. Once you click the Close button, PaintShop Pro will launch.
Hope this helps!
The Discovery Center team