
In this tutorial, you’ll learn how to use the Eraser tool in PaintShop Pro. The Eraser tool can help you remove unwanted areas of a layer by making them transparent. It’s also a great tool for working with multiple layers in your photo editing projects.
Thanks for watching! We hope you found this tutorial helpful and we would love to hear your feedback in the Comments section at the bottom of the page. You will find a written version of this tutorial below, and a printable PDF copy to download on the Download Resources tab above.
Download your FREE 30-day trial and make every shot your best shot with PaintShop Pro, your all-in-one photo editing and design software.
Download these free resources:
Written tutorial (PDF, 878 KB)
PaintShop Pro resources
Keyboard shortcuts (PDF, 173 KB)
PaintShop Pro User Guides
Partner and User websites
PaintShop Pro User Forum
Scrapbook Campus (Tips and tricks, workshops, master classes, and more)
Creation Cassel (Scripts, picture tubes, and other PaintShop Pro tools, plus weekly freebies)
PaintShop Pro Maniacs (Facebook group)
PaintShop Pro (Facebook group)
What’s New in PaintShop Pro
PaintShop Pro Tools
Working with Transparency
Featured products
 PaintShop Pro 2023 Ultimate
 AI HDR Studio 3.0
 PaintShop Pro 2023
 Vision FX 2.0
How to Use the Eraser Tool
In this tutorial, you’ll learn how to use the Eraser tool in PaintShop Pro. The Eraser tool can help you remove unwanted areas of a layer by making them transparent. It’s also a great tool for working with multiple layers in your photo editing projects.
Click on any of the images below to view full-size.
Eraser Tool Settings
The Eraser tool icon is located on the Tools toolbar. Once you activate the tool, you will see that there are many different brush options in the Tool Options palette.
- Choose a brush shape either Round or Square.
- For more shapes, open the Brush Tip drop-list.
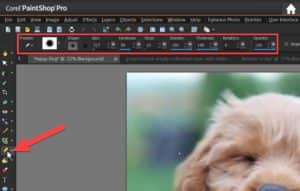
- Adjust the brush Size by dragging on the slider or entering a value. Alternatively, hold down the ALT key and drag up or down to resize the brush.
- Adjust the Hardness level which determines the sharpness of the brush edges, the Density which determines the evenness of the erasure, the Thickness, and Opacity.
- For the Opacity level, you’ll want to set it at 100% if you want the most transparent result.
- There is an option to enable Smart Edge as you are erasing. Once you enable Smart Edge, content-aware technology helps detect the edges of the subject.
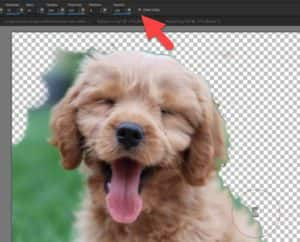
Using the Eraser Tool
Once you have adjusted the settings, simply drag the Eraser tool on your image to erase. If you erase the background layer, the Eraser tool erases to transparency, and the layer is automatically promoted to a raster layer.
As you use the Eraser tool, a gray-and-white checkerboard pattern will appear indicating the new transparent areas.
TIP: Use short careful strokes instead of one long continuous stroke, as this is easier to control and undo if you make a mistake.
You can keep adjusting and fine-tuning the various brush options as you erase to perfectly erase along the edges of your subject. You may want to use a different kind of eraser tip for artistic effects by selecting a different brush from the Brush tip drop-list. You can use full Hardness and Opacity for edge effects and lower Hardness and Opacity for blending or texturing.
TIP: If you accidentally erase too much, you can restore erased pixels by holding down the right mouse button, and dragging over the erased area without having to undo anything.
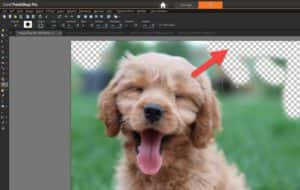
Once you have finished, make sure to save your file as .PNG or .PSP to preserve the transparency.
Erasing on a Duplicate Layer
It may be helpful to duplicate the layer and then erase on the duplicate layer to preserve the original. Go to Palettes > Layers to open the Layers palette. Then right-click on the image and select Duplicate. Now, use the Visibility (eye) icon to hide the original layer and work on the duplicate layer.
How to Erase a Straight Line
Set your Eraser brush properties (adjust the Hardness and Opacity levels to 100 to erase a clean straight line).
Click at the beginning of the line, hold down Shift, and click the end of the line. To continue erasing the line, move to the next point, hold down Shift, and click again.
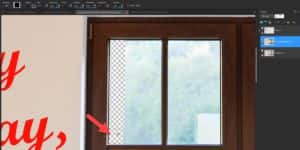
How to Use the Eraser Tool with Multiple Layers
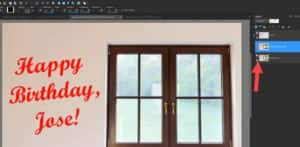
I’ve just completely erased the contents of the window on this photograph. Let’s say I want to make a whimsical birthday card for a friend.
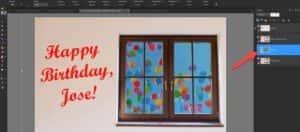
I’ll open a fun background image with balloons to replace the image area I erased.
- Go to Edit > Copy. Then go back to the window image and go to Edit > Paste as New Layer.
- In the Layers palette, rearrange the image layer so it is underneath the window layer and use the Pick tool to resize and reposition the background.
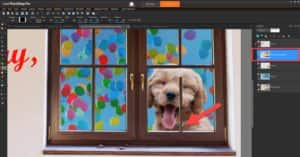
- Go back to the image of the dog from earlier, and copy and paste it onto the birthday card.
- Once again, rearrange the layer so it is in between the window and background layer.
- From here, use the Pick tool to resize or reposition the dog.
- Use the Eraser tool to touch up any of the edges or erase any parts you missed.
You can use the Eraser tool on any of the layers, just make sure to click on the layer you want to erase from before erasing.

The Eraser tool makes it easy to isolate image areas to use in fun projects like this one in PaintShop Pro!
Download your FREE 30-day trial and make every shot your best shot with PaintShop Pro, your all-in-one photo editing and design software.
