
If you are working with JPG logos or other images, often the resolution isn’t high enough for print projects and you will need to convert JPG to vector. In this tutorial you will learn how to use the PowerTRACE feature in CorelDRAW to convert a low-resolution JPG to a vector image that can be enlarged without losing quality. We will review the different options on the Settings and Color tabs available in PowerTRACE and show you how to fine-tune your trace so that the output is sharp and detailed for enlarging and printing.
Thanks for watching! You will find a written version of this tutorial below, and a printable PDF copy and sample file to download on the Download resources tab above.
If you are working with JPG logos or other images, often the resolution isn’t high enough for print projects and you will need to convert JPG to vector. In this tutorial you will learn how to use the PowerTRACE feature in CorelDRAW to convert a low-resolution JPG to a vector image that can be enlarged without losing quality. We will review the different options on the Settings and Color tabs available in PowerTRACE and show you how to fine-tune your trace so that the output is sharp and detailed for enlarging and printing.
Thanks for watching! We hope you found this tutorial helpful and we would love to hear your feedback in the Comments section at the bottom of the page. You will find a written version of this tutorial below, and a printable PDF copy and sample file to download on the Download Resources tab above.
Start your FREE 15-day trial and embark on a design journey with powerful tools for vector illustration, layout, photo editing, typography, and collaboration.
Download these free resources:
Sample logo (Zip file, 88 KB)
Written tutorial for Windows (PDF, 1.5 MB)
Written tutorial for Mac (PDF, 829 KB)
CorelDRAW Graphics Suite resources
Quick Start Guide (PDF, 2 MB)
Keyboard Shortcuts (PDF, 3.5 MB)
CorelDRAW and Corel PHOTO-PAINT user guides
For CorelDRAW Graphics Suite subscription and perpetual licenses (2018 to 2024), languages include English, Português do brasil, 简体中文, 繁體中文, Čeština, Deutsch, Español, Français, Italiano, 日本語, Polski, Русский
CorelDRAW Community
CorelDRAW learning center
Facebook
X (formerly Twitter)
YouTube
What’s new in CorelDRAW Graphics Suite
CorelDRAW tools
Working with bitmaps
 CorelDRAW Graphics Suite
 Ultimate Vector Bundle Vol. 1
 CorelDRAW Standard 2021
 Ultimate Vector Bundle Vol. 2
 Corel Vector
How to convert JPG to vector
In this tutorial you will learn how to use the PowerTRACE feature in CorelDRAW to convert a low-resolution JPG to a vector image that can be enlarged without losing quality. Low-resolution JPG images (72 dpi) are not good for enlarging, but if you convert them into vector images you can reduce or enlarge without losing quality. We will use the PowerTRACE feature to trace this logo.
Click on any of the images below to view full-size.

First, we will review the basics of the settings and color tab inside PowerTRACE to help you fine tune your trace and make the output look better for enlarging or reducing.
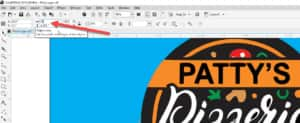
Open a new document in CorelDRAW. You can use the default document size. Go to File >Import to import the sample image PizzaLogo.jpg.
TIP: if you hit spacebar this will place your image in the middle of the blank document.
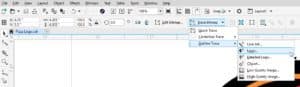
Make sure the logo is selected and open PowerTRACE by using one of the following:
- Go to Bitmaps > Outline Trace > Logo, or
- On the interactive toolbar (when the Pick tool is activated) click the drop-down arrow to the right of Trace Bitmap and select Outline Trace > Logo.
In both methods for opening the PowerTRACE feature you will see that there are other options to choose from:
- The Quick Trace option will use the last-used trace setting, or the setting configured in Tools > Options > Workspace > PowerTRACE.
- Under Centerline Trace you have options for Technical Illustration to trace black-and-white illustrations with thin, faint lines, or Line Drawing to trace black-and-white sketches with thick, prominent lines.
In the PowerTRACE window you will see the original JPG is on the left and the preliminary trace result is on the right.
On the Settings tab you can increase the amount of detail shown by dragging the Detail slider to the right until the trace result is showing the details you want.
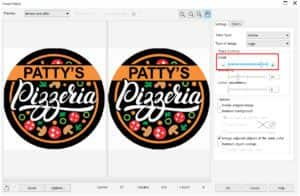
To adjust the smoothing, you can drag the Smoothing slider up. For this image we will set it at 21.
To adjust our corner sharpness, drag the Corner Smoothness slider to 32. This will straighten some of the lines in the text and make the text look cleaner.
If you want to delete your original image you can check the Delete Original Image check box. However, if your preliminary trace does not turn out exactly the way you want it, you will need to return to your original image and retrace it.
To remove the background, click on the Remove Background check box. Once checked, wherever you see the grey and white checkerboard pattern, that will indicate a transparent background. If you want to delete a specific color (white in this case), enable the Specify Color option then select the Eyedropper and hold your Shift key while you click on each of the white corners around the logo.
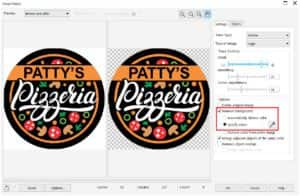
If you click Remove color from entire image it will remove the color (in this case white) from not only the outer corners but also the white Pizzeria letters and pepperoni spots. Merge adjacent objects of the same color will do that as well.
Removing object overlap will make each piece cut through like cookie cutters. You can experiment with each of these settings on and off to see which result works best for you.
Note: If you want to Group objects by color, the Remove object overlap setting must be on.
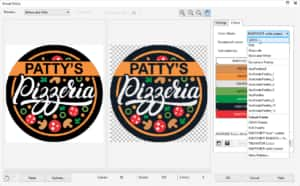
Next, we’ll have a look at the Colors tab. The diagonal lines you see in the trace on the right indicate that this is the color that is selected. Our trace has 2 shades of white, but we can merge those into a single color.
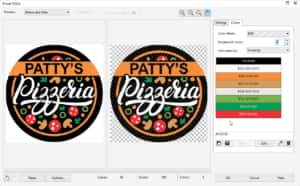
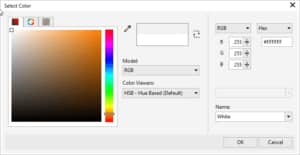
Select the first white in the list of colors then the hold Ctrl key on your keyboard and click the other white. Now click the Merge button. This combines both shades of white into one, but it is not a true white. To adjust this, click the white color then click the Edit button. In the Select Color dialog box set your color to pure white by adjusting the color slider on the left or entering the RBG values or Hex #.
You can repeat this process of merging similar colors and/or editing any colors on the list. If you want to delete a color just select it and click on the Trash icon.
If you need a specific color palette like Pantone® spot colors or CMYK, you can set this right inside PowerTRACE. Just click on the drop-down list beside Color Mode and select the mode that you want.
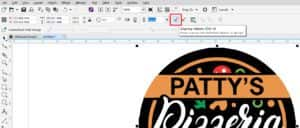
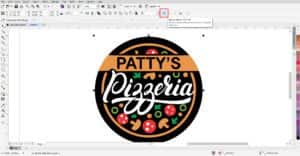
Our trace is looking good so click OK to close the PowerTRACE window. Now back in the CorelDRAW interface, the trace is lying on top of our original JPG. Using the Pick tool, drag it to the side so you can do a side-by-side comparison with the original JPG.

If you notice any details are missing, you can correct that by re-tracing your original JPG and setting the Detail slider to a higher value.
To see the vector lines in your trace, go to View > Wireframe. The trace on the right shows vector lines vs. the JPG on the left is just pixels. To exit wireframe, go to View > Enhanced.

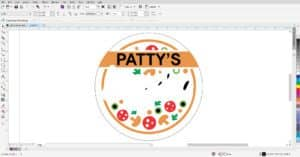
Select the original JPG and hit Delete on your keyboard. Now select your trace and click P on your keyboard – this will center it on your page. Press F4 on your keyboard to zoom in.
The circle in the logo didn’t trace perfectly but we can improve that manually, following these steps:
- Select your traced logo with the Pick tool
- Hold down the Shift key and double-click the Rectangle tool on the left toolbar. This will create a rectangle around your logo.

- Activate the Shape tool on the left toolbar, hold down the Shift key and click and drag the node in the top left into the center to make a perfect circle

- Click on the To back of layer icon in the top toolbar

- Activate the Pick tool and select the logo
- Click the Ungroup icon on the top toolbar (or use Ctrl+U)
- Deselect the logo image by clicking on a blank space on your page
- Select the black curved section along the top of the logo and press Delete
- Do the same for the black curved section along the bottom
- Click on the thin black circle outline then click the black color swatch on the color panel and now your image will be filled with black in the areas you deleted
- Deselect again, then use the Pick tool to drag around the entire image and capture all the individual pieces. Click the Group Object icon on the top toolbar (or use Ctrl+G)
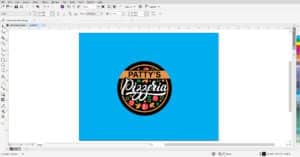
If you want to verify that you’ve deleted the white background entirely, deselect the logo image and double-click the Rectangle tool. This will create a rectangle the size of our page. Then select a color from the color palette to fill it with color. So, you can see our white background was entirely deleted and our sign is ready to enlarge.
Select the logo and enter the size (in this case 36 inches) in the top value of the Object Size settings. Make sure the Lock icon is showing a closed lock, which means that the original width and height ratio will be preserved when you scale or size the image. Now you have a 36-inch sign ready to print at any size you need.
Start your FREE 15-day trial and embark on a design journey with powerful tools for vector illustration, layout, photo editing, typography, and collaboration.

Comments (2)
Reader Interactions
Comments
Link for the sample logo is not a download link – it simply opens the .jpg file in my browser. If I go to right click and save the file, the only available file type is either a .webp or .avif file. I could screenshot it, but that defeats the purpose of setting up a Downloads tab.
Am I using this resource incorrectly?
Thank you.
Hi Evan,
Here is the pizza logo jpg in a zip file that you can download https://learn.corel.com/wp-content/uploads/2023/08/PizzaLogo.zip
Most browsers now default to saving images in webp or avif file formats. If you do an internet search for this topic, you will find that there are extensions/add-ons for common browsers like Chrome and Firefox, that allow you to save as PNG or JPG.
Hope this helps!
The Discovery Center team