

This video covers the following topics:
0:27 I have a design that uses white lettering on a black background. How can I change it to black lettering on a white background?
0:55 How can I crop panorama photos with certain fixed ratios, such as 3:1 or 4:1?
1:49 Where is the Paste to Fit command for text?
2:08 How can I adjust horizontal and vertical perspective in my photos?
3:03 I want to display two images alongside each other and use the Clone tool to copy from one to the other. But when I select the two images with the Ctrl key, the images overlay. How can I display them both?
3:40 How do I install a stylized line? I have a file called dot.pspstylizedline that I’ve placed in PaintShop Pro’s Styled Lines folders but it doesn’t show up. And how do I make my own stylized line?
4:38 In real estate interior photography, sometimes the windows get blown out. How can I get a corrected view from the window into the original shot?
6:17 How can I “deselect” a selection I have created?
You can use the video time stamps if you only want to view a particular question and answer. Below is a written version of this session, with links to related tutorials that provide more details on some of the topics.
Resources
Download a printable PDF of the written tutorial (PDF, 2 MB)
Find the PaintShop Pro User Guide for your version
View our full collection of PaintShop Pro tutorials to learn more
I have a design that uses white lettering on a black background. How can I change it to black lettering on a white background?
To reverse black and white, simply go to Image > Negative Image.


If you want to change the black letters to another color, such as pink, you can use the Color Replacer tool. In the Materials palette, set the Foreground swatch to the new color and the Background swatch to black, activate the Color Replacer tool, then double-click to replace all black with pink.

How can I crop panorama photos with certain fixed ratios, such as 3:1 or 4:1?
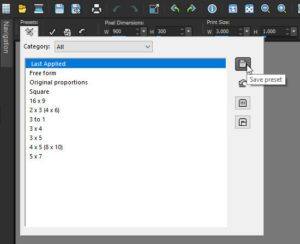
You can crop a photo to any ratio using the Crop tool. With your photo open, activate the Crop tool on the left toolbar and select Free Form in the Presets dropdown list. On the Tool Options palette along the top, enter the width and height you desire; in this example we are using 3” for width and 1” for height. Make sure to enable Maintain Aspect Ratio so that the ratio will be preserved if you move or resize the crop area.

If there is a certain crop ratio that you use often, you can save it as a crop preset. To do this, set the crop width and height and enable Maintain aspect ratio as before. But before you apply the cropping, open the Presets dropdown list on the Tool Options palette and click on the Save Preset icon. Enter a name for your preset and click OK. Your new crop preset will now be listed in the Presets dropdown list on the floating crop toolbar and Tool Options palette.
Learn more about cropping photos in these tutorials:
Enhancing Photos from the Crop Toolbar
Cropping Photos for Better Composition
Where is the Paste to Fit command for text?
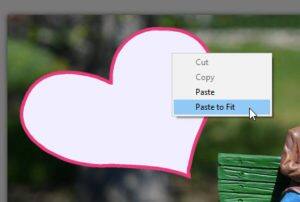
The Paste to Fit command can be found on the context menu of the Text tool. Paste to Fit allows you to fit clipboard text (text you have copied) into a shape in a PaintShop Pro project. The text can be copied from a web page or other document, and expands to fit the vector shape, such as a shape created with the Preset Shape, Rectangle, Ellipse, or Symmetric Shape tools.
For example, I want to add text inside the heart in this image. I’ve copied the text from a document and now I’ll activate the Text tool, click once inside the heart shape and then right-click and choose Paste to Fit.

How can I adjust horizontal and vertical perspective in my images?
When you take pictures of tall or wide objects, the resulting photographs may have perspective distortion — that is, the objects may seem to be leaning or angled. This distortion occurs when the camera is at an angle to the subject.
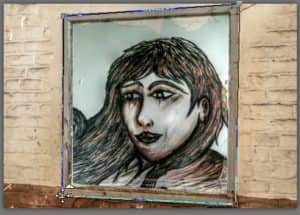
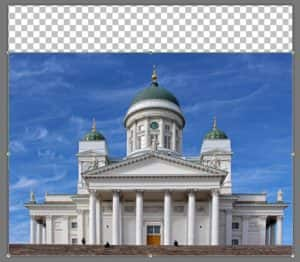
You can use the Perspective Correction tool to adjust horizontal or vertical perspective. Activate the Perspective Correction tool, found under the Straighten tool on the left toolbar, and a bounding box with corner handles appears on the image. For an easy rectangular example like this photo of a painting taken from one side, all you need to do is move the corner handles to the corners of the painting and then click the Apply checkmark on the Tool Options palette.
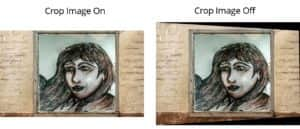
On the Tool Options palette you also have the option to Crop image. If you enable Crop image, the areas of the image that fall outside the rectangle will be deleted.
For a more complex image like this building, you can add grid lines to help. On the Tool Options palette, enter the number of grid lines you want to use. Adjust the corner handles until the grid lines line up with horizontal or vertical features in your image, such as the columns in this building, then click Apply.
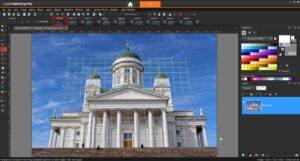

NOTE: if the horizontal or vertical perspective correction results in an image that appears slightly stretched, you can use the Pick tool in Scale mode to adjust, then crop the image.
I want to display two images alongside each other and use the Clone tool to copy from one to the other. But when I select the two images with the Ctrl key, the images overlay. How can I display them both?
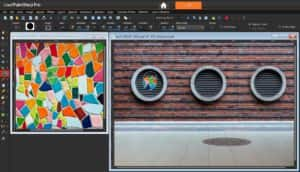
In order to have two images display side by side in the PaintShop Pro interface, go to the Window menu and make sure Tabbed Documents is unchecked. Now each image will be in its own window, and you can resize and reposition with the Pick tool.
Under the Window menu you can also choose Tile Horizontally or Tile Vertically, which will also arrange multiple images in their own windows in the interface.
Once your images are displayed side by side, activate the Clone tool and right-click on your source image, in this example the mosaic pattern. Then left-click or click and drag on the target image, in this example the wall, to clone.
Learn more about cloning in these tutorials:
How to Use the SmartClone Tool
How do I install a stylized line? I have a file called dot.pspstylizedline that I’ve placed in PaintShop Pro’s Styled Lines folders but it doesn’t show up. And how do I make my own stylized line?
The reason this file isn’t showing up as a stylized line is because the file extension is incorrect. Instead of .stylizedline, the extension should just be .styledline.
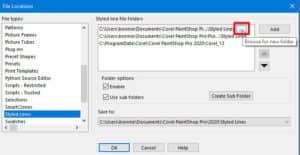
Now for the question of where this file should go. Activate the Pen tool, click the Line Style dropdown list, and click the File Locations icon.
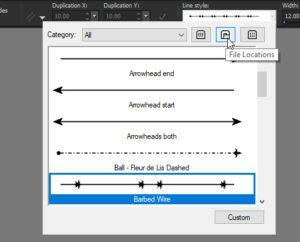
Any of these default folders will work, and you can click the Browse icon to see exactly where a folder is.
To create your own stylized line, open the Line Style dropdown list again and click the Custom button at the bottom. This will open the Styled Line Editor.
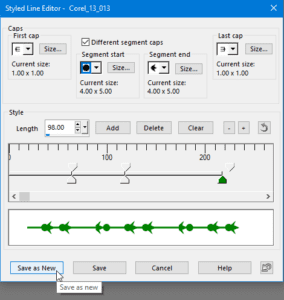
You can clear what’s there and add segments, adjust their lengths, and add a variety of segment caps. Click Save as New, assign a name, and your new line style will appear on the dropdown list.
In real estate interior photography, sometimes the windows get blown out. How can I get a corrected view from the window into the original shot?
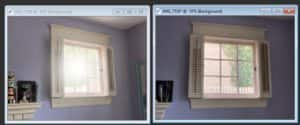
For this example, I’m using two photographs of the same window. The photo taken a bit from the side has an added sunburst effect, to replicate what you’d see with a flash. Then I have this photo taken head-on which has a nice clear view out of the window. Because the angles of the two photos aren’t that different, and we’re dealing with rectangles, it’s not too hard to place this window view in the other photo.
I’ll use the Freehand Selection tool to trace around the glass part of the window and double-click when finished. I’ll copy this selection with Ctrl + C.
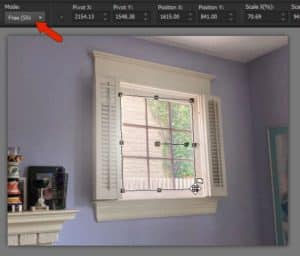
In the sunburst photo, I’ll paste in the selection, which goes on its own layer. Now I can use the Pick tool, set to Free mode, zoom in on each corner, and drag the selection’s nodes to where they fit in the angled window.
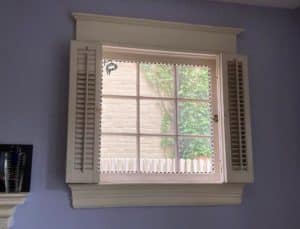
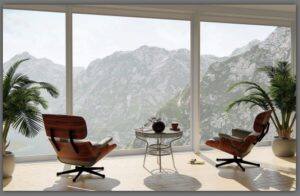
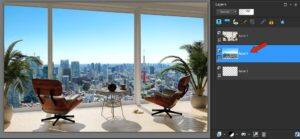
This was an easy example because no interior objects like furniture are in front of the window, like in this other photo.
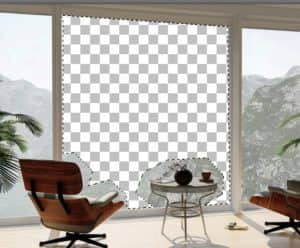
One way to replace the window view here would be to first select and delete the easy parts of the windows. I have a transparent layer below, so deleting each selection shows that layer.
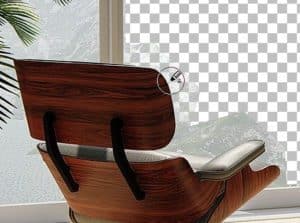
Then I’d switch to the Background Eraser tool to remove the parts of the window that are close to the plants and chairs.
Now I can copy and paste in a new scene to display in the window, making sure to drag the new image below the cut-out window layer in the Layers palette.
Learn more about background removal and selection tools in these tutorials:
Introduction to Selection Tools
Making a Fine-detail Selection
Creating Transparent Backgrounds with the Background Eraser
How can I “deselect” a selection I’ve created?
After you have created a selection with one of the selection tools, the selection marquee (also called marching ants) stays active. To deselect, go to Selections > Select None, or simply press Ctrl + D on your keyboard.
