- Home
- Tips
- Graphic Design
- Color Control in PHOTO-PAINT
Color Control in PHOTO-PAINT
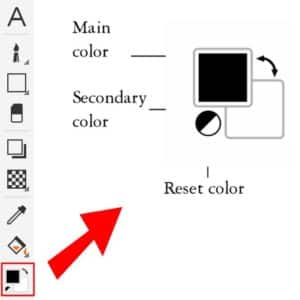
In PHOTO-PAINT, there is a color control area on the Toolbox toolbar. The color control area consists of the Main color swatch, the Secondary color swatch, and the Reset color icon.
The main color is used by the Text tool, all paint tools, and is the fill for shape and fill tools. The secondary color is shown when you erase background areas with the Eraser tool, and is the outline color for shape tools.
To choose a color by using the color control area:
1. In the color control area of the toolbox, double-click on either the main color swatch or secondary color swatch.
2. The Select Color window will open. Here you can move the color slider to set the range of colors displayed in the color selection area.
3. Click in the color selection area to choose a color.
4. Click OK to close the Select Color window.
You can also click the Reset color icon to return the color swatches to their default colors. And if you click the arrow in the upper right corner of the color control area you can switch the main and secondary colors.
RELATED TIPS
Creating a selection group

