
In this tutorial, we’ll show you 9 different ways to customize PaintShop Pro templates by changing backgrounds and frames, adding text and design elements, adjusting photo placeholders and layers, and changing the color scheme.
Thanks for watching! We hope you found this tutorial helpful. You will find a written version of this tutorial below, and a printable PDF copy to download on the Download resources tab above.
Download your FREE 30-day trial and make every shot your best shot with PaintShop Pro, your all-in-one photo editing and design software.
Download these free resources:
Written tutorial (PDF, 1.5 MB)
PaintShop Pro resources
Keyboard shortcuts (PDF, 173 KB)
PaintShop Pro User Guides
Partner and User websites
PaintShop Pro User Forum
Scrapbook Campus (Tips and tricks, workshops, master classes, and more)
Creation Cassel (Scripts, picture tubes, and other PaintShop Pro tools, plus weekly freebies)
PaintShop Pro Maniacs (Facebook group)
PaintShop Pro (Facebook group)
What’s New in PaintShop Pro
Working with Templates
Featured products
 PaintShop Pro 2023 Ultimate
 AI HDR Studio 3.0
 PaintShop Pro 2023
 Vision FX 2.0
How to customize PaintShop Pro templates
In this tutorial, we’ll show you 9 different ways to customize photo templates in PaintShop Pro by changing backgrounds and frames, adding text and design elements, adjusting photo placeholders and layers, and changing the color scheme. We will be using examples for PaintShop Pro’s New From Template library. To access the New From Template library, go to File > New From Template or click on the New From Template button on the Get Started tab of the Welcome Screen.
How to change the background
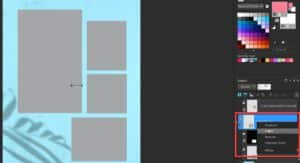
Many templates come with a plain white background, such as the Diamond 01 Collage template. Other templates may have a colored or patterned background. Backgrounds are easy to change to suit your project.
- In the Layers palette, make sure the layer with the white background is selected so that it is the active layer you’re working on.
- Click on the Flood Fill tool and select a color from the Materials palette.
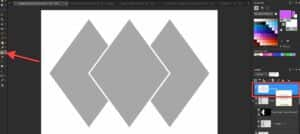
- Click on the white background to replace the white with the color of your choice.
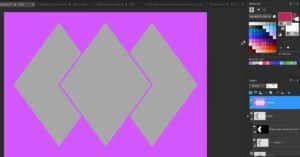
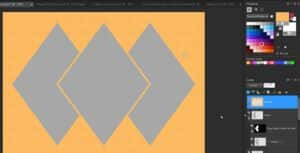
You can also change the background to be a pattern or gradient fill instead of a solid color:
- Click on the Foreground and Stroke Properties (top) swatch in the Materials palette to open the Material Properties dialog box.
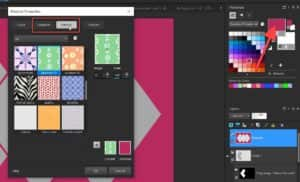
- Click on the Gradient or Pattern tab and select the gradient or pattern of your choice, then click OK.
- Now click on the white background to fill it with your selected gradient or pattern fill.
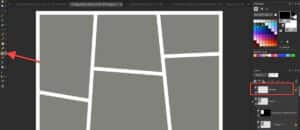
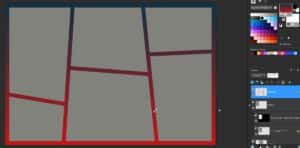
How to change the frame
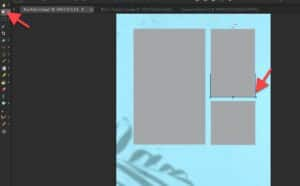
Some templates, such as Shatter 04 Collage, have a frame around the photo openings. These too are easy to change to suit your project.
- Make sure the frame layer is selected in the Layers palette.
- Click on the Flood Fill tool and select a color from the Materials palette.
- Click on the frame to fill it with the color of your choice.
You can also change the frame to be a pattern or gradient fill:
- Click the Foreground and Stroke Properties (top) swatch in the Materials palette to open the Material Properties dialog box.
- Click on the Gradient or Pattern tab and select the fill of your choice, then click OK.
- Now click on the frame to fill it with your selected gradient or pattern fill.
How to add a drop shadow
Drop shadows can be used in a couple ways. You can add a drop shadow to make certain elements in the collage stand out, such as the frame of the Spring 02 Collage template. You can also use a drop shadow to add dimension to the photo placeholders to make them look more realistic. To add a drop shadow:
- In the Layers palette, select the element that you want to add a drop shadow to.
- Go to Effects > 3D Effects > Drop Shadow.
- In the Drop Shadow dialog box, you can adjust the horizontal and vertical Offset plus the amount of Opacity and Blur. Make sure to check Preview on image to see how changes to these settings look on your image.
- Click OK once you are happy with the drop shadow settings.

NOTE: select Shadow on new layer if you want to be able to turn it on and off or customize the shadow layer independently.
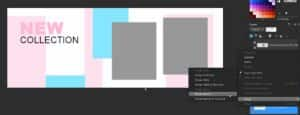
How to add text
While some templates already include editable text boxes, you can add text to ANY collage template, such as the Instagram Valentine 01 template. To add text:
- Activate the Text tool and then click on your image and type your text.
- In the Layers palette, drag the text layer on top of all the other layers so you can see the text.
- While the Text tool is activated, you can adjust the font type, size, and color on the Tool Options palette along the top.
- You can use the Pick tool to reposition or rotate your text layer.
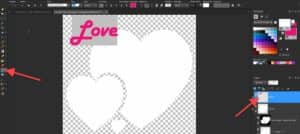
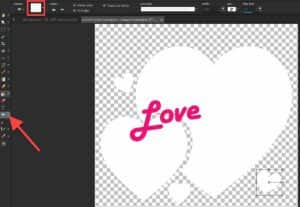
How to add design elements
In addition to adding text, you can also add design elements such as shapes, clipart and image backgrounds to your templates.
To add a shape:
- Click on the Preset shape tool.
- Select a color in the Materials palette for the Background and Fill properties (bottom) swatch.
- On the Tool Options palette, open the Shape List library dropdown and select a shape, such as a heart.
- Click and drag to add some hearts to the template.
To add clipart images:
- Open the clipart image in PaintShop Pro.
- Go to Edit > Copy (or Ctrl + C).
- Go back to your template and go to Edit > Paste as New Layer (or Ctrl + V).
- Use the Pick tool to resize, reposition and/or rotate the clipart image.
- Drag the layer so it is at the bottom of the Layers palette.

How to adjust photo placeholders
Sometimes the layout of the collage template is not exactly what you want. Maybe you would like one less photo placeholder or want to change the photo orientation slightly, as with the Blue Palm Collage template. To do this, you will need to adjust the mask layer group of each photo placeholder you want to modify.
To remove a photo placeholder:
- In the Layers palette, locate and click on the mask group you want to remove.
- Right-click on the mask group and select Delete.
To change the size or orientation of a photo placeholder:
- In the Layers palette, locate and click on the mask group you want to adjust.
- Use the Pick tool to change the size, shape or position of the photo placeholder.
How to adjust layers
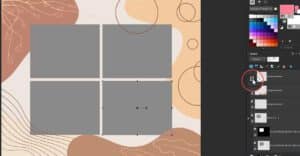
Most of the collage templates will have all the different elements (mask groups, design elements, frames, and background) on separate layers, such as the Brown Abstract Collage template. This gives you the flexibility to adjust each element separately, or even delete some elements you don’t want. Here are a few options:
In the Layers palette, you can use the Visibility (eye) icon to toggle layers on and off to see how that changes the look of the template.
Delete layers you don’t want by right-clicking on them in the Layers palette and selecting Delete, or simply leave the visibility “off” if you’re not sure that you want to delete them permanently.
Adjust the layer transparency by dragging on the slider at the top of the Layers palette.
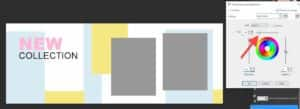
How to change the color scheme
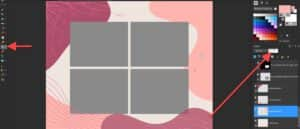
With any template that has colored elements, such as the Facebook Pastel 02 template, you can change the color scheme to better suit your photos or match your brand colors.
In this template, there are 2 design elements that we want to change, so we select Design Element 1, then press and hold the CTRL key and select Design Element 2 so that both layers are selected.
- Right-click on one of the layers and go to Merge > Merge Selected to merge both layers together so you can edit them in one step.
- Go to Adjust > Hue and Saturation > Hue/Saturation/Lightness.
- Drag the sliders to completely change the look of the color scheme in just a few clicks.
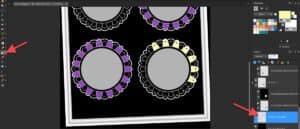
Making multiple customizations
We’ll use the Circle Collage 07 template to show you how you can apply multiple customizations to create a truly unique collage.
- Delete or reposition the outer frame layer with the Pick tool to give it a different look.

- Select the background layer and use the Flood Fill tool to change the background to a different color.
- Select the Image Frames layer and continue using the Flood Fill tool to color in the mandalas around each photo placeholder.
Now that you have learned all these different ways to work with collage templates, what kind of customizations will you make?

Comments (2)
Reader Interactions
Comments
There was no written version as stated below this presentation. No I didn’t watch YouTube , I just viewed the information on this screen.
Nor was there a PDF file!
I find this happens often on your Discovery Center Site!
Mary, please click on the Download Resources tab and you will find the PDF file to download.
Best regards,
The Discovery Center team