
Masks are a wonderful tool for creating collages to showcase your photos. The techniques in this tutorial demonstrate how to use a variety of shapes as photo cut-outs to make collage templates. Each shape is placed on its own layer and made into a mask. Once your masks are ready, it’s a snap to insert photos into each one. The benefit of using masks when you make collage templates is that you are not limited to standard shapes for the photo cut-outs – you can use any kind of unusual shape you wish, and the masking will prevent your photos from overlapping each other or straying outside the boundaries of the photo cut-outs.
NOTE: If you are using PaintShop Pro 2022 or higher, check out the new Frame tool that you can use to create collage templates and other digital layouts.
Thanks for watching! You will find a written version of this tutorial below, and a printable PDF copy to download on the Download resources tab above.
Download your FREE 30-day trial and make every shot your best shot with PaintShop Pro, your all-in-one photo editing and design software.
Download these free resources:
Written tutorial (PDF, 1.5 MB)
Sample images (Zip, 4.9 MB)
PaintShop Pro resources
Keyboard shortcuts (PDF, 173 KB)
PaintShop Pro User Guides
Partner and User websites
PaintShop Pro User Forum
Scrapbook Campus (Tips and tricks, workshops, master classes, and more)
Creation Cassel (Scripts, picture tubes, and other PaintShop Pro tools, plus weekly freebies)
PaintShop Pro Maniacs (Facebook group)
PaintShop Pro (Facebook group)
What’s new in PaintShop Pro
Working with masks
PaintShop Pro tools
Featured products
 PaintShop Pro 2023 Ultimate
 AI HDR Studio 3.0
 PaintShop Pro 2023
 Vision FX 2.0
How to make collage templates in PaintShop Pro
Masks are a wonderful tool for creating collages to showcase your photos. The techniques in this tutorial demonstrate how to create a variety of shapes to use as photo cutouts. These shapes can be selections, or they can be created from vector objects. Each shape is placed on its own layer and made into a mask. Then, once your masks are ready, it’s a snap to insert photos into each one.
Let’s start by investigating an existing collage. Go to File > New From Template, choose the Collage category on the left, and scroll about halfway down to find the free template called 11 x 8.5 inch Scrapbook 02. If you don’t have this one installed, click Download. Then click OK to open the template.
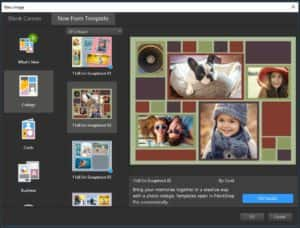
The template frame is a letter-sized image, with transparent cutouts to hold five photos.
Let’s have a look at the components of the template, in the Layers palette.
- The top layer contains the template frame, with its decorative squares and rectangles, and cutouts to insert your photos.
- The five layers below that are the masked layer groups that will each contain one collage photo.
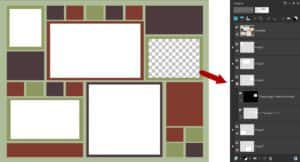
If you click the Visibility (eye) icon to turn off the visibility of a layer, it’s easier to see how the template is set up with its transparent photo cutouts.
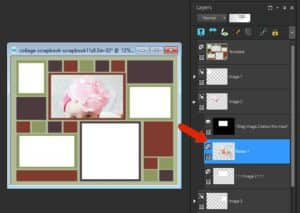
Now open a photo that you want to bring into this collage. We are going to use this baby photo and we want to place it in the large rectangle cutout in the middle of the template.

In the Layers palette, find the layer that contains the mask group for this photo cutout, which is the Image 2 layer in this template. Expand this layer group and you will see instructions “drag image 2 below this mask”.
Click on the Image 2 layer in the Layers palette to make it the active layer. To add your photo into the cutout:
- Drag and drop your photo directly into the Layers palette above the Image 2 layer; or
- Copy your photo (Ctrl + C) and paste as a new layer (Ctrl + V). As long as you have the Image 2 layer active, when you copy and paste as new layer the photo will be placed in the right order.
Now you can use the Pick tool to resize, move, or rotate the photo so that it fits inside its spot. Thanks to the mask, your photo will be contained within the cutout, even if it is larger.
Creating a collage template
Now that we’ve seen how collage layers work, we’ll now create a collage template from scratch. We will use a few different shapes as examples, so we can demonstrate how to create shapes with the Selection tool, Preset Shape tool and Pen tool.
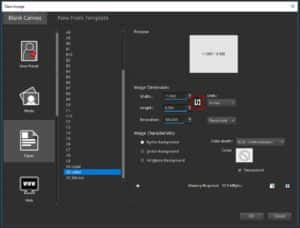
Go to File > New, choose the Paper category on the left and the scroll down to find US Letter (or whatever size you would like to use). Click on the Switch width and height icon to change to landscape orientation.
Choose a color in the Materials Palette and activate the Flood Fill tool to fill the image. In this example we’re using a light-yellow color.
To make it easier to line up the photo cutouts, there are two tools you can use: Grids and Guides.
- To turn on the grid, go to View > Grid.
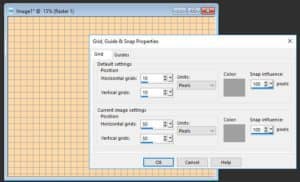
- To adjust the grid spacing, go to View > Grid, Guide and Snap Properties.
- Under Current Image Settings, increase the grid spacing to 50 pixels for both horizontal and vertical.
- You can also change the grid color if you need more contrast against your image background color.
If you prefer to use Guides instead of a grid, first go to View > Rulers to make sure the rulers are visible. To draw out a guide, just click and drag from one of the rulers onto the image. If you right-click on a Guide line marker on the ruler, you can adjust the position of the guide, change its color, or delete it.
For either grid lines or guides to be useful for positioning, go to View> Snap to Grid or View > Snap to Guides to make sure that grid and guide snaps are on. Snapping will align your brushstrokes and image elements precisely to the nearest grid line or guide.
Creating the photo cutouts
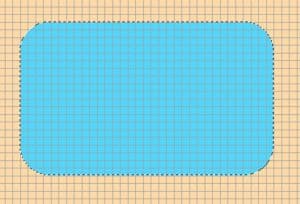
We’ll start by using the Selection tool to create the photo cutouts. The default selection shape is a rectangle, but for the first shape, change the Selection Type to Rounded Rectangle.

Start three grid spaces from the top left corner and draw out the rectangle to be horizontal. Keep the selection marquee active for the following steps.
Before cutting out this shape, we’ll paint a frame that will surround the photo. Choose a blue color and flood fill this rectangle.
Now we’ll shrink the selection to get the rectangle that will hold the photo. Go to Selections > Modify > Contract, set the Number of pixels to 40 and click OK.
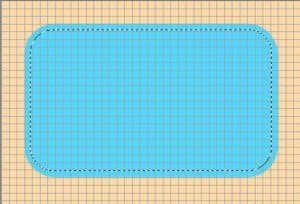
Now press the Delete key to cut out this selected area from the collage frame layer.
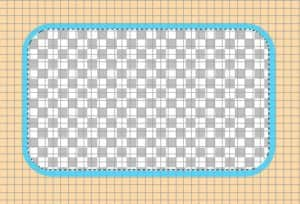
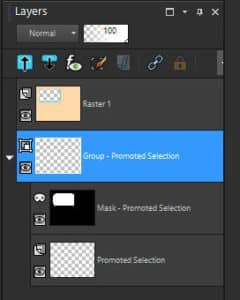
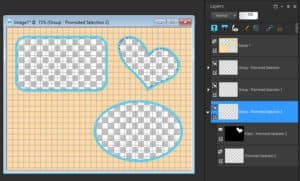
The selection area (defined by the selection marquee) now will become the photo cutout. Go to Selections > Promote Selection to Layer, and a new layer with this shape is created at the top of the Layers palette. The shape can’t be seen because the entire layer is transparent.
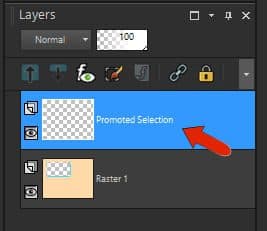
Click the New Mask Layer icon at the bottom of the Layers palette and choose Show Selection. Now the cutout shape can easily be seen.
Drag this entire mask layer group below the frame layer. Press Ctrl + D to clear the selection marquee (or go to Selections > Select None).
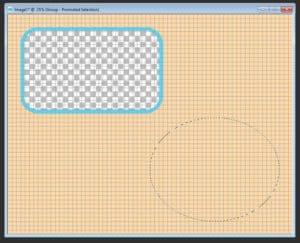
For the second cutout shape, make the frame layer active again by clicking on it in the Layers palette.
With the Selection tool still active, change the Selection Type to Ellipse. Click to place the center in the lower right corner and drag outwards to create your ellipse shape, keeping it 3 grid squares away from the right and bottom edges of the image.
From here the steps are the same as for the rectangle:
- Activate the Flood Fill tool and fill the ellipse with blue
- Go to Selections > Modify > Contract, set the Number of pixels to 40 and click OK
- Press the Delete key to cut out this selected area from the collage frame layer
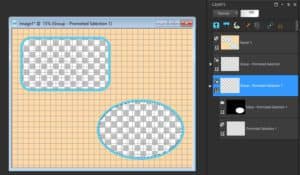
- Go to Selections > Promote Selection to Layer
- Go to New Mask Layer > Show Selection
- Drag this entire mask layer group below the frame layer
- Press Ctrl + D to clear the selection marquee
For the next cutout we are going to use a Preset Shape.
- Make the frame layer active again by clicking on it in the Layers palette.
- Activate the Preset Shape tool in the Tools toolbar.
- In the Property bar, click on the Shape list dropdown and select the heart shape.
- Enable Create as vector and set the Width to 0.

Drag your mouse outwards to draw the heart shape. You can resize and rotate it and adjust the position to keep the same 3-grid square border around the outside.
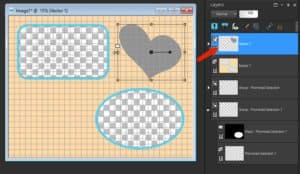
Next go to Selections > From Vector Object and this will select the heart. You won’t be able to see the selection marquee while the Preset Shape tool is activated.
And because we want this vector object to move to the frame layer, right-click on its vector layer in the Layers palette and choose Merge > Merge Down.
From here, the steps to create this cutout will be the same as before.
- Activate the Flood Fill tool and fill the heart with blue
- Go to Selections > Modify > Contract, set the Number of pixels to 40 and click OK
- Press the Delete key to cut out this selected area from the collage frame layer
- Go to Selections > Promote Selection to Layer
- Go to New Mask Layer > Show Selection
- Drag this entire mask layer group below the frame layer
- Press Ctrl + D to clear the selection marquee
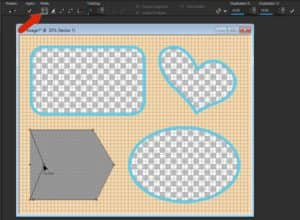
The final cutout shape will be a hand-drawn polygon.
- Make the frame layer active again by clicking on it in the Layers palette
- Activate the Pen tool in the Tools toolbar.
- Ensure Connect Segments and Create on Vector are enabled
- Set the Width to 0

Now you can click and drag out connecting segments to form your shape. In the Property Bar, you can switch the Mode to Editing Mode if you want to make adjustments to your shape by dragging any nodes you want to relocate.
Once you are happy with your hand-drawn shape, the steps to create the photo cutout are the same as before.
- Go to Selections > From Vector Object
- Right-click on this new vector layer in the Layers palette and choose Merge > Merge Down
- Activate the Flood Fill tool and fill the heart with blue
- Go to Selections > Modify > Contract, set the Number of pixels to 40 and click OK
- Press the Delete key to cut out this selected area from the collage frame layer
- Go to Selections > Promote Selection to Layer
- Go to New Mask Layer > Show Selection
- Drag this entire mask layer group below the frame layer
- Press Ctrl + D to clear the selection marquee
Now your collage template is done and ready to fill with photos!

Download your FREE 30-day trial and make every shot your best shot with PaintShop Pro, your all-in-one photo editing and design software.
