
Learn how to create something great, faster than ever with PaintShop Pro’s project templates. With these drag-and-drop templates, you don’t need to be an expert to create professional-looking projects that impress. Just add your own photos to quickly make photo collages, social media images, personalized greetings cards, brochures and more.
Thanks for watching! You will find a written version of this tutorial below, and a printable PDF copy to download on the Download resources tab above.
Download your FREE 30-day trial and make every shot your best shot with PaintShop Pro, your all-in-one photo editing and design software.
Download these free resources:
Written tutorial (PDF, 805 KB)
PaintShop Pro resources
Keyboard shortcuts (PDF, 173 KB)
PaintShop Pro User Guides
Partner and User websites
PaintShop Pro User Forum
Scrapbook Campus (Tips and tricks, workshops, master classes, and more)
Creation Cassel (Scripts, picture tubes, and other PaintShop Pro tools, plus weekly freebies)
PaintShop Pro Maniacs (Facebook group)
PaintShop Pro (Facebook group)
What’s new in PaintShop Pro
Working with templates
Artistic tools and projects
Featured products
 PaintShop Pro 2023 Ultimate
 AI HDR Studio 3.0
 PaintShop Pro 2023
 Vision FX 2.0
Working with project templates
In this tutorial, you’ll learn how to use photo templates within PaintShop Pro to save time when editing and creating photo compositions. Photo templates allow you to easily create collages, social media images, greeting cards, brochures, and more!
How to download and install project templates
To access photo templates, click on File > New from Template. There are different categories of templates available: Collage, Cards, Business, Social Media and Other. These templates can be used over and over again once installed.
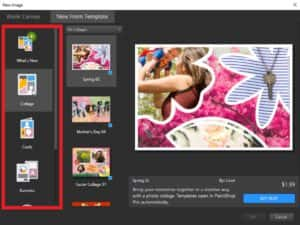
Click on one of the categories such as Collage and you can scroll through the selection of premium photo templates that are available to purchase or to download for free.
- If you choose to purchase one, click Buy Now then follow the payment prompts. Upon completion, your new purchased template will open in PaintShop Pro instantly without having to restart.
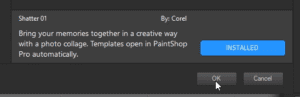
- If you choose to use a free template, simply click on the blue Download button.

PaintShop Pro will download the template automatically and when complete, the blue button will change to say Installed. Click OK to open the template.
How to add photos or images to templates
There are a few different ways to add your photos to the collage. First, make sure you have the Layers palette open by going to Palettes > Layers. You may want to open the Organizer palette as well.
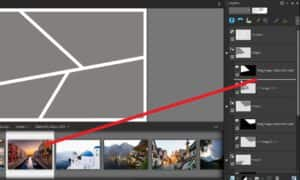
- To add a photo from the Organizer palette:
- Browse to the photos you want to use from the Navigation icon of the Organizer palette.
- Drag the photo from the Organizer palette onto the Layers palette directly below where it says, “Drag image 1 below this mask”.
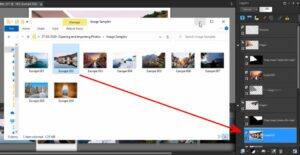
- To add a photo from an open folder on your computer:
- Drag and drop the photo from your computer folder into the Layers palette directly below the layer labelled “Drag Image 2 below this mask”.
- To add a photo that is already open in PaintShop Pro:
- Click on CTRL + C to copy the photo, then switch to your project template.
- In the Layers palette, select the layer under the mask where you want to paste it.
- Click CTRL + V to paste the image and it will be pasted in the right hierarchy and you won’t need to drag it up or down in the Layers palette.
How to resize and reposition images within project templates
The beauty of these templates is that the masks on each layer will prevent any of your photos from overlapping, which is particularly useful for collages or other templates that have irregular shapes for the photo openings. Each photo can be adjusted within the mask area to resize, reposition or rotate.
- Select the Pick tool on the left and on the Property Bar, make sure you are using the Scale mode.
- In the Layers palette, select the image layer that is below the mask layer.
- Use the corner handles to resize or rotate the photo.
- Click and drag the circle in the middle of the image to reposition the photo within the frame.

Repeat this for all the photos within your collage or project template.
Social media templates
In this second example, we’ll use a social media project template for posting pictures on Instagram.
- Click on File > New from Template
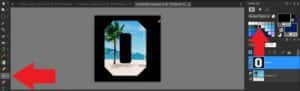
- Select the Social Media category and choose one of the free Instagram templates with a letter mask.
- Click on Download and once the blue button says Installed, click OK.
- Drag the image you want to use onto the Layers palette.
- Click and drag the image layer to reorder it so it’s on top of the image.
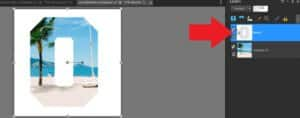
- If necessary, use the Pick tool to resize and reposition your photo within the template.
Changing the color of template frames
You can customize any of these templates by changing the color of the frame:
- Activate the Color Changer tool on the left toolbar.
- Select a color on the Materials palette.
- In the Layers palette, select the template frame layer.
- On your image, click on any section of the frame with the Color Changer tool and it will be changed to the new color you selected.
Saving your template projects
Once you are finished working on your template project, click on File > Save as.
- Save the new image as a .jpg to send or share online.
- Or save as a .pspimage to preserve the layers if you want to make any edits in the future.
Now these images are picture perfect and ready to share on your social media!


Download your FREE 30-day trial and make every shot your best shot with PaintShop Pro, your all-in-one photo editing and design software.

Comments (2)
Reader Interactions
Comments
I am still unable to transfer templates downloaded in PSP 2022 into PSP 2023. I purchased a template bundle for around £60, and do not want to lose them.
Hi Sydney,
Under the Help menu click Restore Purchases, and then you should be able to access your purchased templates through the New from Template window as in PaintShop Pro 2022.
Hope this helps!
The Discovery Center team